
More and more people are talking about .NET Core these days. It is true that .NET Core is the future, and .NET Framework will still be maintained because very large number of applications can’t be migrated in a short time.
.NET Core and .NET Framework are just like electric cars and gasoline powered cars. Gasoline cars is mature, and you can drive it without any problem, but electric cars have their advantage and is replacing gasoline cars. So, make no mistake, you should start the migration to .NET Core today!
I migrated several systems from classic ASP.NET/MVC running on full .NET Framework with IIS to use ASP.NET Core 2.x running with/out IIS.
My blog is one of them. It is a 10-year-old blog starting with ASP.NET 2.0 WebForm written in Visual Basic in 2008, since then, I have been updating the code base with latest .NET technologies, and the .NET Core version of my blog is coming by the end of this year. I wrote this article, to log the roadblocks I met and how to solve them.
This article is targeting experienced .NET Framework developers who are new to .NET Core, to help them make a smooth migration of their existing applications to .NET Core.
1. Migration or Rewrite
Sometimes, I would rather use “rewrite” instead of “migrate”, because it could be a completely different game in some cases between .NET Framework and .NET Core.
From my experience, most front-end code can be directly migrated to ASP.NET Core with just a few changes, because they are client-side code that is naturally cross backend technology platform. For the backend code, it depends how much it is coupled with Windows and IIS. I understand some applications like take advantage of Windows and IIS so that developers don’t have to implement some features by themselves. These includes Scheduled Tasks, Registry, Active Directory, or Windows Service, etc. These can’t be migrated because .NET Core is platform irrelevant. For these parts, you may need to consider redesign your logic, figure out a different way to achieve the same thing without coupling with Windows or IIS components.
For the legacy code that still can’t be migrated, you may consider changing your application architecture, to expose those legacy functions as REST API using ASP.NET Web API on .NET Framework, so that your ASP.NET Core application can consume the API and still do the job.
If your application use WCF services or even old ASMX web services, there is a way to consume these services as described here http://tattoocoder.com/asp-net-core-getting-clean-with-soap/. But in the long term, you should update the WCF services to expose REST protocol, but still, REST and WCF isn’t all equivalent on their functionalities, for example, duplex communications. In certain case, you may need to redesign your API targeting RESTful.
2. NuGet Packages
Please make sure the NuGet packages you are using support .NET Core or .NET Standard. If not, you should investigate if there are any replacement for the package you are using, or could you write your own code to achieve the same goal as the NuGet package does.
.NET Standard means the package can be used both in .NET Framework 4.6.1+ and .NET Core, this is a replacement for the old Portable Class Library (PCL). So, if you see a package that has a dependency on .NET Standard, you can install it into your .NET Core project with no problem.
Some packages, like NLog, has special version for .NET Core, like NLog.Web.AspNetCore, which you should prefer to use.
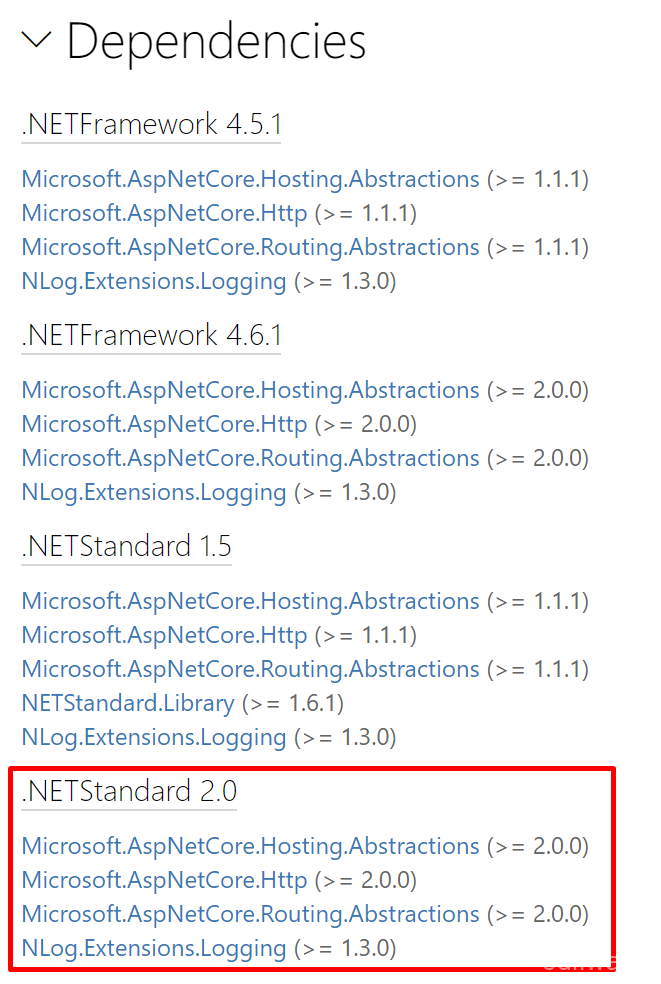
You can still reference a .NET Framework package into .NET Core project, but this will make your website run on Windows only, which is not recommended.
I list a few highly used NuGet packages here, that already support .NET Core for your reference:
- Web.AspNetCore
- Json
- HtmlAgilityPack
- RestSharp
- NUnit
- Dapper
- AutoMapper
- Moq
For client-side packages like jQuery, you should not use NuGet to install it into .NET Core projects, please check “Client-Side Package Management” section in this article.
If you are using Visual Studio Code for development on .NET Core, please notice that the command to install a package is not Install-Package, that is for Visual Studio’s PowerShell host, in VSCode, you need to use the dotnet CLI tools, e.g.:
dotnet add package Newtonsoft.JsonSee https://docs.microsoft.com/en-us/dotnet/core/tools/dotnet-add-package for more details.
3. Client-Side Package Management
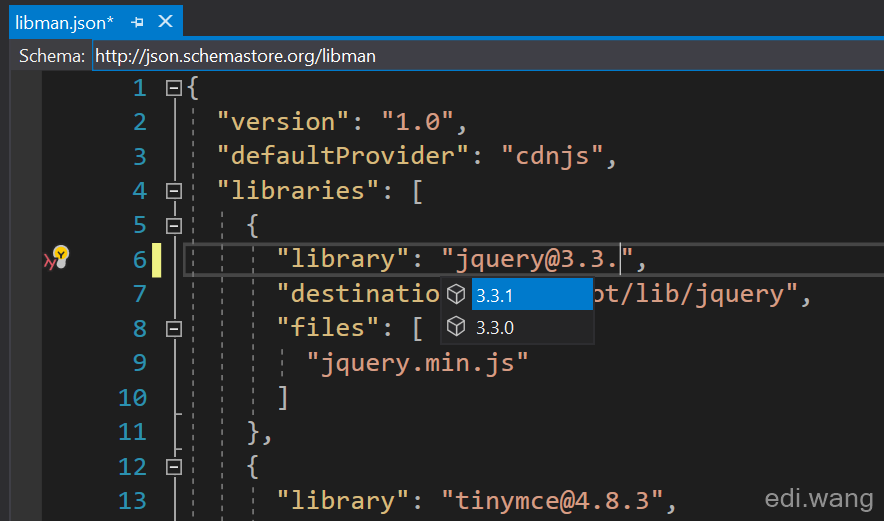
ASP.NET Core used to have Bower for managing client-side libraries. But in latest ASP.NET Core 2.1 release, bower has been removed because the author no longer supports this project. So, Microsoft by default use their own tool called “Library Manager” or “libman” for managing client-side packages. It can be used both in Visual Studio or Visual Studio Code, or even under command line using CLI.
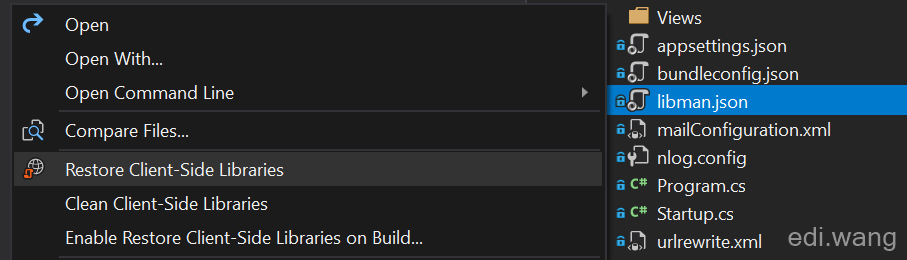
The libman.json can be edited both from UI and code with intellisense support. I would recommend libman if your application is not client-side heavy, because other technologies like NPM is too heavy load. You don’t want to configure your build server to install NodeJS or everything else just for pulling jQuery into your website.
You can refer to Microsoft official document here https://docs.microsoft.com/en-us/aspnet/core/client-side/libman/?view=aspnetcore-2.1
4. Html / JavaScript / CSS
You can copy these files directly to your .NET Core solution. However, please make sure you change the file path in the code such as image path in your CSS. Because classic ASP.NET / MVC template use “/Content/” directory and .NET Core use “/css/”, “/js/”, “/lib/” etc. There are no restrictions on this, they are just conventions.
If you want to bundle and minify your CSS and JS files, there are many tools to do it. I personally use a Visual Studio addon called “Bundler & Minifier”, you can get it here https://github.com/madskristensen/BundlerMinifier.
This addon can generate bundle and minified files at development time, not compile time or runtime.
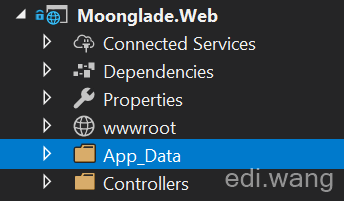
5. App_Data Folder
In classic ASP.NET/MVC applications, you can put data files in a special folder called “App_Data”, but this no longer exists in .NET Core. To achieve the similar function, you need to create an “App_Data” folder outside of “wwwroot”:
Then use it like this
public void Configure(IApplicationBuilder app, IHostingEnvironment env)
{
    // set
    string baseDir = env.ContentRootPath;
    AppDomain.CurrentDomain.SetData("DataDirectory", Path.Combine(baseDir, "App_Data"));

    // use
    var feedDirectoryPath = $"{AppDomain.CurrentDomain.GetData("DataDirectory")}\\feed";
}
6. Custom Http Headers
In classic ASP.NET, you could add custom http headers to each response via Web.Config like this
<httpProtocol>
  <customHeaders>
    <add name="X-Content-Type-Options" value="nosniff" />
  </customHeaders>
</httpProtocol>
In .NET Core, if you need to host your application without Windows, you can’t use Web.config. So, you can do it via a third party NuGet package: NetEscapades.AspNetCore.SecurityHeaders
app.UseSecurityHeaders(new HeaderPolicyCollection()
    .AddCustomHeader("X-UA-Compatible", "IE=edge")
    .AddCustomHeader("X-Developed-By", "Edi Wang")
);
See https://github.com/andrewlock/NetEscapades.AspNetCore.SecurityHeaders for more details.
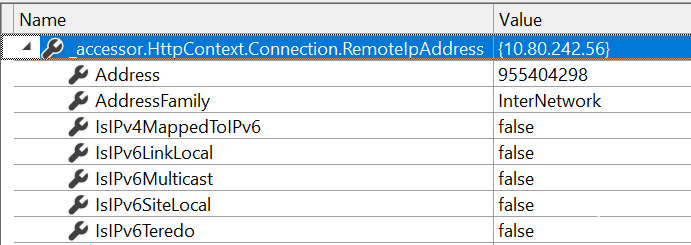
7. Get Client IP Address and HttpContext
In classic ASP.NET we used to get client IP Address by Request.UserHostAddress. But this does not apply to ASP.NET Core 2.x. We need a different way to retrieve HTTP Request information.
Define a variable in your MVC controller
private IHttpContextAccessor _accessor;DI into the controller's constructor
public SomeController(IHttpContextAccessor accessor)
{
    _accessor = accessor;
}
Retrive the IP Address
_accessor.HttpContext.Connection.RemoteIpAddress.ToString()This is how it is done.
If your ASP.NET Core project is created with the default MVC template, you should have the DI for HttpContextAcccessor in Startup.cs
services.AddHttpContextAccessor();
services.TryAddSingleton<IActionContextAccessor, ActionContextAccessor>();
The RemoteIpAddress is in type of IPAddress, not string. It contains IPv4, IPv6 and other information, it is not like the classic ASP.NET, which will be more useful to us.
If you want to access this information in Razor Views (cshtml). Just use @inject to DI into the view:
@inject Microsoft.AspNetCore.Http.IHttpContextAccessor HttpContextAccessorand then use it in your razor page:
Client IP: @HttpContextAccessor.HttpContext.Connection.RemoteIpAddress.ToString()8. JsonResult
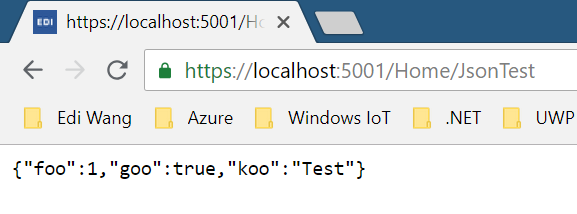
By default, ASP.NET Core will use camelCase to output the JsonResult while classic ASP.NET MVC use PascalCase, which will break your old JavaScript code that use the response Json string.
For example, the following code
public IActionResult JsonTest()
{
    return Json(new { Foo = 1, Goo = true, Koo = "Test" });
}
Will return camelCase Json string to client
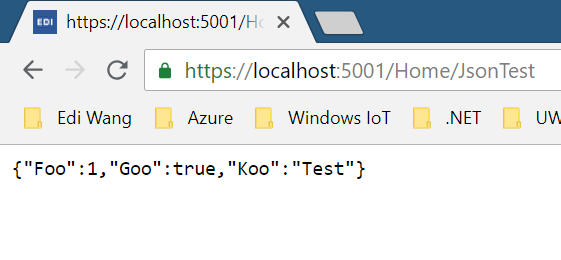
If you have a lot JavaScript code that can’t be updated to use camelCase in limited time, you can still make ASP.NET Core to output PascalCase Json to the client:
public void ConfigureServices(IServiceCollection services)
{
    // Add framework services.
    services.AddMvc()
        .AddJsonOptions(options => options.SerializerSettings.ContractResolver = new DefaultContractResolver());
}
Now the previous code will return PascalCase result.
9. HttpModules and HttpHandlers
These have been replaced by Middleware in ASP.NET Core. But before the migration, you may need to think a different way to achieve the same functions via a normal Controller in ASP.NET Core.
For example, my old blog system use “opml.axd” as an HttpHandler to output an XML document to the client, which can also be done via a Controller like this:
public async Task<IActionResult> Index()
{
    var opmlDataFile = $"{AppDomain.CurrentDomain.GetData(Constants.DataDirectory)}\\opml.xml";
    if (!System.IO.File.Exists(opmlDataFile))
    {
        Logger.LogInformation($"OPML file not found, writing new file on {opmlDataFile}");

        await WriteOpmlFileAsync(HttpContext);
        if (!System.IO.File.Exists(opmlDataFile))
        {
            Logger.LogInformation($"OPML file still not found, something just went very very wrong...");
            return NotFound();
        }
    }

    string opmlContent = await Utils.ReadTextAsync(opmlDataFile, Encoding.UTF8);
    if (opmlContent.Length > 0)
    {
        return Content(opmlContent, "text/xml");
    }

    return NotFound();
}
I used to have HttpHandlers for open search, RSS/Atoms also, which can all be rewrite via Controller.
For other pieces that can’t be done by an MVC Controller, like handling special extension name, please refer to Microsoft official document here:
https://docs.microsoft.com/en-us/aspnet/core/migration/http-modules?view=aspnetcore-2.1
10. IIS URL Rewrite
You can still use the exact same configuration XML code in your old application, regardless of your .NET Core application is hosing on IIS or not.
For example: create a file named "UrlRewrite.xml" under your application root directory with the content below:
<rewrite>
  <rules>
    <rule name="Redirect Misc Homepage URLs to canonical homepage URL" stopProcessing="false">
      <match url="(index|default).(aspx?|htm|s?html|php|pl|jsp|cfm)"/>
      <conditions logicalGrouping="MatchAll" trackAllCaptures="false">
        <add input="{REQUEST_METHOD}" pattern="GET"/>
      </conditions>
      <action type="Redirect" url="/"/>
    </rule>
  </rules>
</rewrite>
Note: You must set this file to always copy to output directory, otherwise it won't work!
<ItemGroup>
  <None Update="UrlRewrite.xml">
    <CopyToOutputDirectory>Always</CopyToOutputDirectory>
  </None>
</ItemGroup>
Open your Startup.cs, add this code to Configure method:
public void Configure(IApplicationBuilder app, IHostingEnvironment env)
{
    ...
    using (var urlRewriteStreamReader = File.OpenText("UrlRewrite.xml"))
    {
        var options = new RewriteOptions().AddIISUrlRewrite(urlRewriteStreamReader);
        app.UseRewriter(options);
    }
    ...
}
This is demonstrated in my previous blog post https://edi.wang/post/2018/9/18/prevent-image-hotlink-aspnet-core.
You can also check https://docs.microsoft.com/en-us/aspnet/core/fundamentals/url-rewriting?view=aspnetcore-2.1 for much more options in .NET Core world.
11. Web.config
The web.config isn’t totally dead yet. In .NET Core, a web.config file is still used in the case when your application is hosting under IIS. In this case, the configuration in Web.config is only for IIS, not related to your application code. See https://docs.microsoft.com/en-us/aspnet/core/host-and-deploy/iis/index?view=aspnetcore-2.1#configuration-of-iis-with-webconfig for details.
A typical web.config used to host ASP.NET Core application on IIS looks like this:
<?xml version="1.0" encoding="utf-8"?>
<configuration>
  <location path="." inheritInChildApplications="false">
    <system.webServer>
      <handlers>
        <add name="aspNetCore" path="*" verb="*" modules="AspNetCoreModule" resourceType="Unspecified" />
      </handlers>
      <aspNetCore processPath="dotnet" arguments=".\Moonglade.Web.dll" stdoutLogEnabled="false" stdoutLogFile="\\?\%home%\LogFiles\stdout" />
    </system.webServer>
  </location>
</configuration>
The AppSettings section can be migrated to appsettings.json, which is explained in https://docs.microsoft.com/en-us/aspnet/core/fundamentals/configuration/?view=aspnetcore-2.1
12. Session and Cookie
Session is not enabled by default in ASP.NET Core, you must manually add the Session support.
services.AddDistributedMemoryCache();
services.AddSession(options =>
{
    options.IdleTimeout = TimeSpan.FromMinutes(20);
    options.Cookie.HttpOnly = true;
});
and
app.UseSession();To get and set values:
HttpContext.Session.SetString("CaptchaCode", result.CaptchaCode);
HttpContext.Session.GetString("CaptchaCode");
To clear values:
context.Session.Remove("CaptchaCode");Check more at https://docs.microsoft.com/en-us/aspnet/core/fundamentals/app-state?view=aspnetcore-2.1
13. Html.Action
We used to use Html.Action for invoke an Action that returns a partial View and then put it into our main view like layout page. This is commonly used in Layout pages, for making widgets on webpages such as category list in a blog system.
@Html.Action("GetTreeList", "Category")This is replaced by ViewComponents in ASP.NET Core. Please check https://docs.microsoft.com/en-us/aspnet/core/mvc/views/view-components for more details.
There is one thing to be aware of, the Invoke method can only be async method:
async Task<IViewComponentResult> InvokeAsync()But your code isn’t always async natively, to silent the compiler warning. You can add this code:
await Task.CompletedTask;14. Check Runtime is Debug or Release
In my old system, I used HttpContext.Current.IsDebuggingEnabled to check if current website is in Debug build, and show a “(Debug)” on title bar.
@if (HttpContext.Current.IsDebuggingEnabled)
{
    <text>(Debug)</text>
}
In ASP.NET Core, we can use the new razor tag helper to do this
<environment include="Development">
    (Debug)
</environment>
In the next section, you will see more tag helper usage.
15. New Razor Tag Helpers
The tag helpers can simplify old razor HTML helpers by using a more HTML readable way, for example, in a form, we used to have:
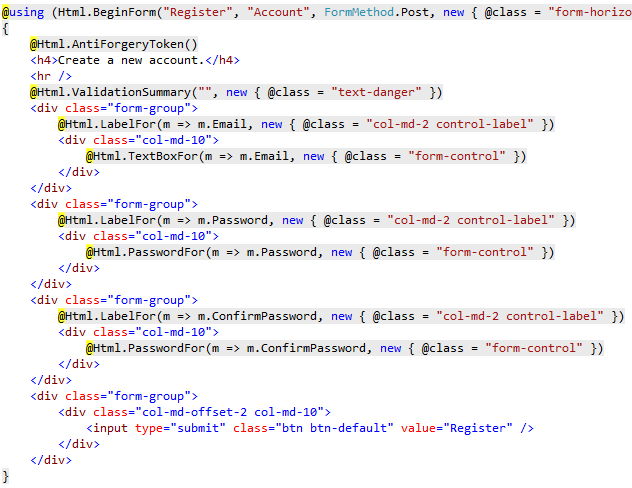
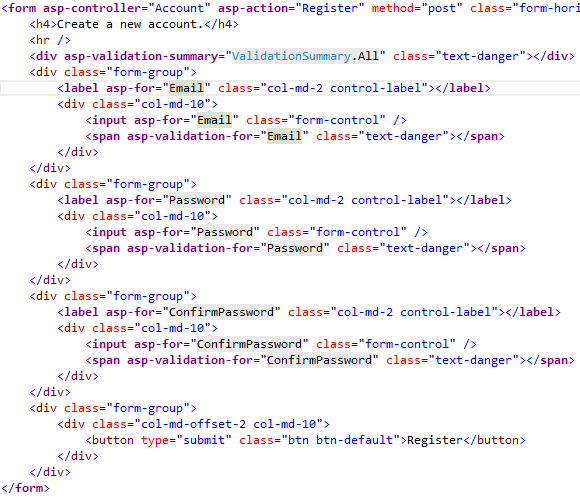
By converting it to Tag Helpers:
My personal favorite would be automatically generating version tails to the js or css files:
<script src="~/js/app/ediblog.app.min.js" asp-append-version="true"></script>This will result in:
<script src="/js/app/ediblog.app.min.js?v=lvNJVuWBoD_RVZwyBT15T_i3_ZuEIaV_w0t7zI_UYxY"></script> The new razor syntax can backward compatible with HTML helpers, which means, you can still use the old HTML helpers in ASP.NET Core with no problem. If your application migration is in a hurry, you can just reuse your old code, and convert them to Tag Helpers later.
For a complete list and introduction, see https://docs.microsoft.com/en-us/aspnet/core/mvc/views/tag-helpers/intro?view=aspnetcore-2.1
16. Anti-Forgery Token
The anti-forgery token has a few improvements. First, you can customize cookie and field names now.
services.AddAntiforgery(options =>
{
    options.Cookie.Name = "X-CSRF-TOKEN-MOONGLADE";
    options.FormFieldName = "CSRF-TOKEN-MOONGLADE-FORM";
});
Second, you no longer need to manually add this code to every form.
@Html.AntiForgeryToken()If you are using the new form tag helper, the anti-forgery field will be automatically added when your view is rendered to the client:

But you will still need to add [ValidateAntiForgeryToken] attribute to the corresponding Action.
However, there’s another way to Automatically validate anti-forgery tokens for every POST actions.
services.AddMvc(options =>
options.Filters.Add(new AutoValidateAntiforgeryTokenAttribute()));
Or you can do this to a specific Controller.
[Authorize]
[AutoValidateAntiforgeryToken]
public class ManageController : Controller
17. DI into Non-Controllers
ASP.NET Core has built in DI for Controllers. We can modify the constructor of a Controller to inject the services that the Controller relies on like this:
public class HomeController : Controller
{
    private readonly IDateTime _dateTime;

    public HomeController(IDateTime dateTime)
    {
        _dateTime = dateTime;
    }
}
But this does not mean the built in DI only works for Controller. For other classes, you can use the exact same DI, for example, my customized class can also use constructor injection:
public class CommentService : MoongladeService
{
    private readonly EmailService _emailService;

    public CommentService(MoongladeDbContext context,
        ILogger<CommentService> logger,
        IOptions<AppSettings> settings,
        EmailService emailService) : base(context, logger, settings)
    {
        _emailService = emailService;
    }

	// ....
}
It only requires registering your customized class in the DI container in Startup.cs, ASP.NET Core will do the magic.
services.AddTransient<CommentService>();For more usage of the DI in ASP.NET Core, see https://docs.microsoft.com/en-us/aspnet/core/mvc/controllers/dependency-injection?view=aspnetcore-2.1
18. API Behavior Differences
Some code from classic ASP.NET will compile without error, but it does not guarantee runtime success. For example, this code from ASP.NET in .NET Framework will throw exception in ASP.NET Core:
var buffer = new byte[context.Request.Body.Length];
context.Request.Body.Read(buffer, 0, buffer.Length);
var xml = Encoding.Default.GetString(buffer);
It will result in
System.NotSupportedException: Specified method is not supported.
at Microsoft.AspNetCore.Server.Kestrel.Core.Internal.Http.HttpRequestStream.get_Length()
And we need to use a different way to do it in .NET Core:
var xml = await new StreamReader(context.Request.Body, Encoding.Default).ReadToEndAsync();19. Watch out for the GDPR problem
ASP.NET Core 2.1 by default added the GDPR support, which can make some problems for us. You can check https://docs.microsoft.com/en-us/aspnet/core/security/gdpr?view=aspnetcore-2.1 for details.
The major problem is that Cookie won’t work until user accepts the GDPR policy. You need to check what cookie is essential for your website to work even the user hasn’t accept the GDPR policy and set them to IsEssential.
This is an example in my blog system:
private void SetPostTrackingCookie(CookieNames cookieName, string id)
{
    var options = new CookieOptions
    {
        Expires = DateTime.UtcNow.AddDays(1),
        SameSite = SameSiteMode.Strict,
        Secure = Request.IsHttps,

        // Mark as essential to pass GDPR
        // https://docs.microsoft.com/en-us/aspnet/core/security/gdpr?view=aspnetcore-2.1
        IsEssential = true
    };

    Response.Cookies.Append(cookieName.ToString(), id, options);
}
Another problem is if you are using Session, then you must make user accept GDPR policy, or it won’t work, because Session relies on Cookie to store the SessionID to client side.
20. Hot Update on Views
In classic ASP.NET MVC, Views folder are not compiled into DLL file by default, so that we can update our razor pages without recompile the whole application. This is useful for just a few text and layout changes that does not require updating C# code. I sometimes use this feature to directly publish an updated page to the server.
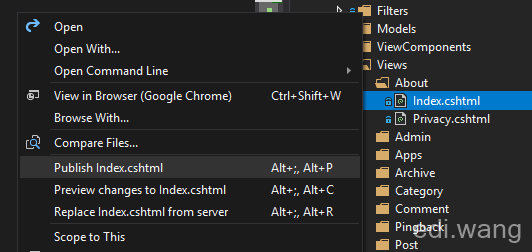
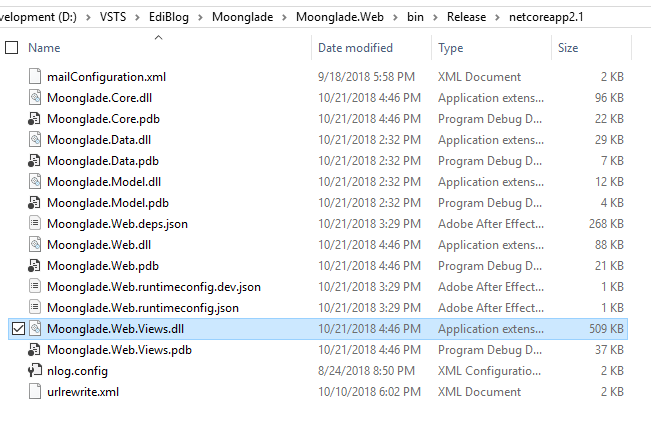
However, ASP.NET Core 2.1 will compile all your Views into DLL by default in order to get better runtime performance, so you could not update a Views file on the server because there is no Views in the directory, only a *.Views.dll:
If you still need hot update for Views in ASP.NET Core, you can modify the project file:
<PropertyGroup>
  <TargetFramework>netcoreapp2.1</TargetFramework>
  <RazorCompileOnBuild>false</RazorCompileOnBuild>
  <RazorCompileOnPublish>false</RazorCompileOnPublish>
</PropertyGroup>
21. Build Number Bumping
In classic .NET applications, we can modify the “AssemblyInfo.cs” to automatically increase the build numbers on each build. This is very useful in build servers.
[assembly: AssemblyVersion("9.0.*")]The result is something like:
9.0.6836.29475
Unfortunately, there’s no built-in way to do it in .NET Core yet. There’s a third-party solution may be helpful: https://github.com/BalassaMarton/MSBump
To use this tool, add it via nuget:
dotnet add package Install-Package MSBumpInclude a Version tag in your project file:
<PropertyGroup>
<TargetFramework>netcoreapp2.1</TargetFramework>
<Version>1.0.0.0</Version>
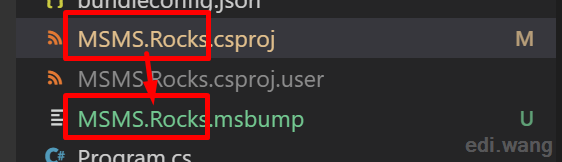
</PropertyGroup>Create a ".msbump" file with same name as your csproj file:
The very basic configuration of this msbump file would be:
{
BumpRevision: true
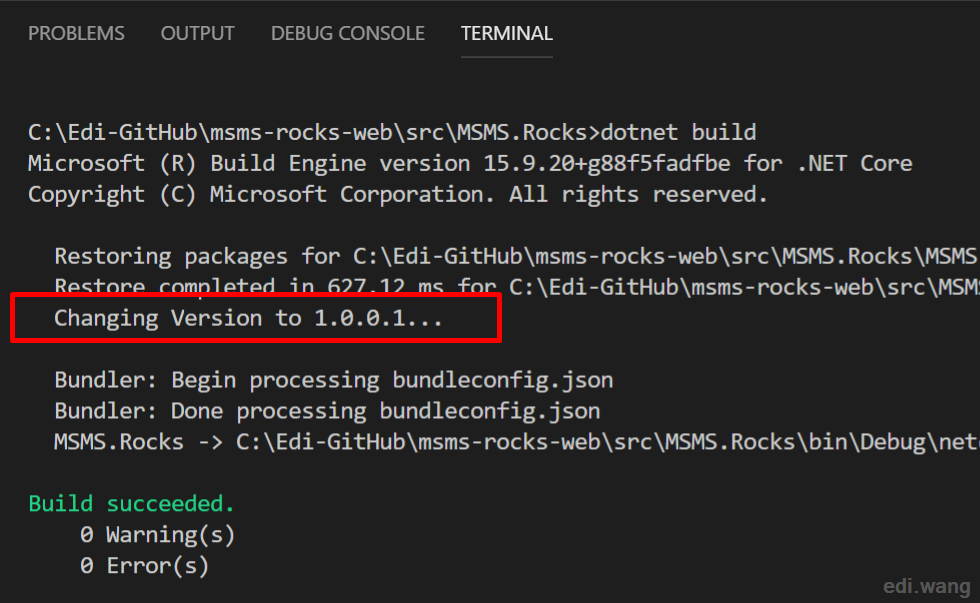
}Now, when you build the project, you can get a revision bump:
End
ASP.NET Core has quite a lot of differences from classic ASP.NET, and it also has some limitations today. I cover only the things I met, there are certainly other stuff that I hadn’t encountered with. Feel free to comment or email me about your discoveries.
zchwei
科技改变生活,微软改变世界
Markus
Great post, lits of information. Thanks...
Javier
How can i estimate the hours of migration from MVC to core? how can you divide the main task to achieve the goal of the project?
Paul
Thanks Javier! Yes! It's the major questions: How can i estimate the hours of migration from MVC to core?
T.Terlemez
Thanks much.
Vaibhav
I have ASP.NET Web Form application which we would like to migrate on ASP.NET Core. Do we have to rewrite completely all the pages for this migration? Any suggestion or tool for such migration?
Shakti Srivastav
Good many things you have covered. Thnx