Because Windows 10 IoT Core is not supporting Pi Camera, I can only use Linux instead. These days, I made a surveillance camera, the functionality is simple, when a person passed by the camera, it will take a picture and upload to Microsoft Azure Storage. It also got a website to remotely view the photos.
1. Hardware
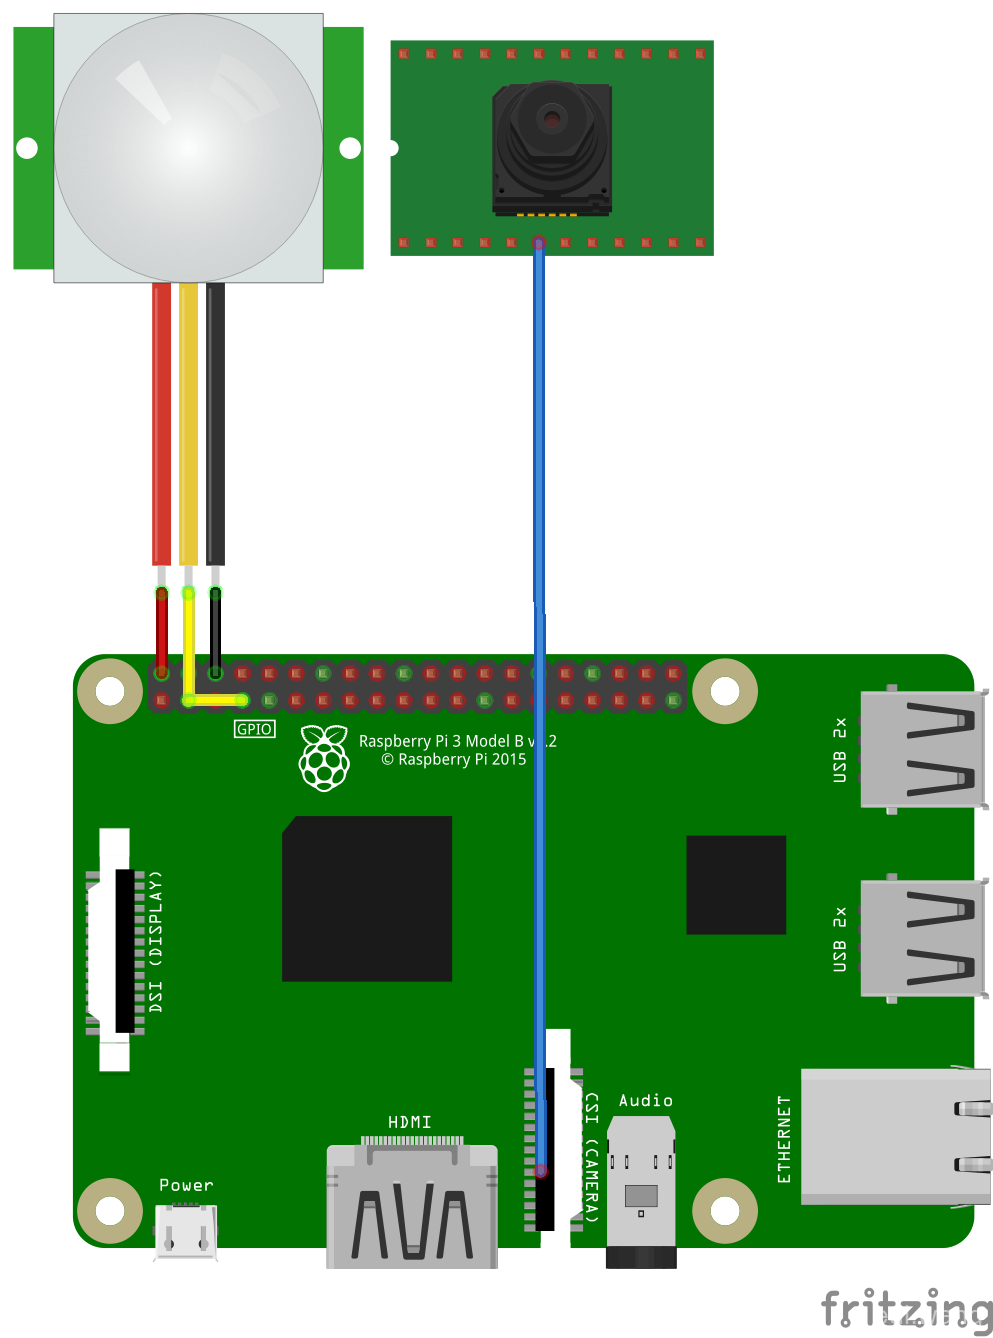
A PIR Sensor, a Pi Camera, a couple of jump wires. Connect the Singal port of the PIR sensor to GPIO 04, install the camera into CSI interface on the Raspberry Pi.
For installing the camera, please refer to official document here: https://www.raspberrypi.org/documentation/raspbian/applications/camera.md
2. Working with PIR Sensor and Camera
SSH into Raspbian, create a new python file:
sudo nano pircam.py
The API for the PIR sensor is built in Raspbian system. We only need to use it directly:
from gpiozero import MotionSensor
pir = MotionSensor(4)
To test if a person is passing by the PIR sensor:
pir.wait_for_motion()
To test if no one is standing in front of the PIR Sensor:
pir.wait_for_no_motion()
The camera API is also already in place.
from picamera import PiCamera
camera = PiCamera()
To take a photo:
camera.capture(filename)
So, to take a photo when a person is passing by the PIR sensor, we could do it this way:
from gpiozero import MotionSensor
from picamera import PiCamera
from datetime import datetime

camera = PiCamera()
pir = MotionSensor(4)

while True:
    pir.wait_for_motion()
    filename = "pircam-" +  datetime.now().strftime("%Y-%m-%d_%H.%M.%S.jpg")
    camera.capture(filename)
    pir.wait_for_no_motion()
Save the python file, and execute the script:
sudo python pircam.py
If everything is good, you can cross your fingers before the PIR sensor, the camera will take a photo. You can use "ls" command to verify if the photo has been saved to disk.
3. Configuration of Azure Storage Account and How to Upload Photo
Please refer to my post 在树莓派上使用PiCamera拍照并上传到Azure
Finally the working code is:
from gpiozero import MotionSensor
from picamera import PiCamera
from datetime import datetime
from azure.storage.blob import BlockBlobService
from azure.storage.blob import ContentSettings

camera = PiCamera()
pir = MotionSensor(4)
block_blob_service = BlockBlobService(account_name='YOURACCOUNT', account_key='YOURKEY')

while True:
    pir.wait_for_motion()
    filename = "pircam-" +  datetime.now().strftime("%Y-%m-%d_%H.%M.%S.jpg")
    camera.capture(filename)
    pir.wait_for_no_motion()
    block_blob_service.create_blob_from_path(
    'YOURCONTAINER',
    filename,
    filename,
    content_settings=ContentSettings(content_type='image/jpeg'))
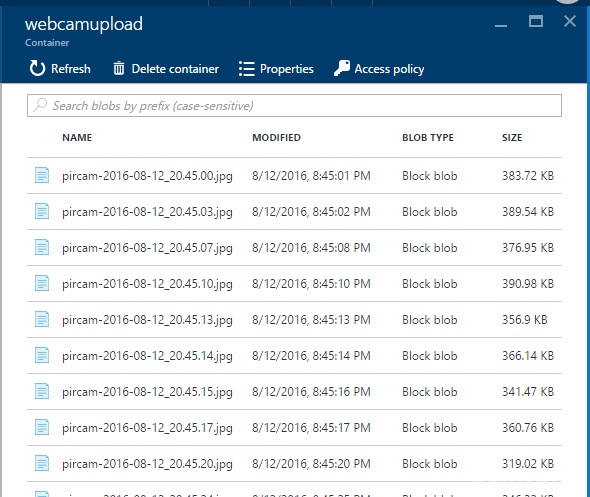
If nothing goes wrong, after execute the script, you will see the photos in your zure Portal:
4. Build the Website
Create a new ASP.NET MVC5 project with VS2015. Naming it like "PirCamWatcher", update all nuget packages to latest version. Install Azure Storage SDK:
PM > Install-Package WindowsAzure.Storage
Modify web.config, add the following keys into appSettings node:
    <add key="StorageConnectionString" value="DefaultEndpointsProtocol=https;AccountName=YOURACCOUNT;AccountKey=YOURKEY" />
    <add key="AzureStorageAccountContainer" value="YOURCONTAINER" />
    <add key="AuthUserName" value="YOURUSERNAME" />
    <add key="AuthPassword" value="YOURPASSWORD"/>
Please modify the values according to your own Azure envrionment.
The next thing is to make an authentication module. Because we are publishing it to the Internet, we can't allow everyone to see our photos. I choose Basic Authentication because it's the most simple way to do. To get it done in ASP.NET, we need to create an HttpModule first:
e.g. BasicAuthHttpModule
using System;
using System.Collections.Generic;
using System.Linq;
using System.Net.Http.Headers;
using System.Security.Principal;
using System.Text;
using System.Threading;
using System.Web;
using System.Web.Configuration;

namespace PirCamWatcher.IISModules
{
    public class BasicAuthHttpModule : IHttpModule
    {
        private const string Realm = "PirCam";

        public void Init(HttpApplication context)
        {
            // Register event handlers
            context.AuthenticateRequest += OnApplicationAuthenticateRequest;
            context.EndRequest += OnApplicationEndRequest;
        }

        private static void SetPrincipal(IPrincipal principal)
        {
            Thread.CurrentPrincipal = principal;
            if (HttpContext.Current != null)
            {
                HttpContext.Current.User = principal;
            }
        }

        private static bool CheckPassword(string username, string password)
        {
            var u = WebConfigurationManager.AppSettings["AuthUserName"];
            var p = WebConfigurationManager.AppSettings["AuthPassword"];
            return username == u && password == p;
        }

        private static void AuthenticateUser(string credentials)
        {
            try
            {
                var encoding = Encoding.GetEncoding("iso-8859-1");
                credentials = encoding.GetString(Convert.FromBase64String(credentials));

                int separator = credentials.IndexOf(':');
                string name = credentials.Substring(0, separator);
                string password = credentials.Substring(separator + 1);

                if (CheckPassword(name, password))
                {
                    var identity = new GenericIdentity(name);
                    SetPrincipal(new GenericPrincipal(identity, null));
                }
                else
                {
                    // Invalid username or password.
                    HttpContext.Current.Response.StatusCode = 401;
                }
            }
            catch (FormatException)
            {
                // Credentials were not formatted correctly.
                HttpContext.Current.Response.StatusCode = 401;
            }
        }

        private static void OnApplicationAuthenticateRequest(object sender, EventArgs e)
        {
            var request = HttpContext.Current.Request;
            var authHeader = request.Headers["Authorization"];
            if (authHeader != null)
            {
                var authHeaderVal = AuthenticationHeaderValue.Parse(authHeader);

                // RFC 2617 sec 1.2, "scheme" name is case-insensitive
                if (authHeaderVal.Scheme.Equals("basic",
                        StringComparison.OrdinalIgnoreCase) &&
                    authHeaderVal.Parameter != null)
                {
                    AuthenticateUser(authHeaderVal.Parameter);
                }
            }
        }

        // If the request was unauthorized, add the WWW-Authenticate header
        // to the response.
        private static void OnApplicationEndRequest(object sender, EventArgs e)
        {
            var response = HttpContext.Current.Response;
            if (response.StatusCode == 401)
            {
                response.Headers.Add("WWW-Authenticate",
                    string.Format("Basic realm=\"{0}\"", Realm));
            }
        }

        public void Dispose()
        {
        }
    }
}
And then, configure it into Web.config:
  <system.webServer>
    <modules>
      <add name="BasicAuthHttpModule"
        type="PirCamWatcher.IISModules.BasicAuthHttpModule, PirCamWatcher"/>
    </modules>
  </system.webServer>
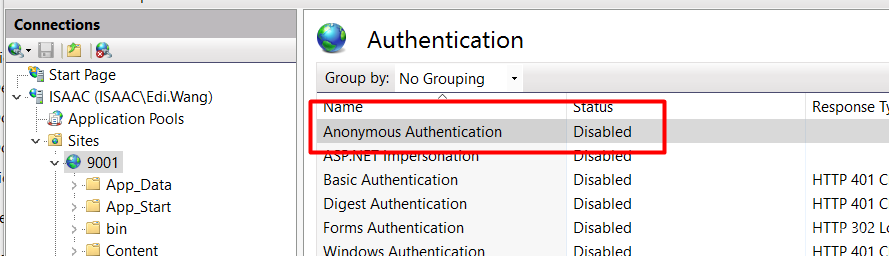
Open IIS, disable "Anonymous Authentication"
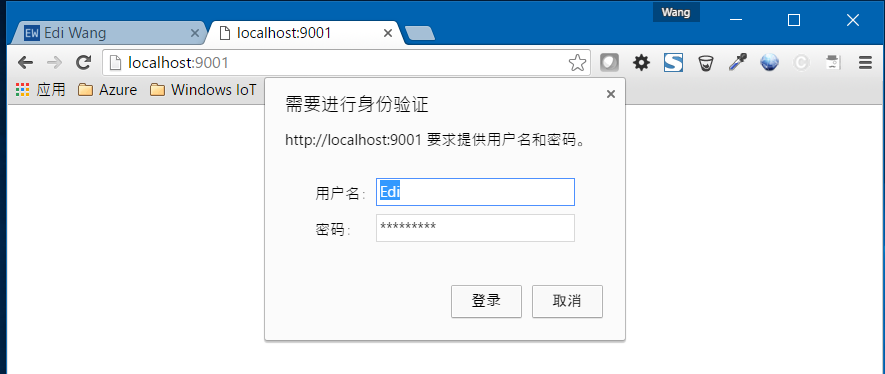
Now, try to access the website, it shoud ask you for a username and password
Finally, because we are deploying it to Azure. We can not operate the IIS on Azure directly, so we need a tricky way to do it:
Modify Web.Release.config, add the following code:
  <system.webServer>
    <security xdt:Transform="Insert">
      <authentication>
        <anonymousAuthentication enabled="false" />
      </authentication>
    </security>
  </system.webServer>
Open HomeController.cs, replace the code with this:
using System.Linq;
using System.Web.Configuration;
using System.Web.Mvc;
using Microsoft.WindowsAzure.Storage;
using Microsoft.WindowsAzure.Storage.Blob;

namespace PirCamWatcher.Controllers
{
    public class HomeController : Controller
    {
        public static CloudBlobContainer BlobContainer { get; set; }

        public HomeController()
        {
            BlobContainer = GetBlobContainer();
        }

        public ActionResult Index()
        {
            return View();
        }

        public JsonResult GetImages()
        {
            var listBlobProperties = (from item in BlobContainer.ListBlobs(null, false)
                                      where item.GetType() == typeof(CloudBlockBlob)
                                      select (CloudBlockBlob)item
                                      into blob
                                      select new Models.PirCamBlobProperties(blob.Properties.LastModified, blob.Uri))
                                     .OrderByDescending(p => p.DateModified)
                                     .ToList();

            return Json(listBlobProperties, JsonRequestBehavior.AllowGet);
        }

        private static CloudBlobContainer GetBlobContainer()
        {
            string connectionString = WebConfigurationManager.AppSettings["StorageConnectionString"];
            CloudStorageAccount storageAccount = CloudStorageAccount.Parse(connectionString);
            CloudBlobClient blobClient = storageAccount.CreateCloudBlobClient();
            CloudBlobContainer container =
                blobClient.GetContainerReference(WebConfigurationManager.AppSettings["AzureStorageAccountContainer"]);
            return container;
        }
    }
}
Add a "PirCamBlobProperties.cs" into Models
using System;

namespace PirCamWatcher.Models
{
    public class PirCamBlobProperties
    {
        public DateTimeOffset? DateModified;

        public Uri Uri;

        public PirCamBlobProperties(DateTimeOffset? dateModified, Uri uri)
        {
            DateModified = dateModified; Uri = uri;
        }
    }
}
Open Home\Index.cshtml, replace the code with
@{
ViewBag.Title = "Home";
}
@section scripts{
<script>
function showImage(uri) {
$(".img-prev-lg").html("<img src='" + uri + "' class='img-responsive' />");
$("#img-modal").modal();
}
$(function () {
$.getJSON("Home/GetImages",
function (data) {
var items = [];
$.each(data, function (k, v) {
items.push(
"<div class='sv-img' data-imgurl='" + v.Uri + "'>" +
"<img src='" + v.Uri + "' class='img-responsive' />" +
"<div class='sv-date'>" + new Date(parseInt(v.DateModified.substr(6))) + "</div>" +
"</div>");
});
$("<div />", {
"class": "img-container",
html: items.join("")
}).appendTo(".gallery-display");
}).done(function () {
$(".sv-img").click(function () {
var uri = $(this).data('imgurl');
showImage(uri);
});
});
});
</script>
}
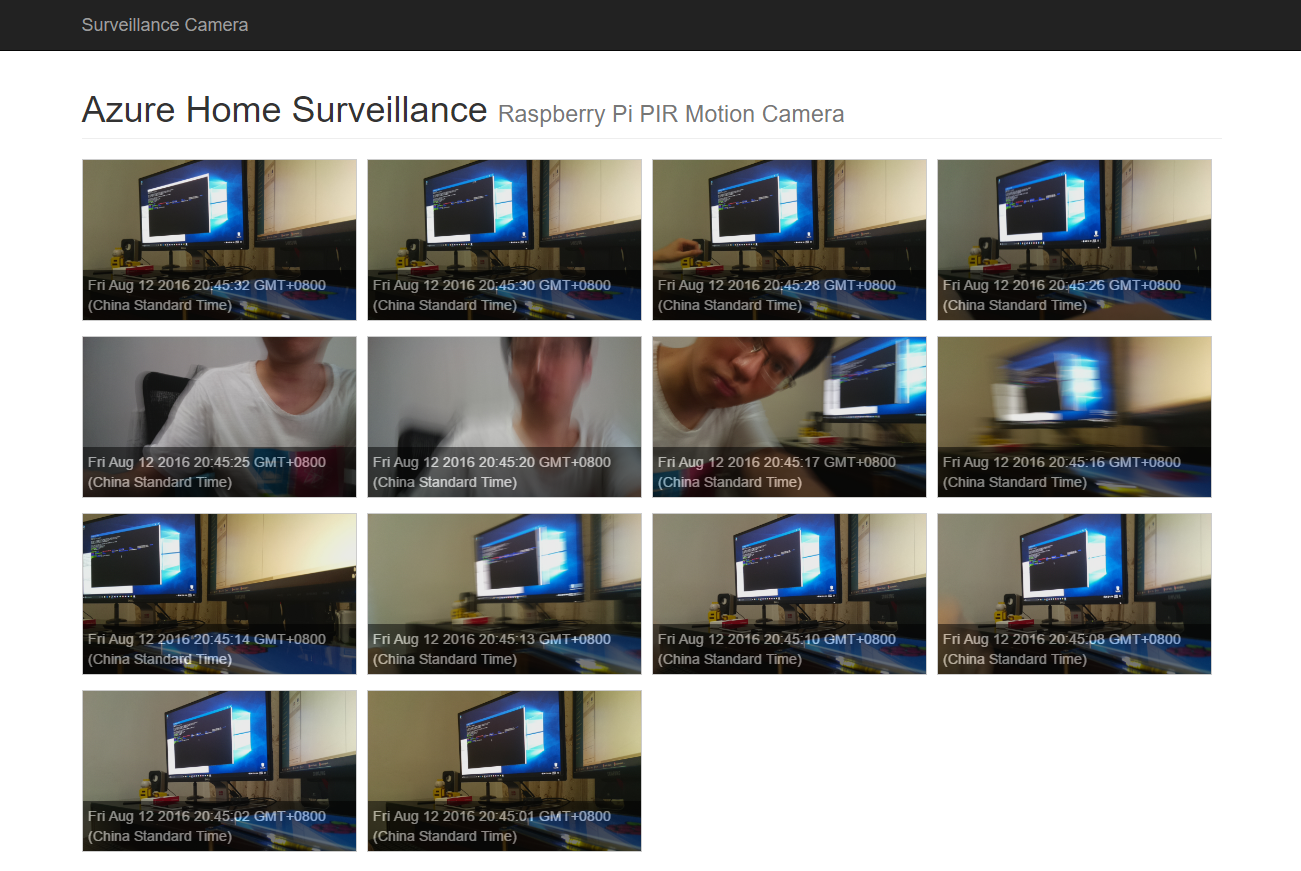
<h1 class="page-header">
Azure Home Surveillance
<small>Raspberry Pi PIR Motion Camera</small>
</h1>
<section class="gallery-display"></section>
<div id="img-modal" class="modal fade" tabindex="-1" role="dialog">
<div class="modal-dialog modal-lg" role="document">
<div class="modal-content img-prev-lg">
</div>
</div>
</div>
Modify site.css, add code:
.sv-img {
    display: inline-block;
    width: 275px;
    margin: 0 10px 10px 0;
    border: 1px solid #CCC;
    position: relative;
    cursor: pointer;
}

.sv-date {
    color: #FFF;
    background-color: #000;
    -ms-opacity: 0.5;
    opacity: 0.5;
    position: absolute;
    bottom: 0;
    padding: 5px;
}
Publish the website to Azure, and you are good to go!
The entire project is on my github:
支持折腾,正好我来学习一下