UWP和WPF以及以前Windows 8.1的WinRT应用有些不一样的地方。首先就是标题栏,以前Windows 8.1的应用都是全屏的,没有标题栏,Windows 10里面应用可以窗口化运行,所以我们也能够利用标题栏做一些定制。本文针对初学者,可能写的比较啰嗦。
一、首先是最基本的,如何改变标题栏及按钮的颜色
标题栏的对象位于Windows.UI.ViewManagement.ApplicationView类里,有个属性是
public ApplicationViewTitleBar TitleBar { get; }为了能够访问这个属性,我们需要先取得当前应用窗口的view:
var view = ApplicationView.GetForCurrentView();拿到view对象后,就能对TitleBar属性操作了,标题栏的活动和非活动状态的前景色和背景色可以这样设置,Background为背景色,Foreground为前景色:
// active
view.TitleBar.BackgroundColor = Colors.DarkBlue;
view.TitleBar.ForegroundColor = Colors.White;

// inactive
view.TitleBar.InactiveBackgroundColor = Colors.LightGray;
view.TitleBar.InactiveForegroundColor = Colors.Gray;
对于按钮颜色,也就是最小化、最大化、还原、关闭,可以这样设置。Hover意思是鼠标悬停的状态,Pressed是按下按钮的状态,Inactive表示窗口非当前活动窗口时候按钮的状态:
// button
view.TitleBar.ButtonBackgroundColor = Colors.DodgerBlue;
view.TitleBar.ButtonForegroundColor = Colors.White;

view.TitleBar.ButtonHoverBackgroundColor = Colors.LightSkyBlue;
view.TitleBar.ButtonHoverForegroundColor = Colors.White;

view.TitleBar.ButtonPressedBackgroundColor = Color.FromArgb(255, 0, 0, 120);
view.TitleBar.ButtonPressedForegroundColor = Colors.White;

view.TitleBar.ButtonInactiveBackgroundColor = Colors.DarkGray;
view.TitleBar.ButtonInactiveForegroundColor = Colors.Gray;
ARGB颜色的意思是 Alpha透明、红、绿、蓝,A-255即不透明。推荐使用ReSharper这个插件可以在VS里直接调出取色器进行配色。
把这段代码包起来做成一个方法,然后放在页面后台文件(.xaml.cs)的构造函数下面就能够完成标题栏颜色设置了:
public MainPage()
{
this.InitializeComponent();
CustomTitleBar();
}
void ApplyColorToTitleBar()
{
var view = ApplicationView.GetForCurrentView();
// active
view.TitleBar.BackgroundColor = Colors.DarkBlue;
view.TitleBar.ForegroundColor = Colors.White;
// inactive
view.TitleBar.InactiveBackgroundColor = Colors.LightGray;
view.TitleBar.InactiveForegroundColor = Colors.Gray;
// button
view.TitleBar.ButtonBackgroundColor = Colors.DodgerBlue;
view.TitleBar.ButtonForegroundColor = Colors.White;
view.TitleBar.ButtonHoverBackgroundColor = Colors.LightSkyBlue;
view.TitleBar.ButtonHoverForegroundColor = Colors.White;
view.TitleBar.ButtonPressedBackgroundColor = Color.FromArgb(255, 0, 0, 120);
view.TitleBar.ButtonPressedForegroundColor = Colors.White;
view.TitleBar.ButtonInactiveBackgroundColor = Colors.DarkGray;
view.TitleBar.ButtonInactiveForegroundColor = Colors.Gray;
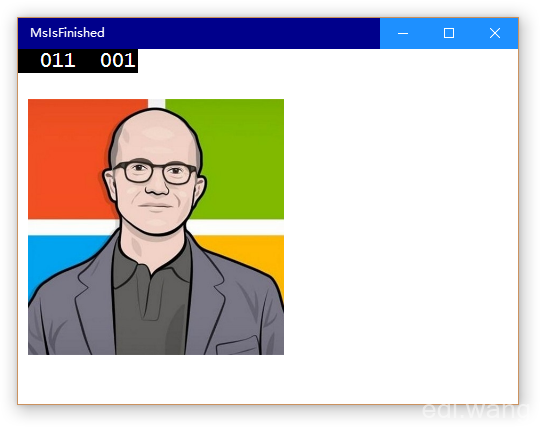
}现在你就得到了一个这样的窗口:
活动状态:
非活动状态:

二、如何加上后退按钮
和刚才非常类似,我们需要先获得一个view,然而管后退按钮的view在SystemNavigationManager里面。这货一共就3个成员:
//
// Summary:
//     提供应用程序响应系统提供的后退导航事件的方式。
[ContractVersion(typeof(UniversalApiContract), 65536)]
[MarshalingBehavior(MarshalingType.Agile)]
[Static(typeof(ISystemNavigationManagerStatics), 65536, typeof(UniversalApiContract))]
public sealed class SystemNavigationManager : ISystemNavigationManager, ISystemNavigationManager2
{
       public AppViewBackButtonVisibility AppViewBackButtonVisibility { get; set; }

       //
        // Summary:
        //     在用户调用系统提供的按钮、特定动作或后退导航的语音命令时发生。
        public event EventHandler<BackRequestedEventArgs> BackRequested;

       //
        // Summary:
        //     返回与当前窗口关联的 SystemNavigationManager 对象。
        //
        // Returns:
        //     与当前窗口关联的 SystemNavigationManager 对象。
        public static SystemNavigationManager GetForCurrentView();
}获得SystemNavigationManager对象之后就能设置后退按钮是否可见了:
AppViewBackButtonVisibility是个枚举类型,Visible(0)表示可见,Collapsed(1)表示隐藏
var currentView = SystemNavigationManager.GetForCurrentView();
currentView.AppViewBackButtonVisibility = AppViewBackButtonVisibility.Visible;
还有件重要的事就是用户点击后退按钮后做什么事,这个事件是BackRequested,为了方便调用可以封成一个方法,然后把委托放在方法参数里:
void EnableBackButtonOnTitleBar(EventHandler<BackRequestedEventArgs> onBackRequested)
{
    var currentView = SystemNavigationManager.GetForCurrentView();
    currentView.AppViewBackButtonVisibility = AppViewBackButtonVisibility.Visible;
    currentView.BackRequested += onBackRequested;
}
于是在页面的构造函数里就能调用了:
public MainPage()
{
    this.InitializeComponent();

    EnableBackButtonOnTitleBar((sender, args) =>
    {
        TxtMessage.Text += DateTime.Now + Environment.NewLine;
    });

    ApplyColorToTitleBar();
}
BackRequested的handler里做的事情是把当前时间输出到一个textblock上,textblock的前台代码如下:
<TextBlock Grid.Column="1" x:Name="TxtMessage" TextWrapping="Wrap" />现在你就得到了一个带后退按钮的窗口:
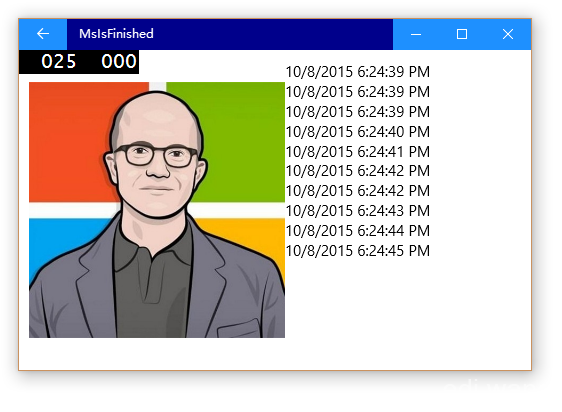
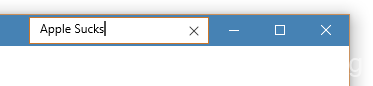
三、如何把控件塞到标题栏里去
如果你想把控件塞到标题栏里去,就像Visual Studio 的标题栏里面有个搜索框那样,甚至完全自己定义一个标题栏也是可以的。比如我们就模仿VS,在标题栏里加个搜索框。
思路是,先用XAML画个标题栏出来,可以用Grid,分2列,第一列是标题文字,第二列是搜索框。然后把这个Grid的位置塞到原来标题栏的位置去。
所以,我们的页面布局现在至少包含2个容器了,可以给MainPage.xaml默认的Grid分两行,第一行作为自定义标题栏,高度自动,第二行为窗体内容,高度用*占满其余高度:
<Grid.RowDefinitions>
    <RowDefinition Height="Auto" />
    <RowDefinition Height="*" />
</Grid.RowDefinitions>
标题栏Grid的XAML如下:
<Grid Background="SteelBlue" Grid.Row="0" Height="32">
<Grid.ColumnDefinitions>
<ColumnDefinition Width="*"/>
<ColumnDefinition Width="Auto"/>
</Grid.ColumnDefinitions>
<Grid Grid.Column="0" x:Name="GridTitleBar" Background="Transparent">
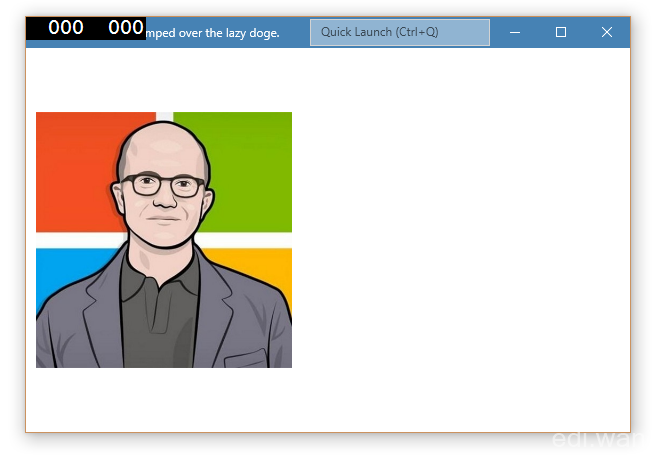
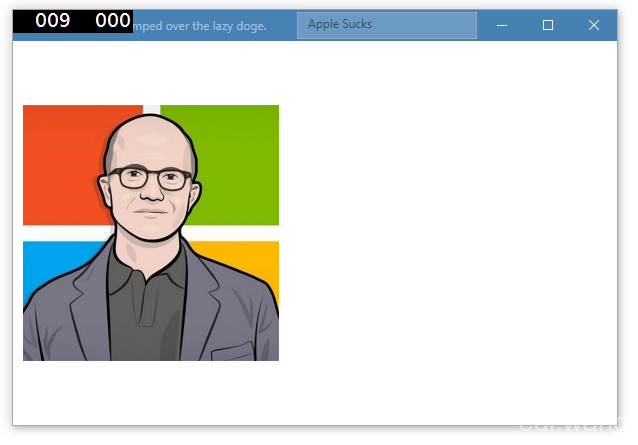
<TextBlock Text="A quick brown fox jumped over the lazy doge." VerticalAlignment="Center" FontSize="12" FontFamily="Segoe UI" FontWeight="Normal" Margin="10,0" Foreground="White"/>
</Grid>
<TextBox Grid.Column="1" x:Name="TxtSearchBox" Width="180" BorderThickness="1" BorderBrush="LightGray" PlaceholderText="Quick Launch (Ctrl+Q)" MinHeight="20" Height="27" FontSize="12" Margin="0,0,140,0"/>
</Grid>注意搜索框必须距离右边有一定距离(margin),因为最小化、最大化、关闭这三个按钮已经占据了标题栏最右大约130px的位置。GridTitleBar则是我们模拟的标题栏文字部分的容器。
后台C#代码:
var coreTitleBar = CoreApplication.GetCurrentView().TitleBar;
coreTitleBar.ExtendViewIntoTitleBar = true;
Window.Current.SetTitleBar(GridTitleBar);首先获得TitleBar对象,和之前设置颜色时候的对象是同一个。然后设置ExtendViewIntoTitleBar属性为true,这个属性的意思就是让窗体的内容延伸到标题栏里面去。
最后一个SetTitleBar()方法的意思是,被Set的那部分对象,会负责处理标题栏的行为,比如鼠标拖动和右键菜单。所以把我们在XAML里定义的GridTitleBar给塞了进去,要不用户就没法移动窗口了。
经过这样的操作,之前设置颜色和后退按钮的代码就不起作用了,因为标题栏已经完全被我们定义的XAML覆盖了,所以得重新设置颜色。当然,如果你需要,再自己做个后退按钮也行。
var view = ApplicationView.GetForCurrentView();
view.TitleBar.ButtonBackgroundColor = Colors.SteelBlue;
view.TitleBar.ButtonForegroundColor = Colors.White;

view.TitleBar.ButtonHoverBackgroundColor = Color.FromArgb(255, 92, 157, 211);
view.TitleBar.ButtonHoverForegroundColor = Colors.White;

view.TitleBar.ButtonPressedBackgroundColor = Color.FromArgb(255, 92, 157, 211);
view.TitleBar.ButtonPressedForegroundColor = Colors.White;

view.TitleBar.ButtonInactiveBackgroundColor = Color.FromArgb(129, 70, 130, 180);
view.TitleBar.ButtonInactiveForegroundColor = Colors.WhiteSmoke;
最后有一点要注意,因为标题栏已经是我们自定义的了,所以窗口的活动和非活动状态也得考虑到,简单的做法是,在非活动状态时候,设置标题栏及搜索框的透明度为50%,活动状态下还原为100%:
Window.Current.Activated += (sender, args) =>
{
    if (args.WindowActivationState != CoreWindowActivationState.Deactivated)
    {
        GridTitleBar.Opacity = 1;
        TxtSearchBox.Opacity = 1;
    }
    else
    {
        GridTitleBar.Opacity = 0.5;
        TxtSearchBox.Opacity = 0.5;
    }
};把以上的3段代码包成一个方法,比如CustomTitleBar(),然后塞在构造函数里。因为原生后退按钮和颜色已经被覆盖了,所以之前的代码可以注释掉:
public MainPage()
{
    this.InitializeComponent();

    //EnableBackButtonOnTitleBar((sender, args) =>
    //{
    //    TxtMessage.Text += DateTime.Now + Environment.NewLine;
    //});

    //ApplyColorToTitleBar();

    CustomTitleBar();
}
于是你就得到了一个带搜索框的自定义标题栏:
活动状态:
搜索框:
非活动状态:
工程代码在我的GitHub上:https://github.com/EdiWang/UWP-Demos/tree/master/CustomTitleBar/MsIsFinished
遇到一个问题,你的例子中也存在: 从UI上看搜索框是紧挨着最小化按钮的。但其实靠近最小化按钮那边的功能并不可用,比如说你在搜索框输入内容后那个清除内容的X按钮就点不中,那个区域好像还是被系统的标题栏占用着,点住可以拖动。 不知楼主是否有解决办法?
有个问题是自定义标题栏后,其中的控件并不能使用,按住还可以拖动。这个怎么解决呢?
Has marked, good article!