
After Windows 10's launch. More and more UWP applications are coming as well as more Windows developers. I have been doing UWP development besides my job for more than 2 years. Today, I will share some tips and tricks from my UWP development experience as well as some handy tools, so that you can do your development quicker and easier.
1. Automatically Set Color to Title Bar
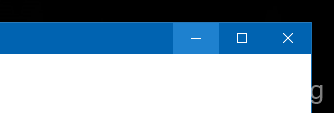
The default color on Windows 10 title bar is white. Although it can be changed in Personalize settings, many users won't do it. If your App's theme color does not fit the white title bar, it would be very ugly. So we always want to color the title bar within the App. But we will need to consider the background color on the "3 major buttons" when mouse hovering on that. It used to be very complicated, for example, many developers will need to use other color palettes application to select serveral colors for different title bar status.
Good news is, I have developed an open source UWP Helpers Library. Just with a little trick, you can make your App's title bar fit the system accent color, and it can calculate the hover automatically!
First, install my Edi.UWP.Helpers from NuGet:
PM> Install-Package Edi.UWP.HelpersThen, add this code to wherever you need to change the title bar color. It usually is the start point for your application, such as App.xaml, ActivationService, or a page's constructor:
var accentColor = Edi.UWP.Helpers.UI.GetAccentColor();
var btnHoverColor = Color.FromArgb(128,
    (byte)(accentColor.R + 30),
    (byte)(accentColor.G + 30),
    (byte)(accentColor.B + 30));
Edi.UWP.Helpers.UI.ApplyColorToTitleBar(
accentColor,
Colors.White,
Colors.LightGray,
Colors.Gray);
Edi.UWP.Helpers.UI.ApplyColorToTitleButton(
    accentColor, Colors.White,
    btnHoverColor, Colors.White,
    accentColor, Colors.White,
    Colors.LightGray, Colors.Gray);
In this code, getting the current system accent color is using another API in my helper library:
var accentColor = Edi.UWP.Helpers.UI.GetAccentColor();It is perfectly OK if you want to customize your own accent color, just remember to to add 30 to each R G B values for the btnHoverColor color.
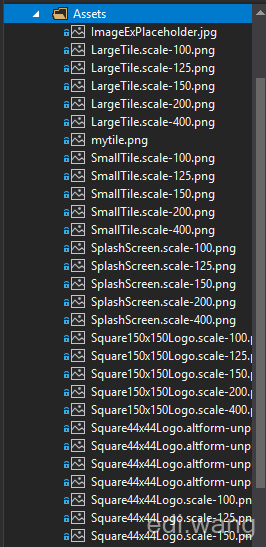
2. Generate App Icons Automatically
For may individual developers, making picture and icons are not thier skills. Especially for UWP, it require a lot of different size of icons. If you make evey icon manually according to Microsoft's guideline, it takes a huge amount of time. Once, there was a Visual Studio plugin that can generate all icons from a single image file, now it is merged into Visual Studio 2017, located here:
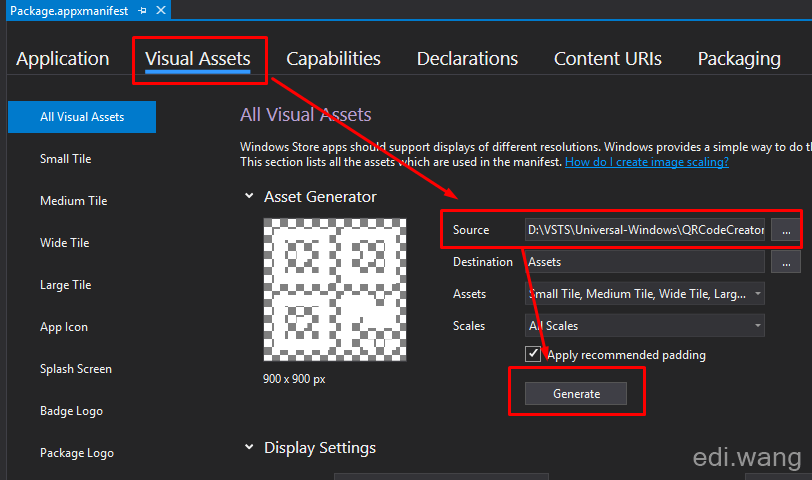
Now, you will need only one high resolution images, it can generate every icon that UWP requires for you. Including different DPIs and Windows Store logos. Notice, your image would be better not to have any blank paddings, the tool will handle all paddings for you.
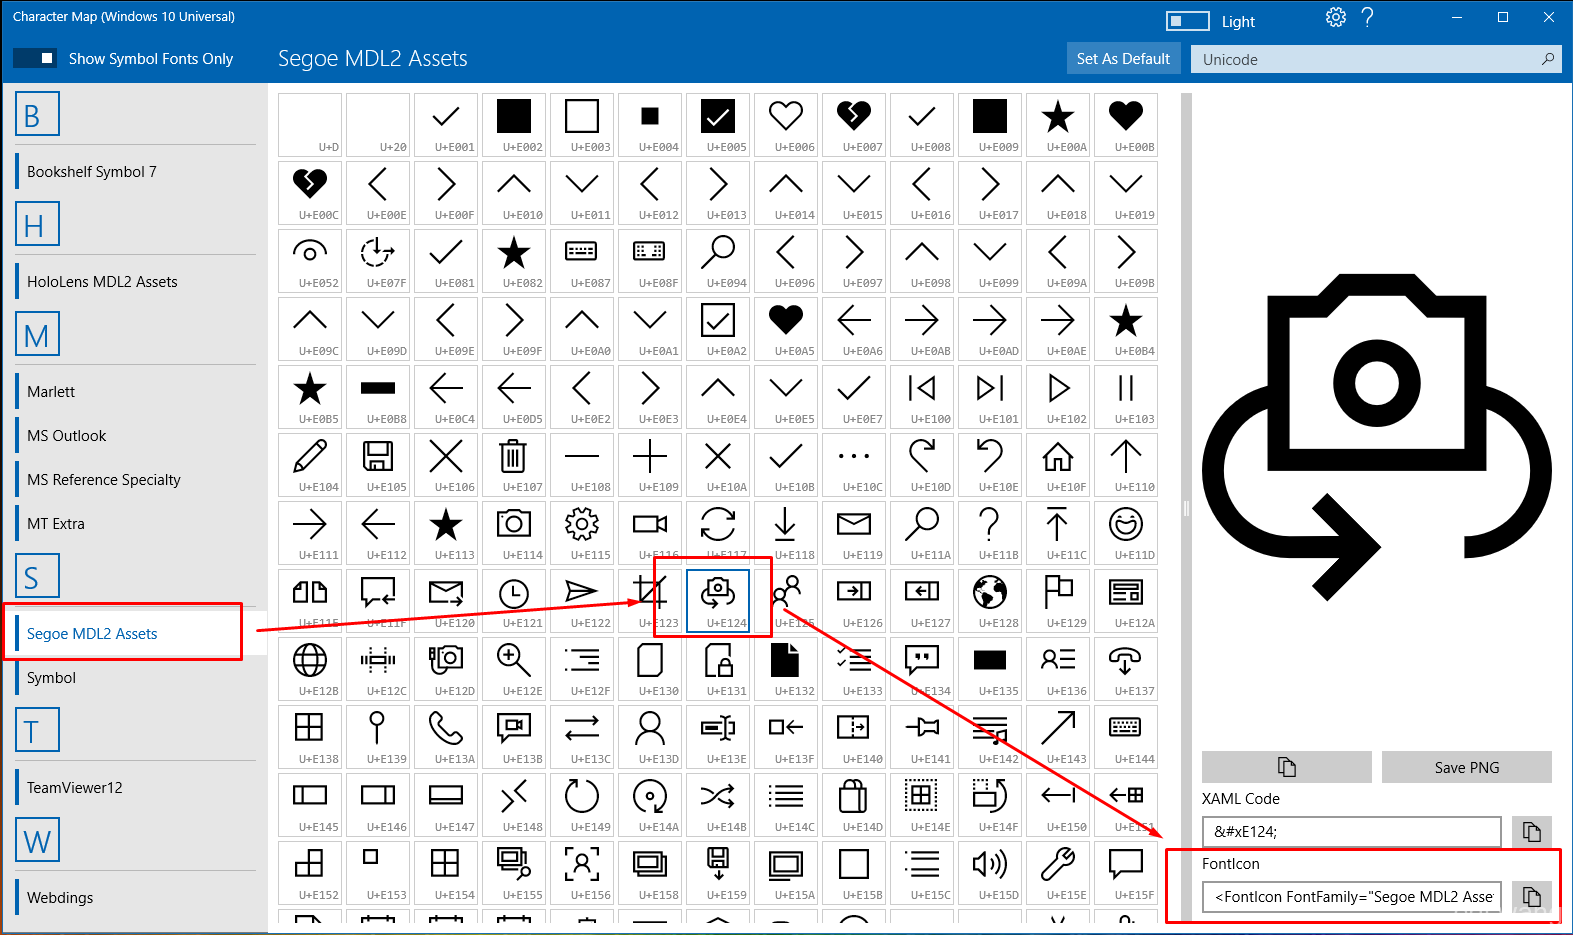
3. Looking for Segoe MDL2 Assets Icons
If you re still using the WIN32 character map, or looking up icons on Microsoft's online document and write XAML by your self, it is also taking lots of time. Recommending my powerful tool:Character Map UWP It is also one of my open source projects. It is basically a character map with high DPI support, and can generate XAML code for you! You just need to choose the icon you want, and copy the XAML code for FontIcon in the App to Visual Studio!
And also, this tool can export Icon to high resolution PNG images, you can make App icons using the trick from the previous section.
4. Symbol Enum does not have all Segoe MDL2 Assets icons?
If the API you are using only takes Symbol type icons, and you can't find the icon you need in Symbol Enum. How to proceed with this?

Acutally there is a trick to do it without modifying or changing the API you are using.
For example, the Symbol Enum does not have WIFI icon. You can find it in my Character Map UWP and see the Unicode: U+E701
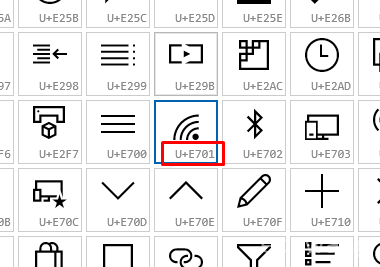
Just use (Symbol) to force convert it to a Symbol type:
(Symbol)0xE701So violent, but it is working!
5. Global Error Handling
There ususally be some exceptions that we ignored to handle in our Application. It will result in App crash and disappear in front of the user. A good practice on this is, when the App meets fatal problem and about to crash, pop up a dialog to user, save the user's current App data, when the user restart your App and find thier data is still preserved, you may avoid being 1 started in the Windows Store.
Open App.xaml.cs, add an event handler in the constructor:
UnhandledException += OnUnhandledException;In the event handler, add code to save data and pop up the error message:
private async void OnUnhandledException(object sender, UnhandledExceptionEventArgs e)
{
    e.Handled = true;
    // TODO: Save App Data
    var message = e.Message;
    await new MessageDialog("We are sorry, but something just went very very wrong, trying to save your work. " +
                            "\n\nError: " + message,
                            "🙈 App Blow Up Sky High").ShowAsync();
}
6. MVVM-Friendly Message Dialog
How to use UI stuff like MessageDialog in ViewModel? We can't just write every piece of code that uses ContentDialog into ".xaml.cs", it is not a MVVM way to code. By example of MVVM Light, we can use Dependency Injection to abstract the dialog into a service:
First, register an IDialogService interface in ViewModelLocator Set it to type of GalaSoft.MvvmLight.Views.DialogService, this type is already implemented by MVVM Light, we don't need to do it ourselves.
SimpleIoc.Default.Register<IDialogService, DialogService>();Then, modify the constructor of the ViewModel, add a parameter with type of IDialogService, and initialized it.
...
public IDialogService DialogService { get; set; }
...
public MainViewModel(IDialogService dialogService)
{
...
    DialogService = dialogService;
...
}
Then we can use a MVVM way to pop up the dialog on the UI:
catch (Exception ex)
{
    await DialogService.ShowMessageBox(ex.Message,
        Utils.GetResource("Resources/MessageDialogTitle-Error"));
}
7. Batch Cleaning the Temporary Files After Compile
Everytime we use Visual Studio to compile a UWP app, or generate App Package to upload to the store. VS will leave a hell of temporary files in our solution directory. Each App will have 1GB to serveral Gs of these files. For thos developers, when you have almost 30 UWP Apps like me. It will eat up a lot of your disk space. If you don't want do manully delete these Temporary files, here's a batch script that will help you:
For a UWP App, the directoy to clean up are:
-
bin
-
obj
-
AppPackages
-
BundleArtifacts
So, we can write a cmd script and put it outside of each App's directory:
for /d /r . %%d in (bin obj AppPackages BundleArtifacts) do @if exist "%%d" rd /s/q "%%d"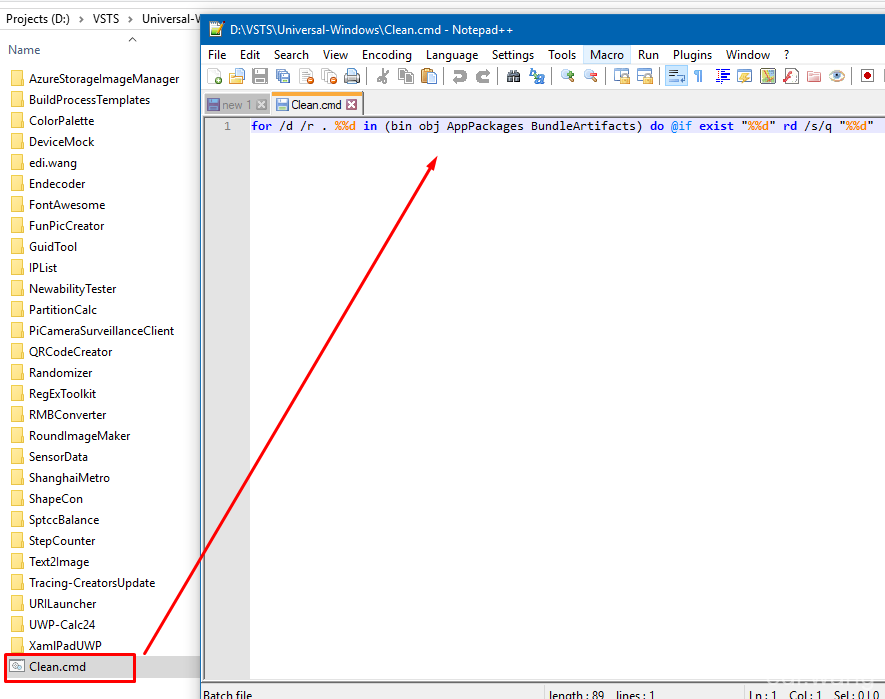
Execute it as Administrator:
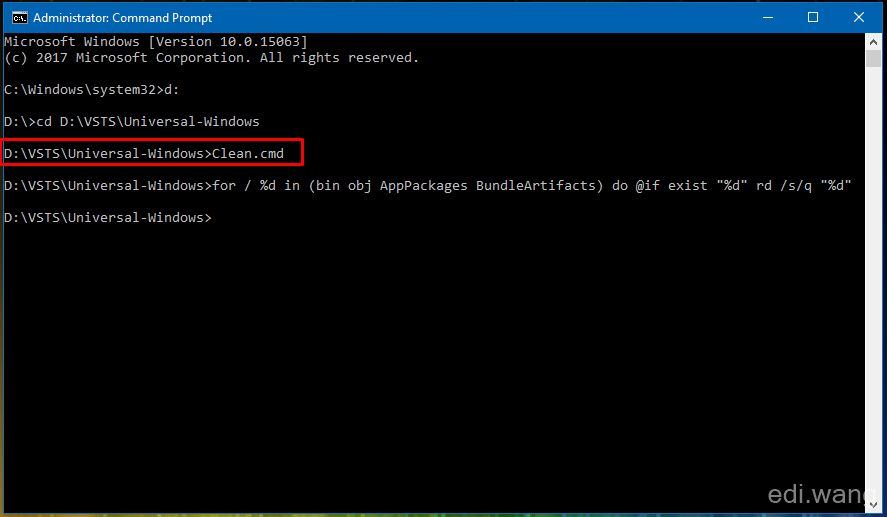
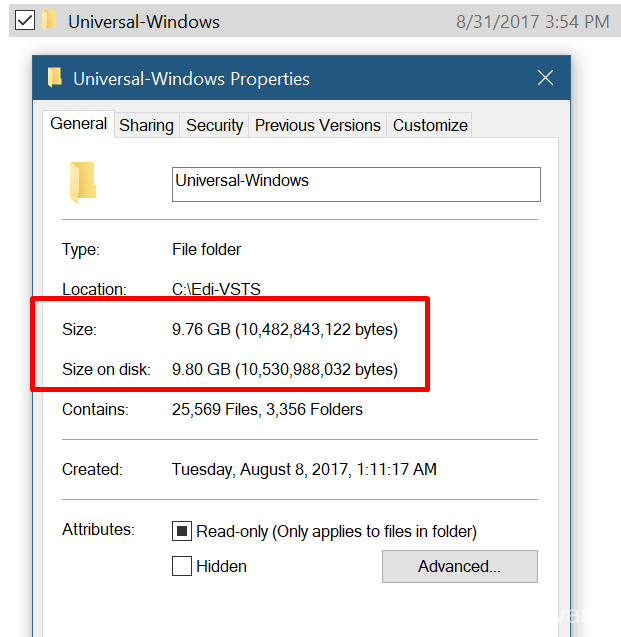
Then you can free up tens of Gs of your disk space!
Before cleaning:
After cleaning:

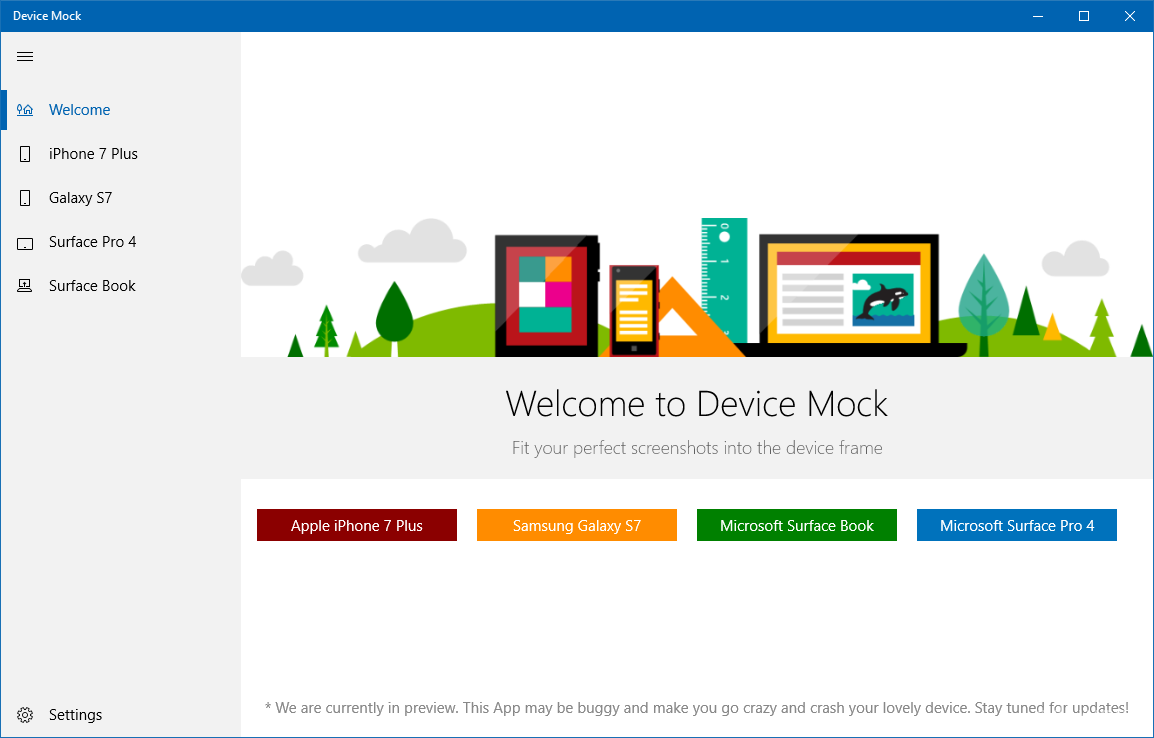
8. Make Your Screen Shots Embedded into a Device Frame
When you submit your App to Windows Store, a nice screen shot is very helpful. It would be very nice if your screen shot just fit in a particular device frame, like a Surface Pro:

I also created an UWP App for this, it can generate iPhone, Samsung, Surface Pro 4 and Surface Book's screen shots:
Get Device Mock for Windows 10
9. How to Deal with UI Thread Dispatcher in MVVM
Usually, if your code is being normal, you won't have the problem to deal with UI thread Dispatcher in MVVM. But what if it happens? It is no go to access Dispatcher directly in a ViewModel. For exapmle, in MVVM Light, we need to initialize a DispatcherHelper in OnLaunched event:
DispatcherHelper.Initialize();Then you can use it everywhere in your ViewModel like this:
await DispatcherHelper.UIDispatcher.RunAsync(CoreDispatcherPriority.Normal, () =>
{
    FireDetectionLog += "\nFire detected! Sending alarm to Azure.";
});
10. Highly Recommending Windows Template Studio by Microsoft
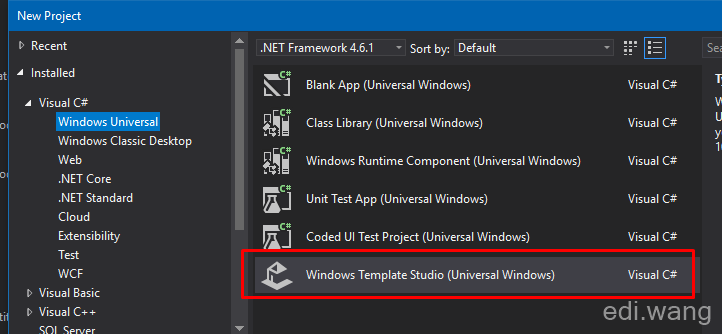
This is a UWP template gallery from Microsoft and it's community. It have some little problem, but it is already the most outstanding UWP template gallery on this planet. It covers the most common UWP component and design patterns. It can scaffold your application in minutes. For example, you want an App with hamburger menu, use MVVM, can switch theme, can show notification, can show first run message, can show message after every update, etc.. If you do all these yourself, it would take at least one or two hours. By using WTS, you can do it in one minute.
https://github.com/Microsoft/WindowsTemplateStudio
After installation, you will get an extra item called "Windows Template Studio" in your UWP template:
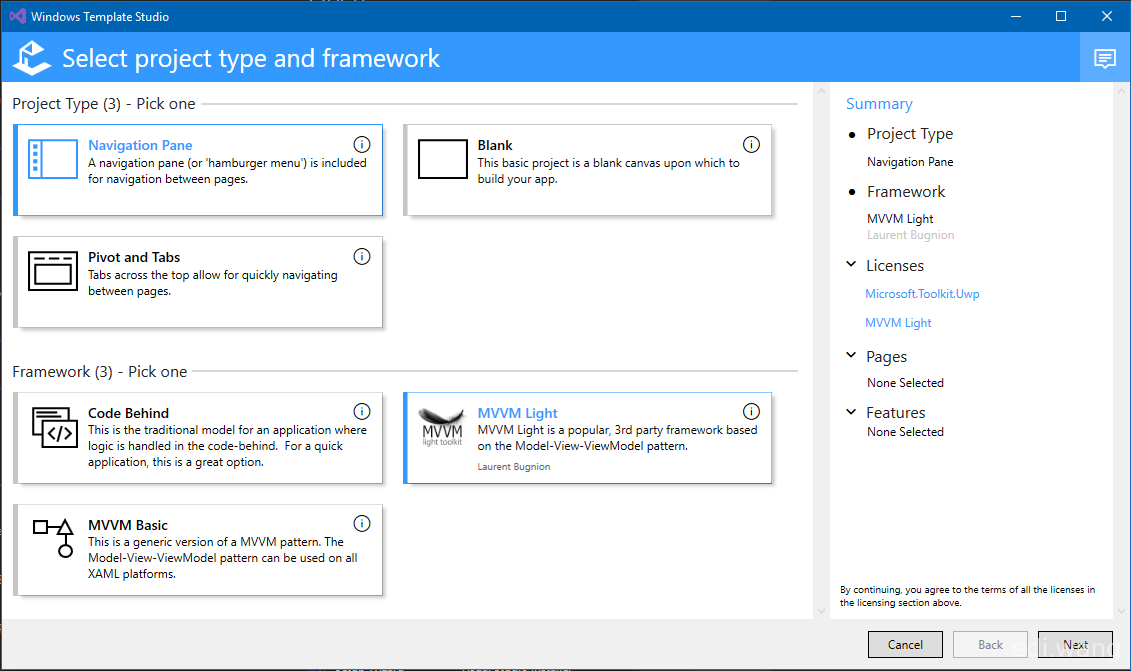
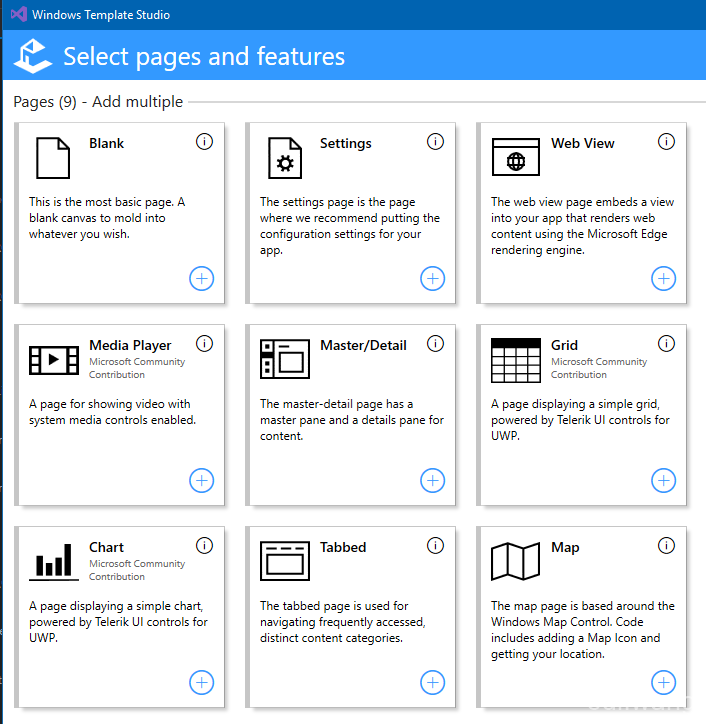
It requires only 2 steps to scaffold your App:
Wonderful! Isn't it?
OK, this is everything for my sharing, thank for reading!
vv
赞22
vv
Segoe MDL2 Assets图标是包含了很多,但是还有很多没有的,比如微信图标。。。 我一般都是用metro studio制作,但是却不能像segoe字体图标那样自适应 黑色主题和白色主题
蛋疼
Dustray
666很可以,学习了
ailemon
那个屏幕截图的应用商店传送门链接是失效了吗?点进去找不到链接。。 那个UWP应用的图标确实之前一直很让我头疼,手动一个一个生成不同尺寸的图片,都快疯了。。
Mike
Edi, thanks so much, this blog is amazing - you have answered 6 or 7 issues that I have had (or still have) with UWP in one single page. I have already downloaded your character map tool which is going to be incredibly useful as I use the symbols all the time in apps (mainly for DataGrid action buttons).
I'm going to read some of your other blogs in the hope they are also this useful :-)