
I recently bought a Raspberry Pi 4 with 4GB RAM. I've managed to run an ASP.NET Core application on this Raspberry Pi 4.
05/13/2022 Update content for .NET 6.0 LTS for ARM64. Original post is for .NET Core 3.1 ARM32.
ARM32 or ARM64?
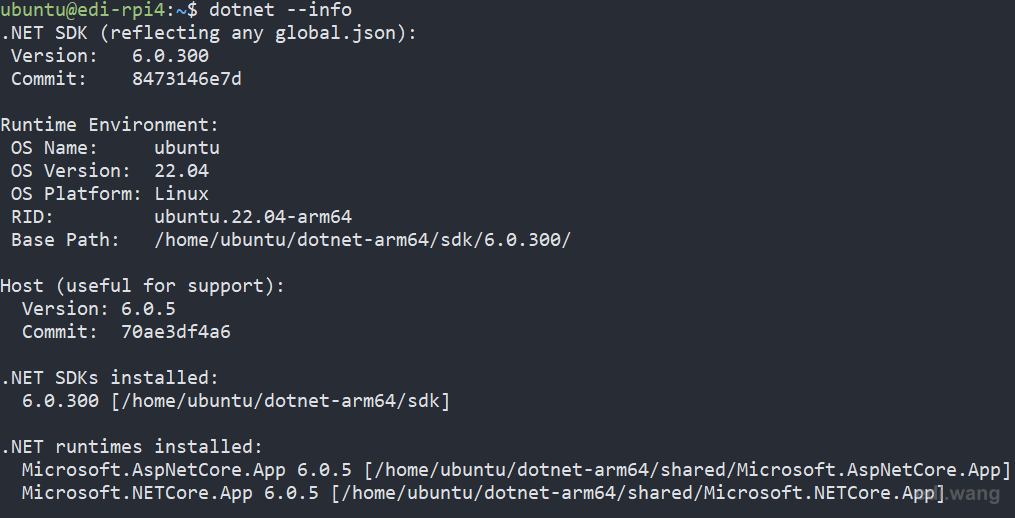
You can't run ARM64 version of .NET Core runtime or SDK on a Raspberry Pi 4 with the official Raspbian system today. Although Raspberry Pi 4's CPU supports 64 bit, its official operating system "Raspbian" isn't 64 bit. However, Ubuntu for Raspberry Pi 4 can install ARM64 .NET 6.0 SDK. It's up to you to choose ARM32 or ARM64. The setup steps are the same.
Prepare
Required: An Internet connection for downloading .NET SDK and Runtime.
Optional: Visual Studio Code / Visual Studio on your desktop machine to create a sample project
Update your Raspbian:
sudo apt-get update
sudo apt-get upgrade
I also suggest using a monitor for your Raspberry Pi or a VNC connection, so that you can test your ASP.NET Core websites at the final step without messing up the port and network settings.
Download .NET SDK and Runtime
On your desktop machine, open https://dotnet.microsoft.com/download/dotnet-core/6.0
Find Linux distributions for ARM32/64 SDK and ASP.NET Core Runtime, click into it, you can then copy the Direct Link. These 2 links are what we use in Raspbian / Ubuntu to download the latest SDK and Runtime. For example:
- .NET Core 6.0 SDK (Linux/ARM64)
- ASP.NET Core 3.1 Runtime (Linux/ARM64)
Use wget on your Raspbian to download .NET SDK and ASP.NET Core runtime, for example, Linux ARM64:
wget https://download.visualstudio.microsoft.com/download/pr/7c62b503-4ede-4ff2-bc38-50f250a86d89/3b5e9db04cbe0169e852cb050a0dffce/dotnet-sdk-6.0.300-linux-arm64.tar.gz
wget https://download.visualstudio.microsoft.com/download/pr/8ba7087e-4513-41e5-8359-a4bcd2a3661f/e6828f0d8cf1ecc63074c9ff57685e27/aspnetcore-runtime-6.0.5-linux-arm64.tar.gz
Please always check for updated URLs for a newer version of SDK and Runtime.
Install .NET SDK and Runtime
Create a folder named for example "dotnet-arm64" and unzip them into it.
mkdir dotnet-arm64
tar zxf dotnet-sdk-6.0.300-linux-arm64.tar.gz -C $HOME/dotnet-arm64
tar zxf aspnetcore-runtime-6.0.5-linux-arm64.tar.gz -C $HOME/dotnet-arm64
So far you can only run .NET commands inside the dotnet-arm64 folder. To make "dotnet" command can be run everywhere, you have to make something like environment variables, which will link dotnet-arm64 folder to system level.
export DOTNET_ROOT=$HOME/dotnet-arm64
export PATH=$PATH:$HOME/dotnet-arm64
Now, you can run dotnet --info to have a quick test:
Create .NET Applications
Now that we have the SDK, we don't have to use another machine to develop and publish the App. We can just do it directly on our Raspberry Pi.
mkdir hello-dotnet
cd hello-dotnet
dotnet new console
After the project files are created and NuGet restore completes. You can run the project using "dotnet run" command.
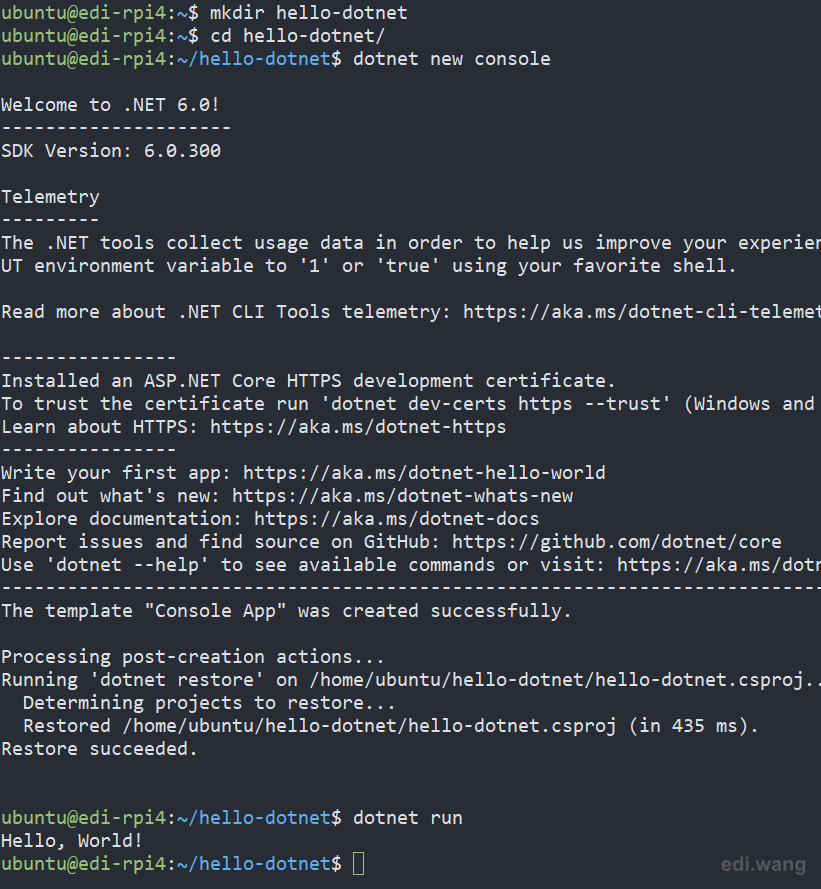
You can even use nano as a basic code editor.
sudo nano Program.cs
Deploy and Run ASP.NET Core Applications
In a more real-world scenario. You just can't develop complex .NET applications without an IDE on Raspbain. We usually develop and test our App on desktop machines first and then publish it to Raspberry Pi to run it.
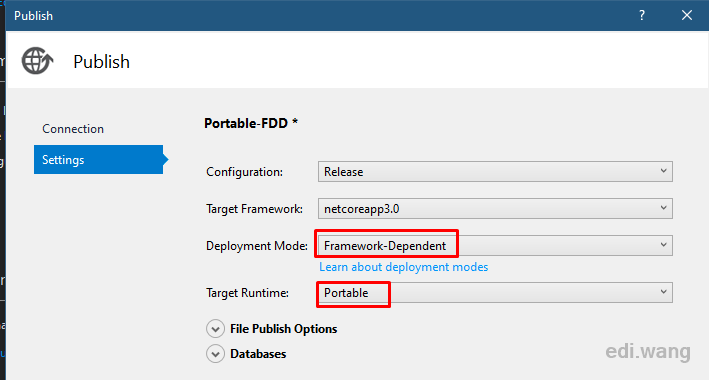
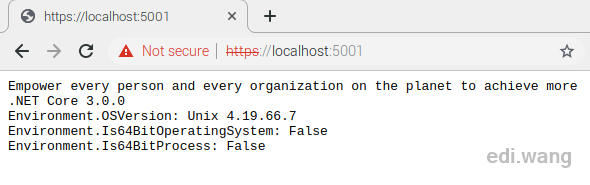
To run an ASP.NET Core application. You need to first publish it. For example, from Visual Studio 2022. What I have is an empty ASP.NET Core application with a little more output information in Startup.cs
await context.Response.WriteAsync($"Empower every person and every organization on the planet to achieve more{Environment.NewLine}" +
                                  $".NET Core {Environment.Version}{Environment.NewLine}" +
                                  $"Environment.OSVersion: {Environment.OSVersion}{Environment.NewLine}" +
                                  $"Environment.Is64BitOperatingSystem: {Environment.Is64BitOperatingSystem}{Environment.NewLine}" +
                                  $"Environment.Is64BitProcess: {Environment.Is64BitProcess}", Encoding.UTF8);
Publish it using Framework-Dependent (FDD) and Portable. Because we have the native runtime on Raspberry Pi. We DON'T have to build it into linux-arm RID! Portable will run just fine!
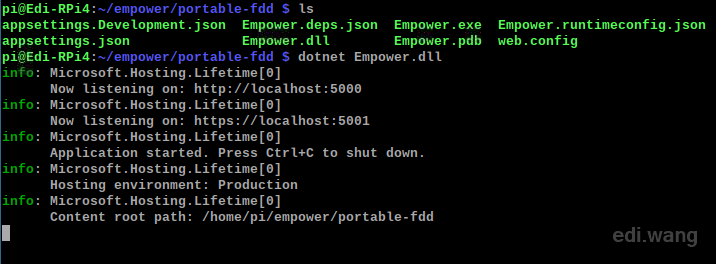
Copy the published directory to Raspberry Pi.
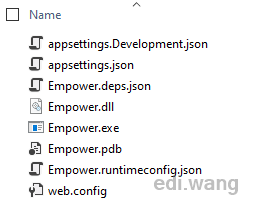
Now you can use "dotnet <Your DLL Name>.dll" to run your ASP.NET Core application.
"Auto Start" .NET Environment
Every time you restart your Raspberry Pi, you'll have to re-configure the DOTNET_ROOT and PATH environment variables or .NET CLI won't work. To make them auto start with the system, we can modify the ".profile".
sudo nano .profileAdd those lines at the end of this file
# set .NET SDK and Runtime path
export DOTNET_ROOT=$HOME/dotnet-arm64
export PATH=$PATH:$HOME/dotnet-arm64
Looks like this
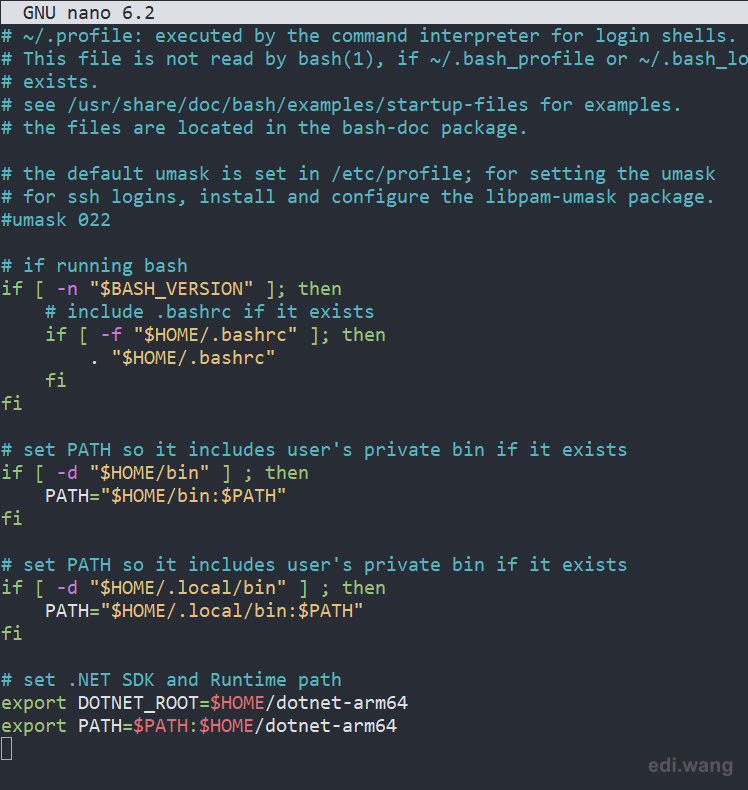
Save the file and restart your Raspbian system. Now you can run "dotnet --info" directly without manually setting the environment variables again.
Access ASP.NET Core Website from LAN
So far your ASP.NET Core application can only be visited on Raspberry Pi itself using "localhost". It would be much more useful if we expose it to LAN. There are two ways to do that.
Host by Kestrel itself
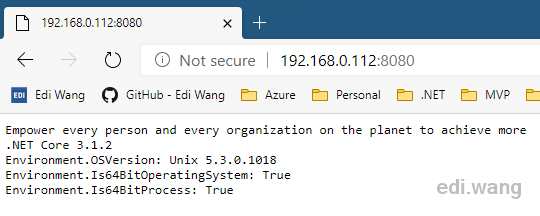
Just give dotnet command a --urls parameter, it would listen on the domain and port you provided. I don't want to limit to any domain name, so I use * instead.
dotnet Empower.dll --urls "http://*:8080"Now you will be able to access your Raspberry Pi via LAN.
But this hosting model has its disadvantages, for example, when you have an exception in your code, the dotnet process will end and you have to manually restart it. Let's check out a more real-world hosting model.
Host by Nginx with auto-restart capability
First, install and start Nginx:
sudo apt-get install nginx
sudo /etc/init.d/nginx start
Open Nginx config file:
sudo nano /etc/nginx/sites-available/defaultReplace its content with:
server {
    listen        80 default_server;
    server_name   _;
    location / {
        proxy_pass         http://localhost:5000;
        proxy_http_version 1.1;
        proxy_set_header   Upgrade $http_upgrade;
        proxy_set_header   Connection keep-alive;
        proxy_set_header   Host $host;
        proxy_cache_bypass $http_upgrade;
        proxy_set_header   X-Forwarded-For $proxy_add_x_forwarded_for;
        proxy_set_header   X-Forwarded-Proto $scheme;
    }
}
server_name is set to _; means I don't limit domain names, just accept any hostnames. proxy_pass is the default Kestrel HTTP endpoint, which runs our ASP.NET Core website.
Check and apply the config file:
sudo nginx -t
sudo nginx -s reload
Now, start your ASP.NET Core website, you will be able to access your Raspberry Pi using port 80.
dotnet Empower.dll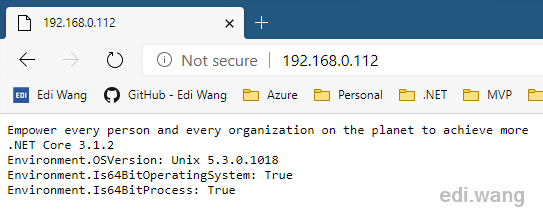
Now we have one last step to go, make dotnet process auto-restart in case your code accidentally blow up. To do that, we will create a systemd service.
sudo nano /etc/systemd/system/kestrel-empowerapp.serviceWith the following content:
[Unit]
Description=ASP.NET Core App - Empower

[Service]
WorkingDirectory=/home/pi/dotnet-playground/empower/portable-fdd
ExecStart=/home/pi/dotnet-arm64/dotnet /home/pi/dotnet-playground/empower/portable-fdd/Empower.dll
Restart=always
# Restart service after 10 seconds if the dotnet service crashes:
RestartSec=10
KillSignal=SIGINT
SyslogIdentifier=dotnet-empower
User=pi
Environment=ASPNETCORE_ENVIRONMENT=Production
Environment=DOTNET_PRINT_TELEMETRY_MESSAGE=false

[Install]
WantedBy=multi-user.target
Note, we can only use absolute path in systemd configuation.
Register and start the service:
sudo systemctl enable kestrel-empowerapp.service
sudo systemctl start kestrel-empowerapp.service
sudo systemctl status kestrel-empowerapp.service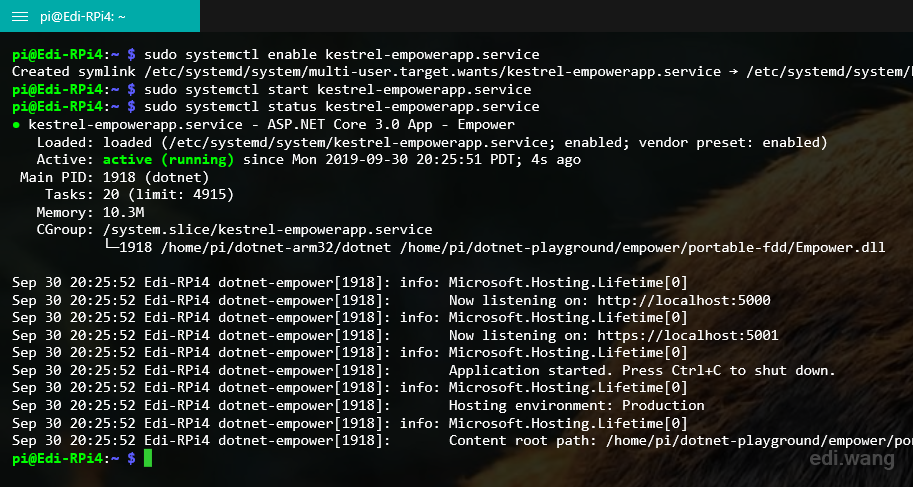
Now, you have the auto start and failure restart capability for your ASP.NET Core 3.0 application running on Raspberry Pi 4. Try to reboot your Raspberry Pi, your website will auto start! It is a web server now!
For more configuration details, you can refer to Microsoft official document here.
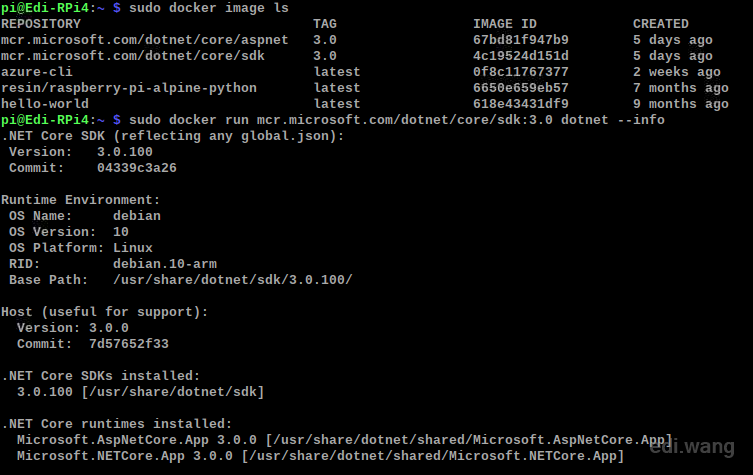
Want Docker?
There are Microsoft official docker images supporting ARM32 on Raspberry Pi 4, if you managed to install docker on your Raspberry Pi 4, have fun :)
Mostafa
Thank you sooo much this was really helpful
Salie
Thanks for the guide Edi!! Very nice article.
This only started working when i used the directory /usr/share/dotnet to copy the contents of the sdk and runtime. It would give me errors when attempting dotnet run (--info and restore worked):
A fatal error occurred. The required library libhostfxr.so could not be found. If this is a self-contained application, that library should exist in [/home/pi/hello-netcore3/bin/Debug/netcoreapp3.0/]. If this is a framework-dependent application, install the runtime in the global location [/usr/share/dotnet] or use the DOTNETROOT environment variable to specify the runtime location or register the runtime location in [/etc/dotnet/installlocation].
That also means the symlink creation looks like this:
sudo ln -s /usr/share/dotnet/dotnet /usr/bin/dotnetVara
Hi,
Very nice article. Can we install the same in Raspberry Pi 3
Seb
Once in .profile use control+x to exit and you will be promoted to save.
Thanks :)
Luke
It would be worth adding to the guide the app called screen. What screen does is create detachable instances for the Pi. So you can log in via SSH, start a screen and start your server then detach the screen. You can then close the SSH without the server stopping. It's super useful if you are going to run console applications like Discord Bots on your Pi. You can even share screens and access them from multiple computers.
Install: sudo apt-get install screen
To make a screen: screen
To see the list of screens: screen -list
To reconnect screen -r <number from list>
To end the screen(connect to screen) CTRL+A then Shift+K then confirm with "y" press <ENTER KEY>
Ivan Farkas
Ubuntu Server 19.10.1 (https://ubuntu.com/download/raspberry-pi) successfully installed on Raspberry Pi 4. I also installed .NET Core 3.1.1 SDK. All running fine.
I was not able to install any of the desktop managers like ubuntu-desktop yet. It reports a Kernel failure on boot.
James
Thanks for the guide, for some reason I keep getting kestrel errors though with Permission Denied on the Socket Exception. I tried sudo dotnet .dll and that wouldn't go either.
Daniel
Thanks for this nice explanation. I have successfully installed the .Net SDK and the ASP .Net RunTime. Focusing on this sentence, and take in consideration I do not have Web Experience. "In a more real-world scenario. You just can't develop complex .NET Core applications without an IDE on Raspbain" I created a blank WebApi or an MVC App in Visual Studio on my Windows Laptop. When I go publish I cannot get to the Portable FDD screen. How do I get there?
Daniel
Still Daniel from the comment above: Turns out the Visual Studio 2017 is pretty different of the 2019 when it comes to interface docker...After some much mock around I decided to upgrade my VS to 2019 version, and follow the tutorial everything worked perfectly!
Daniel
Same Daniel from above: Mate, I have a question how can I handle request to other pages. For example, this http://localhost:5000/Home/Privacy works, but if I do <IP>/Home/Privacy it fails. Cheers
David
Your roadmap helped me to construct a REST service on a RaspberryPi3+. In retrospect, the screen captures provided offered assurances, unlike some other sites with numerous typo's, that the instructions provided were valid. I am trying to compare the response times of a .net core provided REST web service vs a Python 3+ web service. I suspect the Python version will be faster, but still it is nice to know how to the same in ASP net core.
Peter T
Thanks for a great guide. It has helped me lots. Keep up the good work.
Deastery
Thank you a lot, this saved me so much time and headaches, works perfectly for my raspberry pi 3B+
Pedro L.
Thanks for the tutorial, really neat!
I'm getting - "Illegal instruction" error after rebooting my raspberry pi and trying to run command "dotnet --info" or anything else related. Any ideia why this might be?
Pedro L.
I'm getting this error when trying to start my app after configuring nginx proxy ports.
System.IO.IOException: Failed to bind to address http://127.0.0.1:5000: address already in use.
Anyone else with this problem?
Chris
Thank you so much! Got me up and running in no time. Just one thing to note, when I tried running the [sudo systemctl start myservice.service] I got the error "System has not been booted with systemd as init system (PID 1)". When I looked online almost all of the troubleshooting solutions were for a WSL environment. The solution I found was adding init=/bin/systemd to the /boot/cmdline.txt and then doing a sudo reboot It worked a treat. Source: https://raspberrypi.stackexchange.com/questions/103458/cant-use-sudo-systemctl-start-myservice
Charles Gallo
Thanks. This really helped when first setting up Now I've got it running Self Contained and it is working great.
SC
Thank you. Incredibly useful write-up. Do you have any idea how to get sqlite working in connection with .net core on the rpi?
Hermann
Thank you very much for this guide. I would like to publish an asp.Net Core web API. But I can not reach the default api-template on localhost:5001. dotnet--info is ansering correctly. But now connection to localhost:5001 on the browser.
Piotr
Thanks, working perfectly :)
Antonio
You are an HERO
Noname
Thanks!