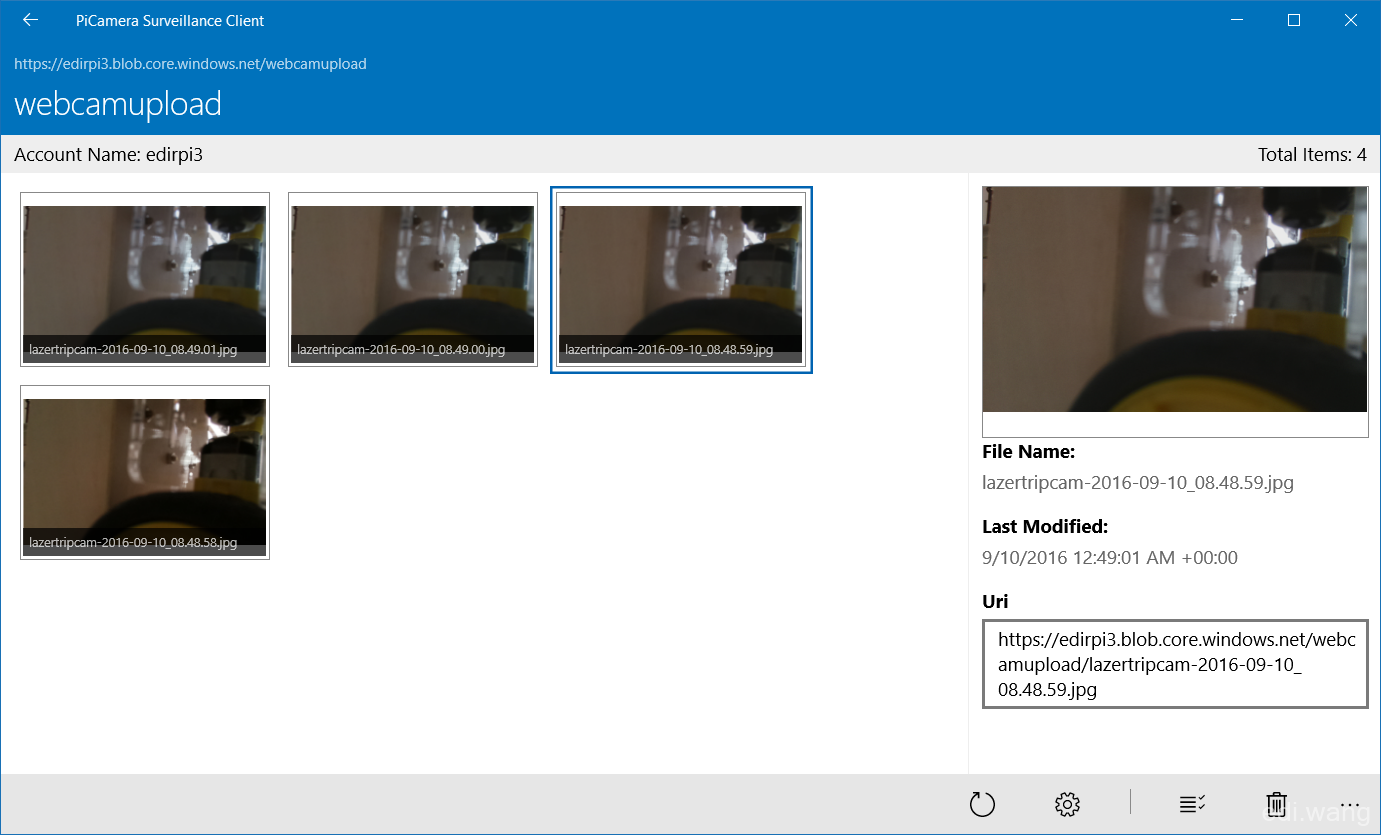
I wrote a post about Raspberry Pi Surveillance Camera with Linux and Azure, it was using an ASP.NET website for displaying the photos. I made an UWP client App these days, you can download from here
https://www.microsoft.com/store/apps/9nblgggzfnv0 (Because WP is already finished, so I don't provide Windows 10 Mobile package)

It doesn't allow upload photos, because the photos should all come from Raspberry Pi, not your PC. However, it supports multiple selection and deleting the photo.
I don't intend to open source the entire solution, but I still got something to share with you.
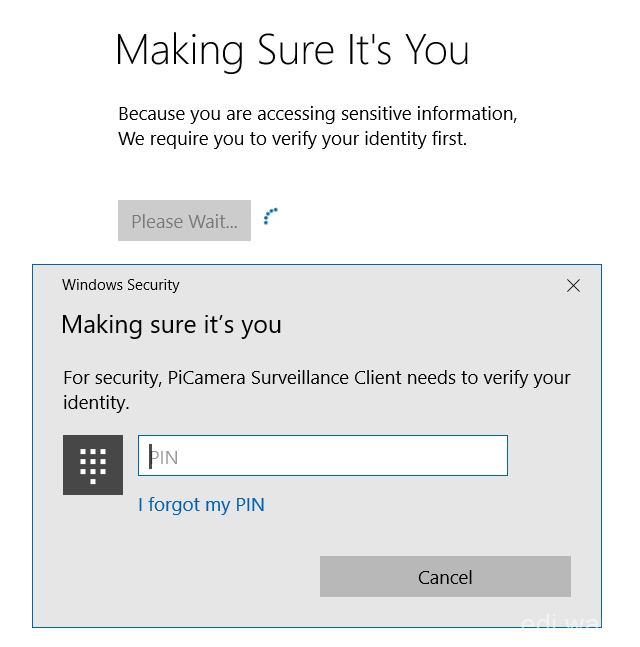
First, How to Sign In with PIN
This functionality is achieved by Microsoft Passport

XAML Code:
<StackPanel HorizontalAlignment="Center" Margin="0,60,0,0">
            <TextBlock Text="Making Sure It's You" Style="{StaticResource SubheaderTextBlockStyle}" Margin="0,0,0,20" />
            <TextBlock Text="Because you are accessing sensitive information, " />
            <TextBlock Text="We require you to verify your identity first." />

            <Border x:Name="BrdNotSetupMessage" BorderThickness="1" BorderBrush="Red" Padding="10" Margin="0,20,0,0" Visibility="Collapsed">
                <StackPanel>
                    <TextBlock Text="Microsoft Passport is not setup!" Foreground="Red" />
                    <TextBlock Text="Please go to Windows Settings and set up a PIN to use it." Foreground="Red" />
                </StackPanel>
            </Border>

            <Border x:Name="BrdFailed" BorderThickness="1" BorderBrush="Red" Padding="10" Margin="0,20,0,0" Visibility="Collapsed">
                <StackPanel>
                    <TextBlock Text="Validation Failed" Foreground="Red" />
                    <TextBlock Text="Please use the correct PIN to unlock the Application" Foreground="Red" />
                </StackPanel>
            </Border>

            <StackPanel Orientation="Horizontal" Margin="0,40,0,0">
                <Button Content="It's Me"
                    x:Name="BtnVerify" Click="BtnVerify_OnClick"
                    Background="{StaticResource SystemControlBackgroundAccentBrush}" Foreground="White" />
                <ProgressRing x:Name="Prg" Margin="10,0,0,0" />
            </StackPanel>
        </StackPanel>
XAML.cs Code:
protected override async void OnNavigatedTo(NavigationEventArgs e)
{
    if (!await MicrosoftPassportHelper.MicrosoftPassportAvailableCheckAsync())
    {
        BrdNotSetupMessage.Visibility = Visibility.Visible;
        BtnVerify.IsEnabled = false;
    }
}

private async void BtnVerify_OnClick(object sender, RoutedEventArgs e)
{
    Prg.IsActive = true;
    BrdFailed.Visibility = Visibility.Collapsed;
    BtnVerify.IsEnabled = false;
    BtnVerify.Content = "Please Wait...";
    var result = await MicrosoftPassportHelper.CreatePassportKeyAsync("default");
    if (result)
    {
        Frame.Navigate(typeof(MainPage));
    }
    else
    {
        BtnVerify.Content = "Try Again";
        BrdFailed.Visibility = Visibility.Visible;
        BtnVerify.IsEnabled = true;
    }
    Prg.IsActive = false;
}
The core functionality is this Class:
public static class MicrosoftPassportHelper
    {
        /// <summary>
        /// Checks to see if Passport is ready to be used.
        ///
        /// Passport has dependencies on:
        ///     1. Having a connected Microsoft Account
        ///     2. Having a Windows PIN set up for that _account on the local machine
        /// </summary>
        public static async Task<bool> MicrosoftPassportAvailableCheckAsync()
        {
            bool keyCredentialAvailable = await KeyCredentialManager.IsSupportedAsync();
            if (keyCredentialAvailable == false)
            {
                // Key credential is not enabled yet as user
                // needs to connect to a Microsoft Account and select a PIN in the connecting flow.
                Debug.WriteLine("Microsoft Passport is not setup!\nPlease go to Windows Settings and set up a PIN to use it.");
                return false;
            }

            return true;
        }

        /// <summary>
        /// Creates a Passport key on the machine using the _account id passed.
        /// </summary>
        /// <param name="accountId">The _account id associated with the _account that we are enrolling into Passport</param>
        /// <returns>Boolean representing if creating the Passport key succeeded</returns>
        public static async Task<bool> CreatePassportKeyAsync(string accountId)
        {
            KeyCredentialRetrievalResult keyCreationResult = await KeyCredentialManager.RequestCreateAsync(accountId, KeyCredentialCreationOption.ReplaceExisting);

            switch (keyCreationResult.Status)
            {
                case KeyCredentialStatus.Success:
                    Debug.WriteLine("Successfully made key");

                    // In the real world authentication would take place on a server.
                    // So every time a user migrates or creates a new Microsoft Passport account Passport details should be pushed to the server.
                    // The details that would be pushed to the server include:
                    // The public key, keyAttesation if available,
                    // certificate chain for attestation endorsement key if available,
                    // status code of key attestation result: keyAttestationIncluded or
                    // keyAttestationCanBeRetrievedLater and keyAttestationRetryType
                    // As this sample has no concept of a server it will be skipped for now
                    // for information on how to do this refer to the second Passport sample

                    //For this sample just return true
                    return true;
                case KeyCredentialStatus.UserCanceled:
                    Debug.WriteLine("User cancelled sign-in process.");
                    break;
                case KeyCredentialStatus.NotFound:
                    // User needs to setup Microsoft Passport
                    Debug.WriteLine("Microsoft Passport is not setup!\nPlease go to Windows Settings and set up a PIN to use it.");
                    break;
                default:
                    break;
            }

            return false;
        }
    }
Windows will automatically popup a window to validate PIN for us.
How to do Multiple Selection Mode for GridView in MVVM
In normal situation, the SelectedItems property of GridView can not be binded to a collection property. We have to do it this way:
1. Install a NuGet package by
"Microsoft.Xaml.Behaviors.Uwp.Managed"
2. Add a Converter:
public class SelectionChangedConverter: IValueConverter
{
    public object Convert(object value, Type targetType, object parameter, string language)
    {
        var gv = parameter as GridView;
        if (gv == null) throw new ArgumentNullException(nameof(gv));
        return gv.SelectedItems;
    }

    public object ConvertBack(object value, Type targetType, object parameter, string language)
    {
        throw new NotImplementedException();
    }
}
3. Add XAML Code:
<GridView x:Name="GrdResults" ItemsSource="{Binding ListBlobItems}" ......>
                    <interactivity:Interaction.Behaviors>
                        <core:EventTriggerBehavior EventName="SelectionChanged">
                            <core:InvokeCommandAction Command="{Binding SelectionChangedCommand}"
                                      InputConverter="{StaticResource SelectionChangedConverter}"
                                      InputConverterParameter="{Binding ElementName=GrdResults}" />
                        </core:EventTriggerBehavior>
                    </interactivity:Interaction.Behaviors>
....
</GridView>
4. The ViewModel code:
private RelayCommand<IList<object>> _selectionChangedCommand;

public RelayCommand<IList<object>> SelectionChangedCommand
{
    get
    {
        return _selectionChangedCommand ?? (_selectionChangedCommand = new RelayCommand<IList<object>>(
                   items =>
                   {
                       SelectedImages.Clear();
                       foreach (object item in items)
                       {
                           var img = item as BlobImage;
                           if (null != img)
                           {
                               SelectedImages.Add(img);
                           }
                       }
                       IsDeleteButtonEnabled = SelectedImages.Any();
                   }
               ));
    }
}
The "SelectedImages" is the collection that we want to bind to:
public ObservableCollection<BlobImage> SelectedImages
{
    get { return _selectedImages; }
    set
    {
        _selectedImages = value;
        RaisePropertyChanged();
    }
}
Creeper Lv
就是一个勾选移动设备而已,,,生成一个ARM的包,为何不支持Win10M?
one
博主,您这个网站的界面是使用了开源的还是自己设计的么?我可以模仿着来么? 谢谢