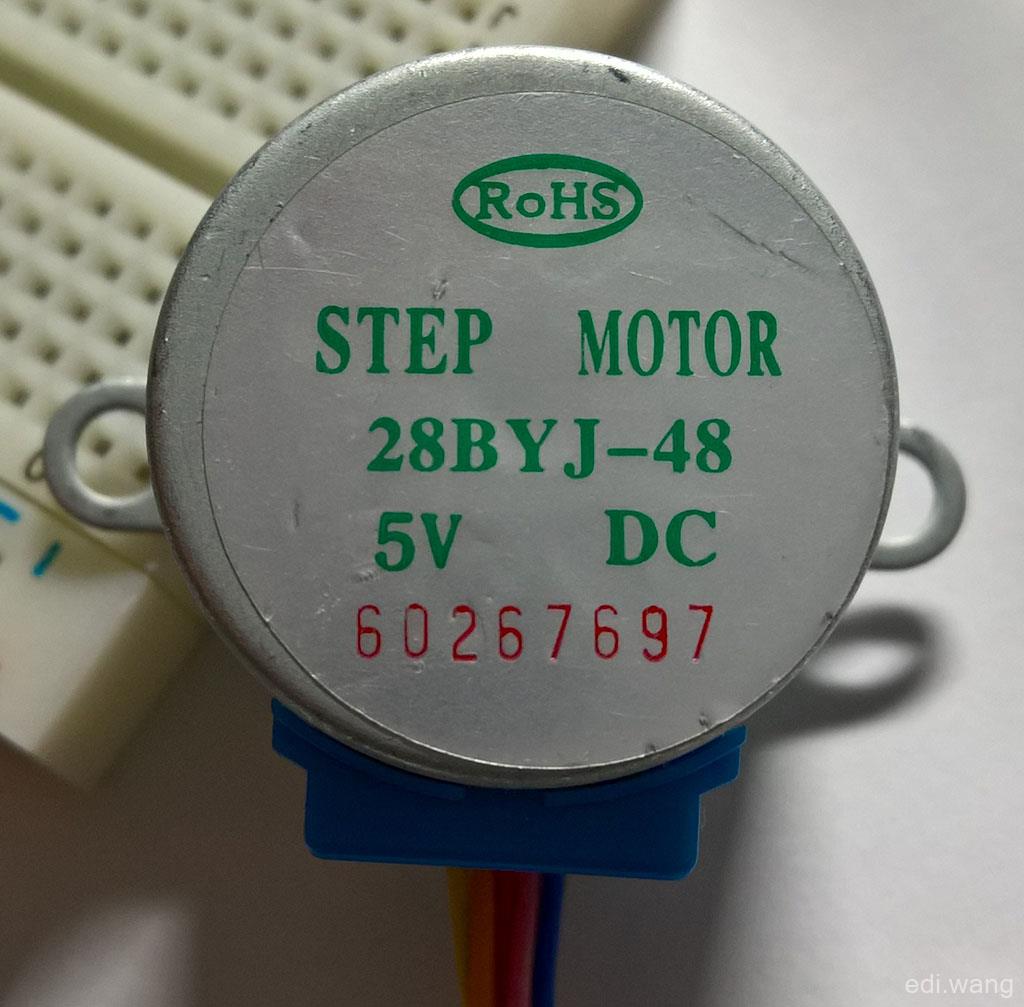
If you need to precisely control the rotation angle of the equipment, ordinary motors can't do it, usually we use stepper motors. For example, the 28BYJ-48 model is easy to buy.
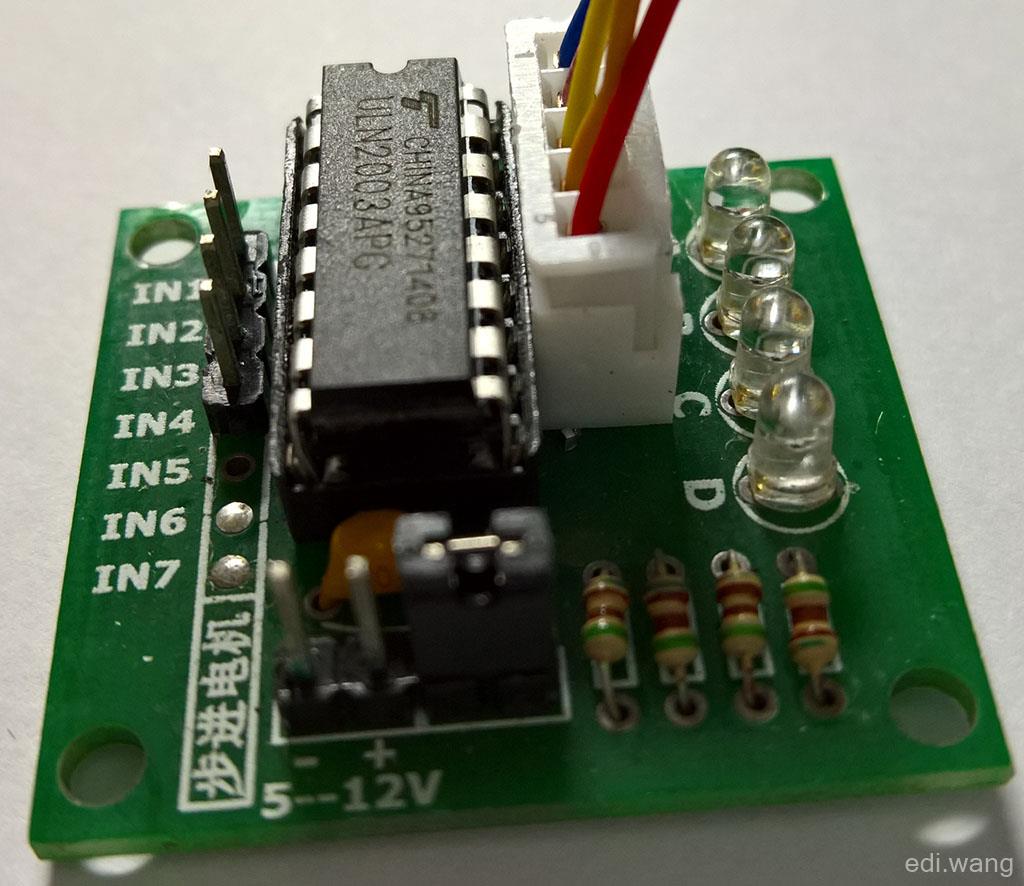
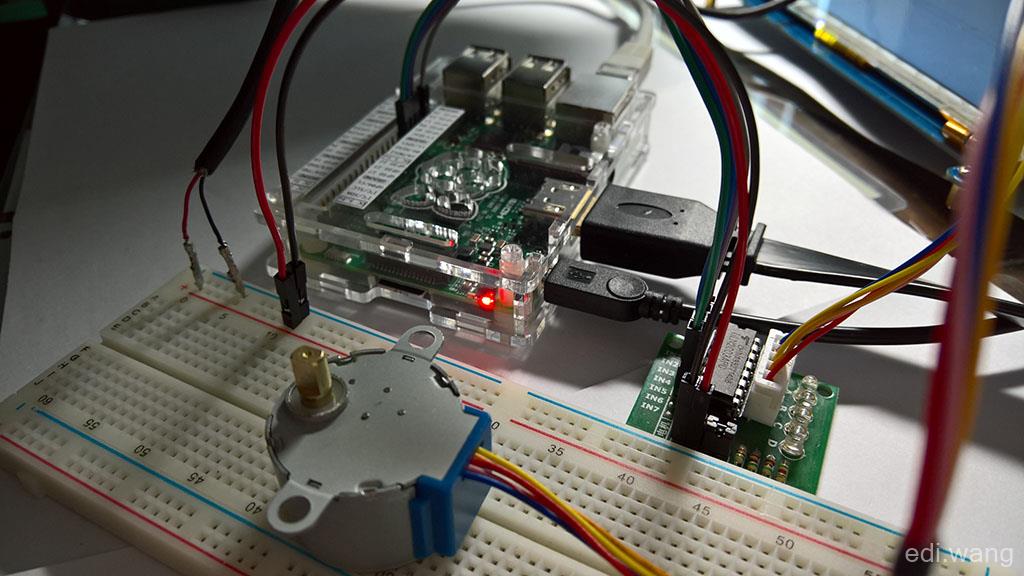
The stepper motor has to be used with the driver board, and the most commonly used is the driver board ULN2003 the chip, as shown in the figure below. However, note that the driver board you buy may not look the same, but it doesn't matter, as long as the chip is written on the ULN2003, you can use it, and their interfaces are the same. For the principle of stepper motor, you can see this: https://en.wikipedia.org/wiki/Stepper_motor
After getting the driver board and stepper motor, insert the motor into the white slot of the driver board, this interface has a foolproof design, so it will not be plugged in backwards.
There's a great article in English about how Windows 10 IoT drives stepper motors:
https://www.hackster.io/erickbp/stepper-motor-and-windows-10-iot-core-d3c5d6
My example is an improvement and addition based on the article above.
1. Physical Connection
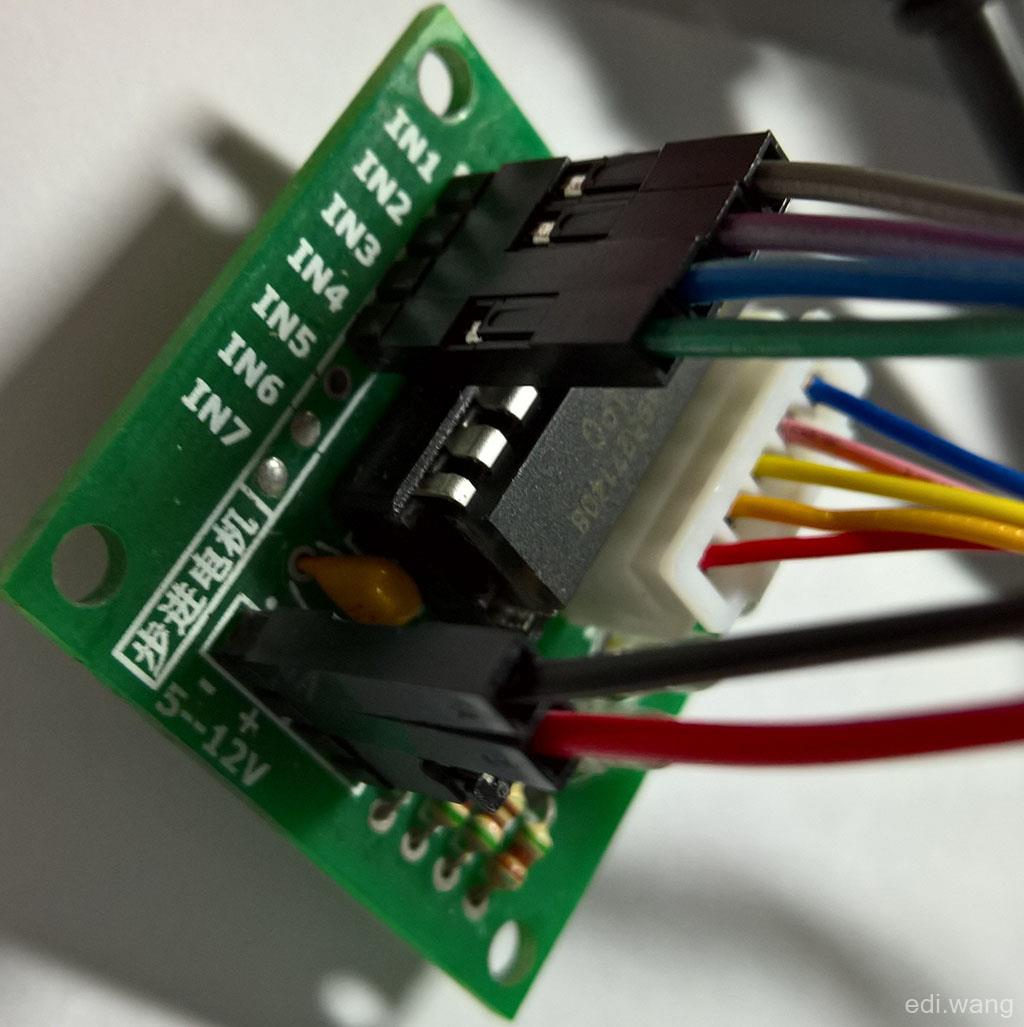
First of all, it is not recommended to connect the 5V power supply of the stepper motor driver board to the 5V output of the Raspberry Pi, the Raspberry Pi will report a low voltage prompt when it is running, if you have any other devices connected to the Raspberry Pi, it is likely to cause the machine to restart. Therefore, it is recommended that you use an external 5v power supply, the positive and negative poles can be completely independent, and the negative pole can not be connected to the GND of the Raspberry Pi, which is not the same as what is said in the English information. I don't know if it will explode, though. I didn't blow up anyway.
The external power supply I use is a waste USB mouse cable, and the output of USB is 5v, which is the most convenient.
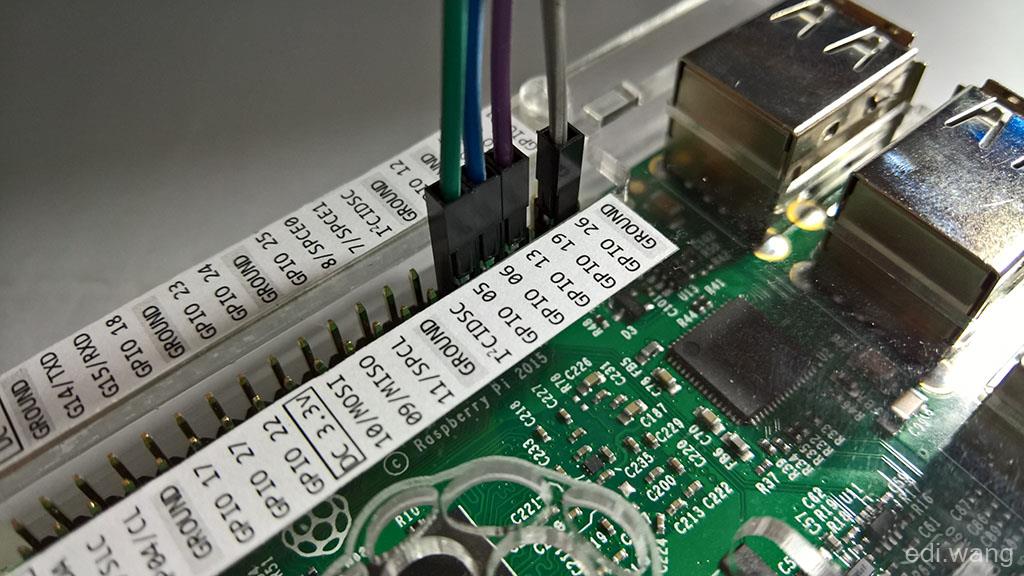
After connecting the power supply, use 4 wires to connect IN1-IN4 to the GPIO port of Raspberry Pi, the correspondence is as follows (of course, you can change it yourself, and the program should also be modified accordingly):
| Driver board port | Raspberry Pi port |
|---|---|
| IN1 | GPIO 26 |
| IN2 | GPIO 13 |
| IN3 | GPIO 6 |
| IN4 | GPIO 5 |
2. Write Code
The original code is here: https://github.com/erickbp/IoT/blob/master/Stepper%20Motor/Stepper%20Motor/Uln2003Driver.cs
I made some improvements. Post the full code first:
using System;
using System.Diagnostics;
using System.Threading;
using System.Threading.Tasks;
using Windows.Devices.Gpio;

namespace Uln2003StepMotor
{
    public class Uln2003Driver : IDisposable
    {
        public int IntervalMs { get; set; }

        private readonly GpioPin[] _gpioPins = new GpioPin[4];

        private readonly GpioPinValue[][] _waveDriveSequence =
        {
            new[] {GpioPinValue.High, GpioPinValue.Low, GpioPinValue.Low, GpioPinValue.Low},
            new[] {GpioPinValue.Low, GpioPinValue.High, GpioPinValue.Low, GpioPinValue.Low},
            new[] {GpioPinValue.Low, GpioPinValue.Low, GpioPinValue.High, GpioPinValue.Low},
            new[] {GpioPinValue.Low, GpioPinValue.Low, GpioPinValue.Low, GpioPinValue.High}
        };

        private readonly GpioPinValue[][] _fullStepSequence =
        {
            new[] {GpioPinValue.High, GpioPinValue.Low, GpioPinValue.Low, GpioPinValue.High},
            new[] {GpioPinValue.High, GpioPinValue.High, GpioPinValue.Low, GpioPinValue.Low},
            new[] {GpioPinValue.Low, GpioPinValue.High, GpioPinValue.High, GpioPinValue.Low},
            new[] {GpioPinValue.Low, GpioPinValue.Low, GpioPinValue.High, GpioPinValue.High }

        };

        private readonly GpioPinValue[][] _halfStepSequence =
        {
            new[] {GpioPinValue.High, GpioPinValue.High, GpioPinValue.Low, GpioPinValue.Low, GpioPinValue.Low, GpioPinValue.Low, GpioPinValue.Low, GpioPinValue.High},
            new[] {GpioPinValue.Low, GpioPinValue.High, GpioPinValue.High, GpioPinValue.High, GpioPinValue.Low, GpioPinValue.Low, GpioPinValue.Low, GpioPinValue.Low},
            new[] {GpioPinValue.Low, GpioPinValue.Low, GpioPinValue.Low, GpioPinValue.High, GpioPinValue.High, GpioPinValue.High, GpioPinValue.Low, GpioPinValue.Low},
            new[] {GpioPinValue.Low, GpioPinValue.Low, GpioPinValue.Low, GpioPinValue.Low, GpioPinValue.Low, GpioPinValue.High, GpioPinValue.High, GpioPinValue.High }
        };

        public Uln2003Driver(GpioController gpioController,
            int wireIn1, int wireIn2, int wireIn3, int wireIn4,
            GpioSharingMode sharingMode = GpioSharingMode.Exclusive, int intervalMs = 5)
        {
            var gpio = gpioController ?? GpioController.GetDefault();

            _gpioPins[0] = gpio.OpenPin(wireIn1, sharingMode);
            _gpioPins[1] = gpio.OpenPin(wireIn2, sharingMode);
            _gpioPins[2] = gpio.OpenPin(wireIn3, sharingMode);
            _gpioPins[3] = gpio.OpenPin(wireIn4, sharingMode);

            foreach (var gpioPin in _gpioPins)
            {
                gpioPin.Write(GpioPinValue.Low);
                gpioPin.SetDriveMode(GpioPinDriveMode.Output);
            }

            IntervalMs = intervalMs;
        }

        public async Task TurnAsync(TurnDirection direction, CancellationToken ct,
            DrivingMethod drivingMethod = DrivingMethod.FullStep)
        {
            bool stop = false;
            GpioPinValue[][] methodSequence;
            switch (drivingMethod)
            {
                case DrivingMethod.WaveDrive:
                    methodSequence = _waveDriveSequence;
                    break;
                case DrivingMethod.FullStep:
                    methodSequence = _fullStepSequence;
                    break;
                case DrivingMethod.HalfStep:
                    methodSequence = _halfStepSequence;
                    break;
                default:
                    throw new ArgumentOutOfRangeException(nameof(drivingMethod), drivingMethod, null);
            }
            while (!stop)
            {
                for (var j = 0; j < methodSequence[0].Length; j++)
                {
                    for (var i = 0; i < 4; i++)
                    {
                        _gpioPins[i].Write(methodSequence[direction == TurnDirection.Right ? i : 3 - i][j]);
                    }

                    // don't pass cancellation token, will blow up.
                    await Task.Delay(IntervalMs);

                    if (ct.IsCancellationRequested)
                    {
                        Debug.WriteLine("Cancel Requested, stop now.");
                        stop = true;
                        break;
                    }
                }
            }

            Stop();
        }

        public async Task TurnAsync(int degree, TurnDirection direction, CancellationToken ct,
            DrivingMethod drivingMethod = DrivingMethod.FullStep)
        {
            var steps = 0;
            GpioPinValue[][] methodSequence;
            switch (drivingMethod)
            {
                case DrivingMethod.WaveDrive:
                    methodSequence = _waveDriveSequence;
                    steps = (int)Math.Ceiling(degree / 0.1767478397486253);
                    break;
                case DrivingMethod.FullStep:
                    methodSequence = _fullStepSequence;
                    steps = (int)Math.Ceiling(degree / 0.1767478397486253);
                    break;
                case DrivingMethod.HalfStep:
                    methodSequence = _halfStepSequence;
                    steps = (int)Math.Ceiling(degree / 0.0883739198743126);
                    break;
                default:
                    throw new ArgumentOutOfRangeException(nameof(drivingMethod), drivingMethod, null);
            }
            var counter = 0;
            while (counter < steps)
            {
                for (var j = 0; j < methodSequence[0].Length; j++)
                {
                    for (var i = 0; i < 4; i++)
                    {
                        _gpioPins[i].Write(methodSequence[direction == TurnDirection.Right ? i : 3 - i][j]);
                    }

                    // don't pass cancellation token, will blow up.
                    await Task.Delay(IntervalMs);

                    if (ct.IsCancellationRequested)
                    {
                        Debug.WriteLine("Cancel Requested, stop now.");
                        counter = steps;
                    }
                    else
                    {
                        counter++;
                    }

                    if (counter == steps)
                    {
                        break;
                    }
                }
            }

            Stop();
        }

        public void Stop()
        {
            foreach (var gpioPin in _gpioPins)
            {
                gpioPin.Write(GpioPinValue.Low);
            }
        }

        public void Dispose()
        {
            foreach (var gpioPin in _gpioPins)
            {
                gpioPin.Write(GpioPinValue.Low);
                gpioPin.Dispose();
            }
        }
    }

    public enum DrivingMethod
    {
        WaveDrive,
        FullStep,
        HalfStep
    }

    public enum TurnDirection
    {
        Left,
        Right
    }
}
The improvements are:
1. CancellationToken is added to the TurnAsync method, which can be force stop the rotation.
public async Task TurnAsync(int degree, TurnDirection direction, CancellationToken ct,
    DrivingMethod drivingMethod = DrivingMethod.FullStep)
// don't pass cancellation token, will blow up.
await Task.Delay(IntervalMs);
if (ct.IsCancellationRequested)
{
Debug.WriteLine("Cancel Requested, stop now.");
counter = steps;
}
else
{
counter++;
}2. TurnAsync adds a reload for rotating in one direction without specifying an angle. Then stop with a CancellationToken.
public async Task TurnAsync(TurnDirection direction, CancellationToken ct,
    DrivingMethod drivingMethod = DrivingMethod.FullStep)
Usage
XAML
<Button x:Name="BtnLeftForever" Content="Trun Left Forever" Click="BtnLeftForever_OnClick" />

<Button x:Name="BtnLeft90" Content="Turn Left 90" Click="BtnLeft90_OnClick" Margin="0,10,0,0" />
<Button x:Name="BtnRight90" Content="Turn Right 90" Margin="0,10,0,0" Click="BtnRight90_OnClick" />
<Button x:Name="BtnStop" Content="Stop" Margin="0,10,0,0" Click="BtnStop_OnClick"/>

<TextBox Text="10" Header="Degree" x:Name="TxtDegree" />
<Button x:Name="TurnDegree" Click="TurnDegree_OnClick" Content="Trun Left" />
Backend
public sealed partial class MainPage : Page
{
    public CancellationTokenSource Cts { get; private set; }

    public Uln2003Driver Uln2003Driver { get; set; }

    public MainPage()
    {
        this.InitializeComponent();
        var controller = GpioController.GetDefault();
        Uln2003Driver = new Uln2003Driver(controller, 26, 13, 6, 5);
    }

    private async Task TurnMotor(int degree, TurnDirection direction)
    {
        Cts = new CancellationTokenSource();
        await Uln2003Driver.TurnAsync(degree, direction, Cts.Token);
    }

    private async void BtnLeft90_OnClick(object sender, RoutedEventArgs e)
    {
        await TurnMotor(90, TurnDirection.Left);
    }

    private async void BtnRight90_OnClick(object sender, RoutedEventArgs e)
    {
        await TurnMotor(90, TurnDirection.Right);
    }

    private async void TurnDegree_OnClick(object sender, RoutedEventArgs e)
    {
        await TurnMotor(int.Parse(TxtDegree.Text), TurnDirection.Left);
    }

    private void BtnStop_OnClick(object sender, RoutedEventArgs e)
    {
        Cts.Cancel();
    }

    private async void BtnLeftForever_OnClick(object sender, RoutedEventArgs e)
    {
        Cts = new CancellationTokenSource();
        await Uln2003Driver.TurnAsync(TurnDirection.Left, Cts.Token);
    }
}
3. Run
qin
终于换上了打印的阵脚标签
FANG G
当初被一个不知道是坏的ULN2003弄到崩溃
admin
我在TurnMotor()方法里最上面加了一行 if (Cts != null) Cts.Cancel(); 这样随便瞎按都没事啦
netsbig3
您好 很感谢您提供的例子,我在我专案的单一UWP页面上有成功的让步进马达转动 不过我在我的专案新增了第二个页面,从控制马达的页面跳到第二个页面在跳回原来的页面(控制马达的页面)时
系统出现了Exception并显示「Pin ' is currently opened in an incompatible sharing mode. Make sure this pin is not already in use by this application or another application.」的讯息
请问要如何修正这方面的错误?