防火是日常生活中非常重要的意识,如果你恰好有Windows 10的设备,比如Lumia,Surface,能及时收到火警是至(mei)关(sha)重(luan)要(yong)的。今天就教大家如何用Microsoft Azure公有云+Windows 10 IoT Core在树莓派上实现一个远程火警系统。
阅读这篇文章,你需要的前置知识:
Windows 10,UWP的基本开发能力
MVVM基础知识
ASP.NET MVC的基础知识
树莓派、GPIO及逻辑电路的基本知识(也就是大学里的计算机电路)
Azure公有云的使用经验
……当然,还要有对微软的信仰
一、设计原理
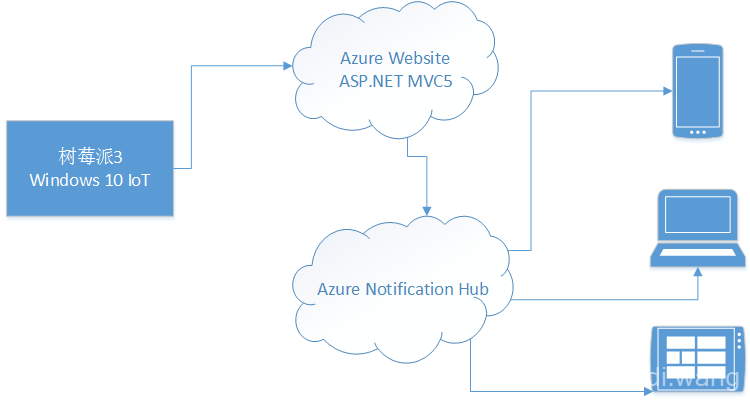
基本想法是,通过火焰传感器的输入信号,触发一个警报,把消息发送到Azure上的Notification Hub,这个服务是专门给Windows客户端推送消息的,然后就能在手机、平板、PC等各种Windows设备上弹出火警信息。
由于树莓派3上运行的是UWP程序,UWP还没有直接向Notification Hub发送消息的办法,所以得用一个ASP.NET网站帮它完成这件事。树莓派上的UWP程序先向ASP.NET网站发送请求,再由网站后台给Notification Hub发送消息,最终推送到客户端。
整个过程如下图所示:
二、树莓派的配置
树莓派3必须用预览版的Windows 10 IoT,下载和安装步骤都在这里:http://ms-iot.github.io/content/en-US/win10/GetStarted/SetUpYourDeviceManually.htm
我用的是最新的Build 14295。如何在树莓派上装WIN10 IoT的教程满天飞,我就不啰嗦了,给几个实用连接:
格式化SD卡的工具:https://www.sdcard.org/downloads/formatter_4/eula_windows/index.html
Windows 10 IoT Core的发行说明:https://ms-iot.github.io/content/en-US/win10/ReleaseNotesInsiderPreview.htm
Powershell 远程管理的命令:http://ms-iot.github.io/content/en-US/win10/samples/PowerShell.htm
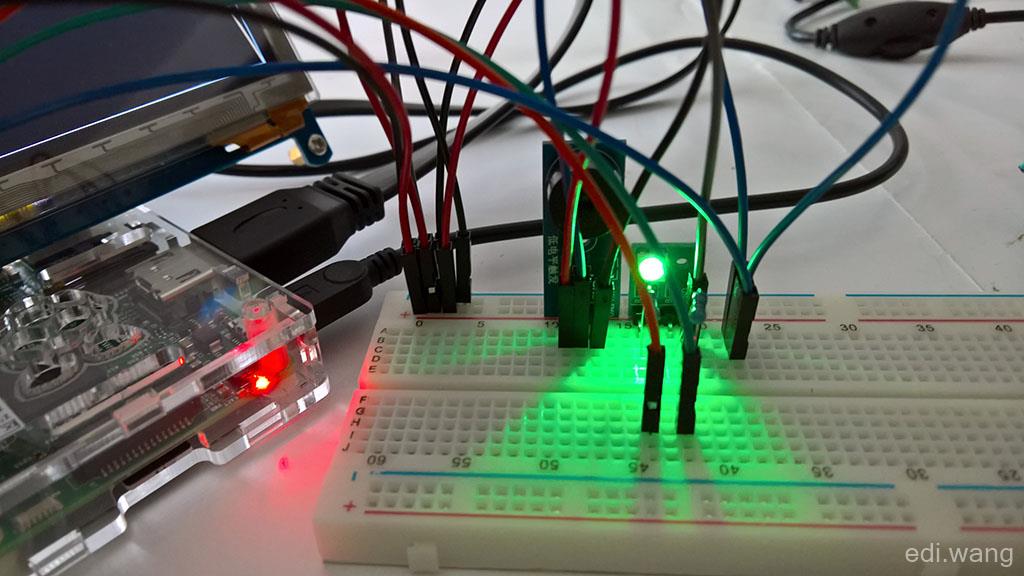
三、配件和物理连接
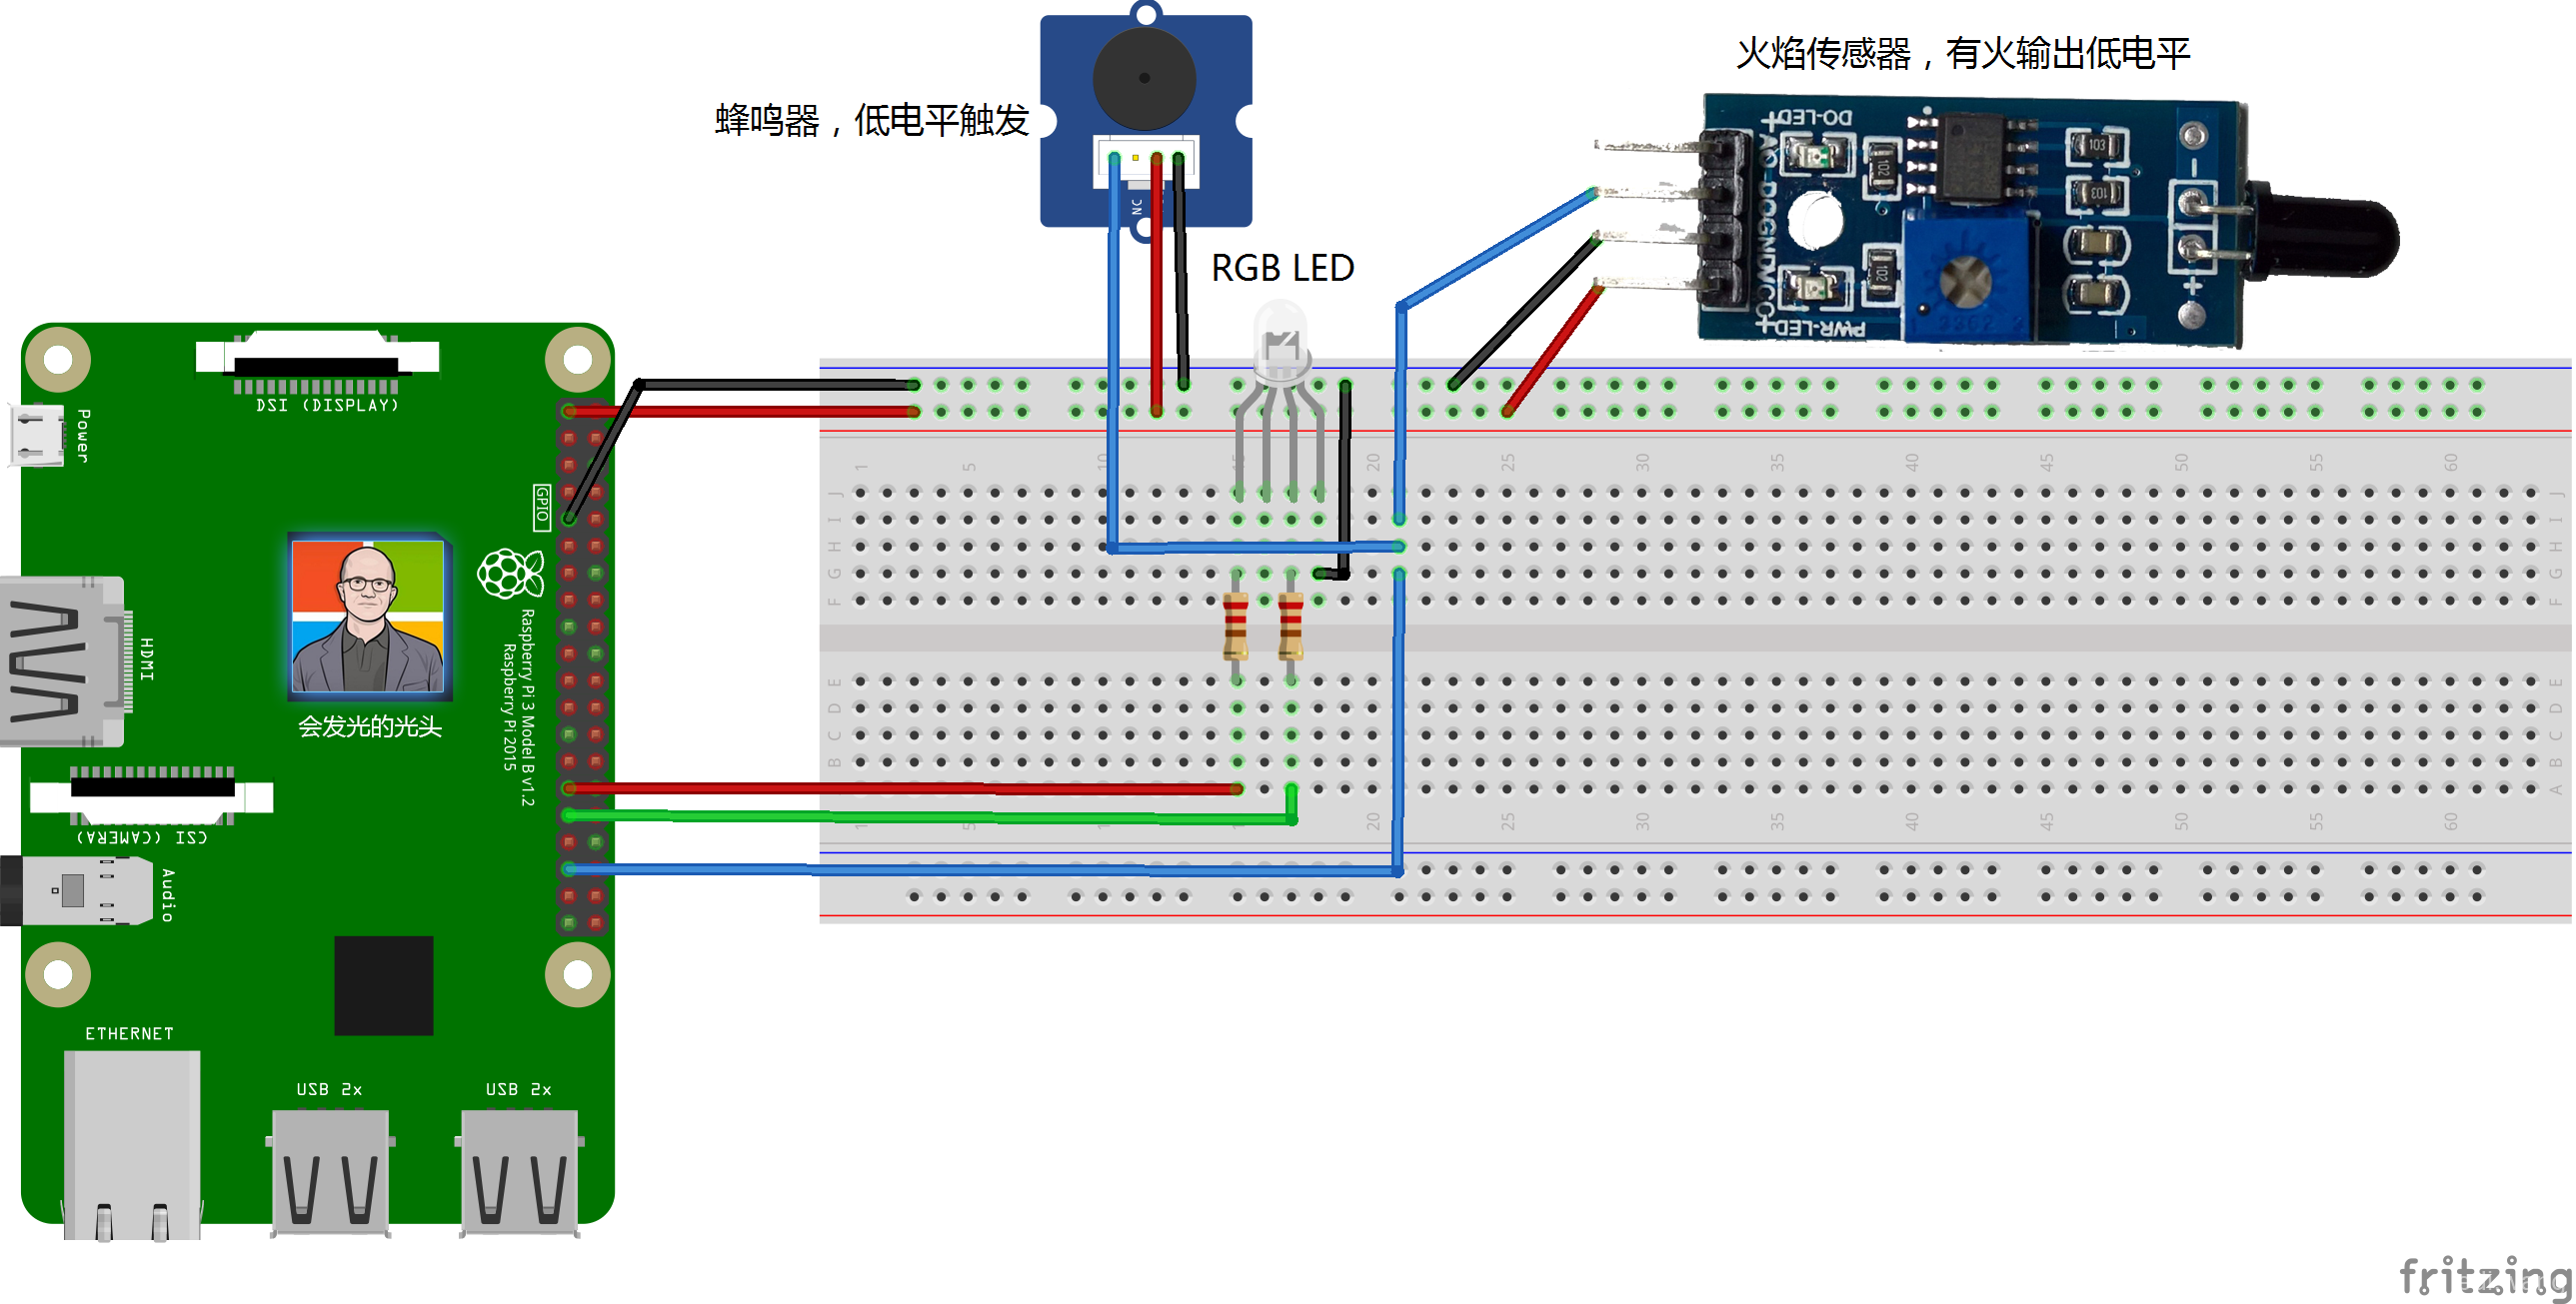
需要的配件有:
1. 蜂鸣器(低电平触发)
2. 三色LED(通用)
3. 火焰传感器(遇火焰输出低电平)
4. 面包板和杜邦线若干
5. 680欧电阻两个
为了避免广告嫌疑,购买链接不适合贴在博客文章里,大家可以自己去某宝搜。
连接方式如下图:
其中,LED的红色输入连接到GPIO 05,绿色输入连接到GPIO 06,火焰传感器的DO输出连到GPIO 19。为了简化,DO输出同时连接蜂鸣器的SIG端,这样就不用写代码触发蜂鸣器了。
三、Azure配置
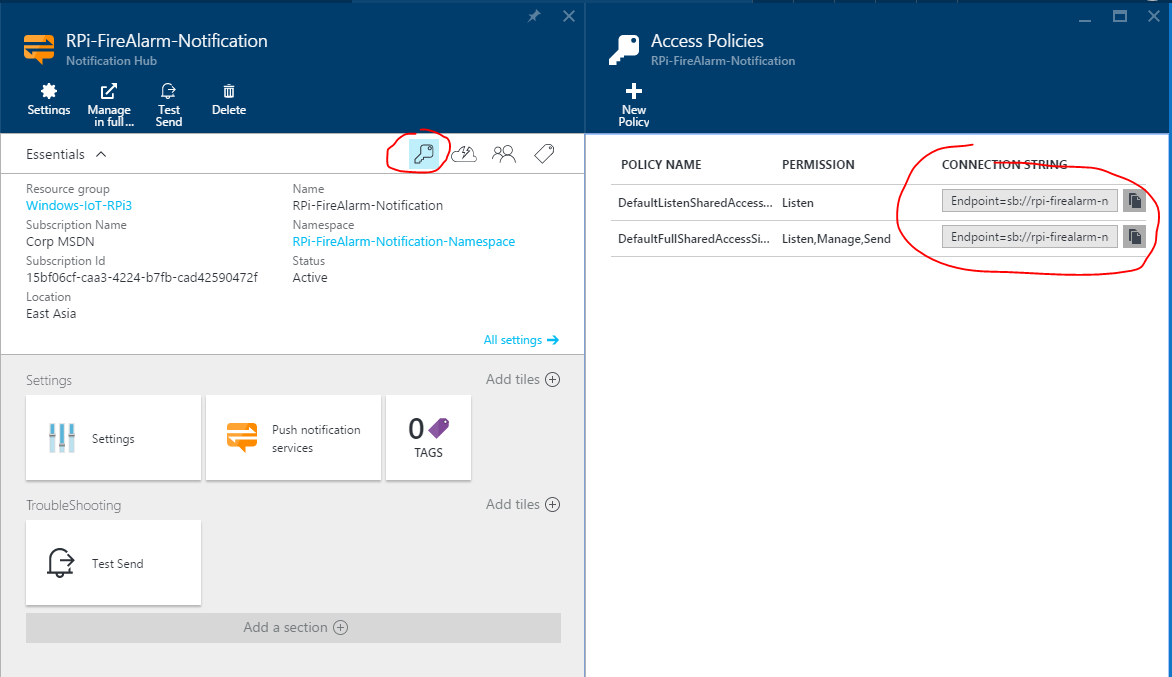
打开Azure的新版portal(https://portal.azure.com ),新建一个Notification Hub,比如:RPi-FireAlarm-Notification,记下名称和两个连接字符串,稍后要用。
这个Notification Hub推送消息是要有key的,得去Windows开发者中心新建一个App然后拿它的推送消息的key。
位置在这里:
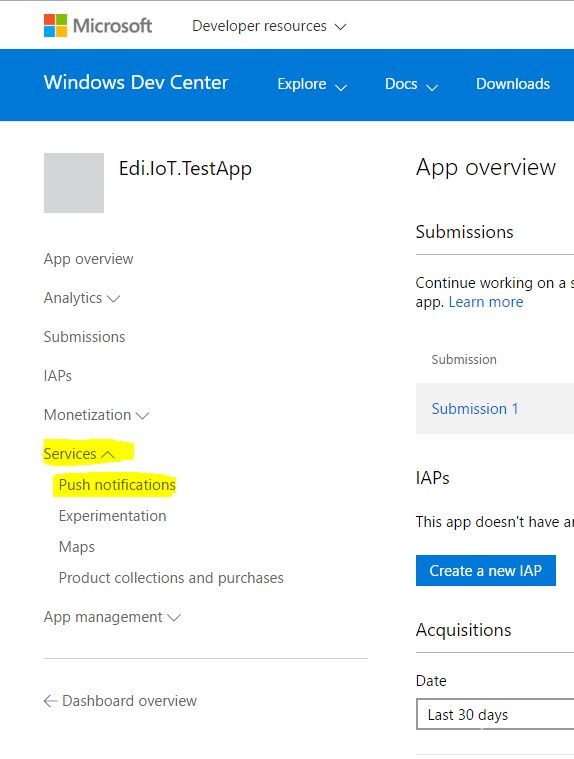
然后点 Live Serviecs Site的链接
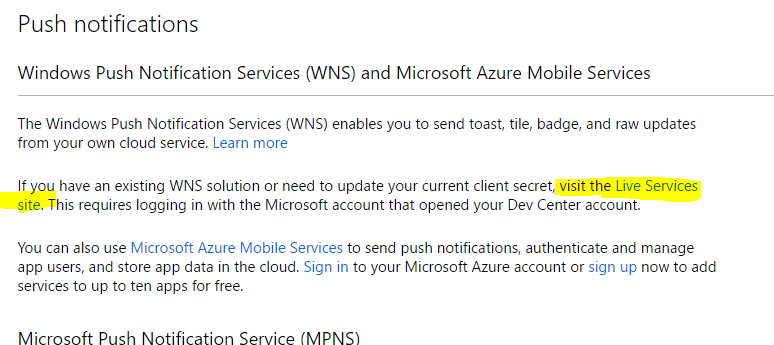
从里面拿到Application identity和Client secret的信息。
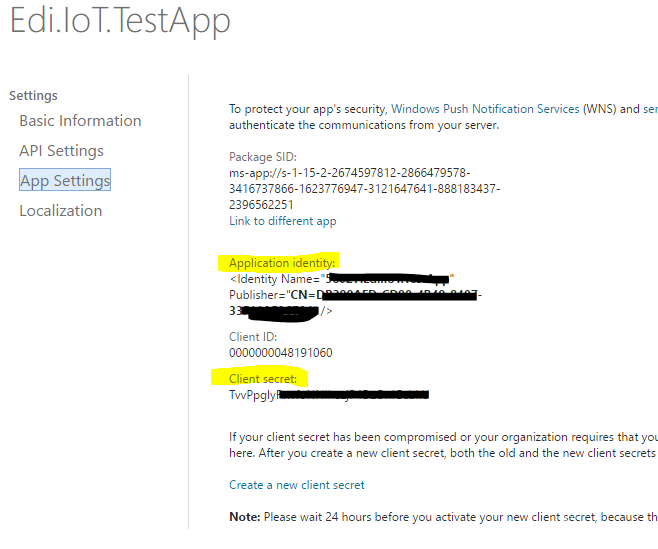
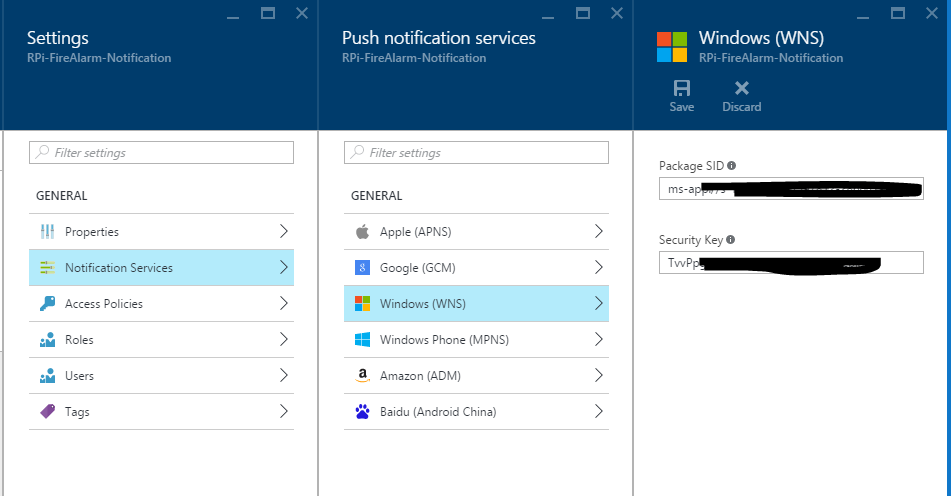
回到Azure Notification Hub,在Settings页面,选择"Notification Services",然后选择"Windows",把刚才得到的SID和Key填进去保存。
四、接受通知的客户端
用VS2015新建一个UWP工程,比如AzureFireAlarm.NotificationClient,关联到应用商店里刚刚建立的APP上,这一步很重要!!!关联的方法是在工程上点右键=>Store=>Associate App with the Store...
然后在App.xaml.cs里加入一个新方法:
private async Task InitNotificationsAsync()
{
    var channel = await PushNotificationChannelManager.CreatePushNotificationChannelForApplicationAsync();

    var hub = new NotificationHub("刚才Azure里的Notification Hub名称", "刚才Azure里的Listen连接字符串");
    var result = await hub.RegisterNativeAsync(channel.Uri);

    //// Displays the registration ID so you know it was successful
    //if (result.RegistrationId != null)
    //{
    //    var dialog = new MessageDialog("Registration successful: " + result.RegistrationId);
    //    dialog.Commands.Add(new UICommand("OK"));
    //    await dialog.ShowAsync();
    //}
}
并且在OnLaunced方法最后调用一下:
protected override async void OnLaunched(LaunchActivatedEventArgs e)
{
    .....
    if (e.PrelaunchActivated == false)
    {
        ...
        Window.Current.Activate();
    }

    await InitNotificationsAsync();
}
然后部署和启动一次这个APP,注意,这是客户端接受通知的APP,不是给树莓派用的,所以部署到自己的电脑或者手机上就好!
五、测试消息推送
回到Azure Notification Hub,点击“Test Send”,Platforms选Windows,Notification Type选Toast,然后点击Send
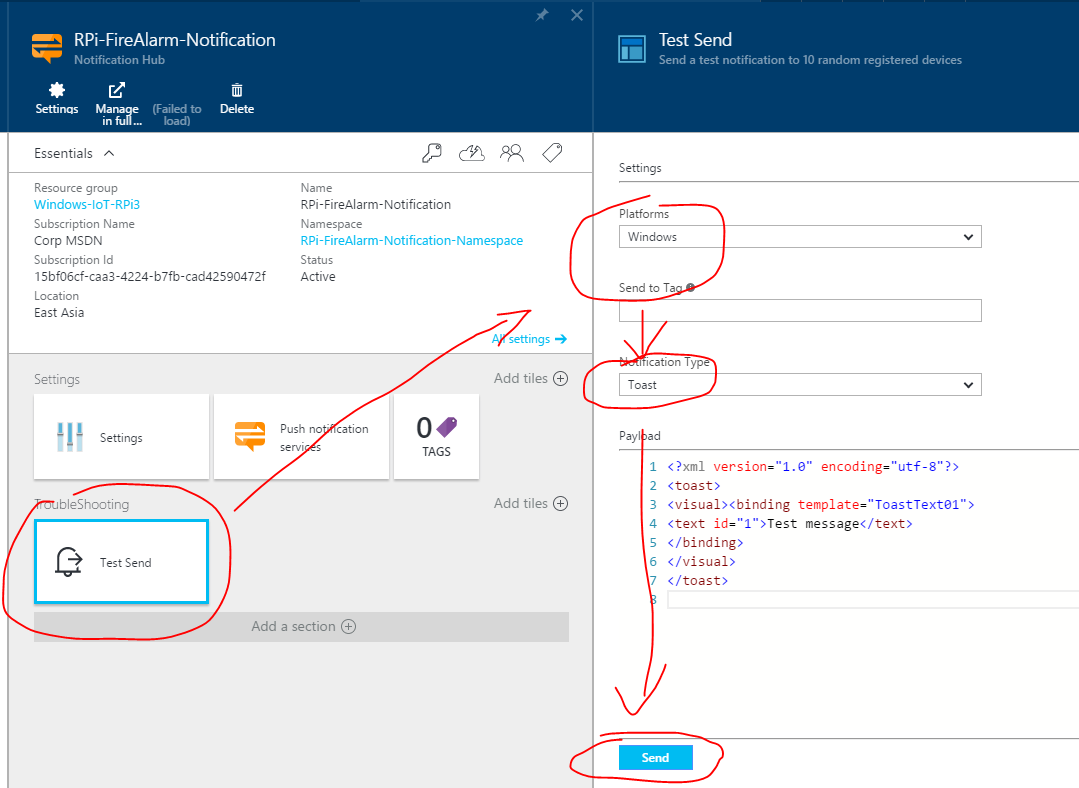
你的设备应该能收到测试消息:
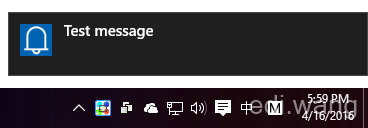
这就证明通知消息配置成功了。
六、ASP.NET网站
用VS新建一个ASP.NET MVC5网站,安装nuget包:Microsoft.Azure.NotificationHubs。
新建一个FireAlarmController:
public class FireAlarmController : Controller
{
    public string HubName => "刚才Azure里的Notification Hub名称";

    public string ConnectionString => "刚才Azure里的Listen,Manage,Send连接字符串";

    public async Task<ActionResult> SendAlarm(bool isFire)
    {
        string msg = isFire ? "Oh, Fuck! There's a fucking fire!" : "Fire is out.";
        await SendNotificationAsync(msg);
        return Json(true, JsonRequestBehavior.AllowGet);
    }

    private async Task SendNotificationAsync(string message)
    {
        NotificationHubClient hub = NotificationHubClient
            .CreateClientFromConnectionString(ConnectionString, HubName);
        var toast = $@"<toast><visual><binding template=""ToastText01""><text id=""1"">{message}</text></binding></visual></toast>";
        await hub.SendWindowsNativeNotificationAsync(toast);
    }
}
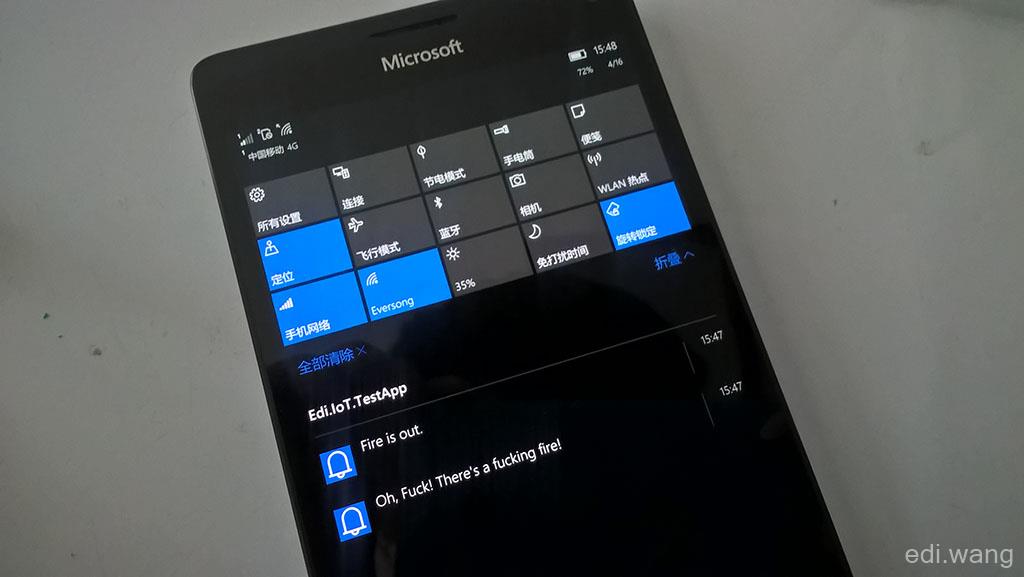
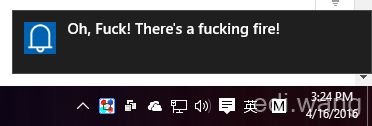
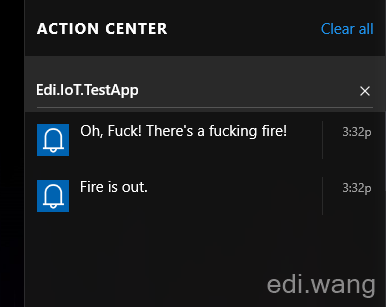
主要就一个方法,SendAlarm,如果是true就发送火警消息:Oh, Fuck! There's a fucking fire!,如果是false就发送火已灭的消息:Fire is out.
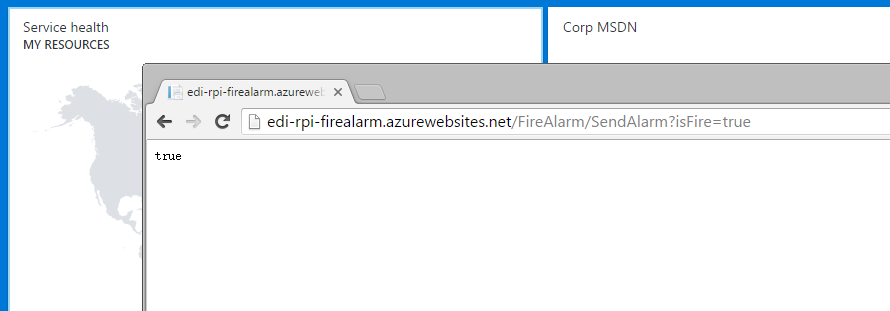
运行这个ASP.NET网站,测试一下消息推送:
访问地址:
http://你的ASP.NET网站地址/FireAlarm/SendAlarm?isFire=true
应该能收到消息:
测试成功后,把网站部署到Azure上去。然后再测试一次,保证成功。
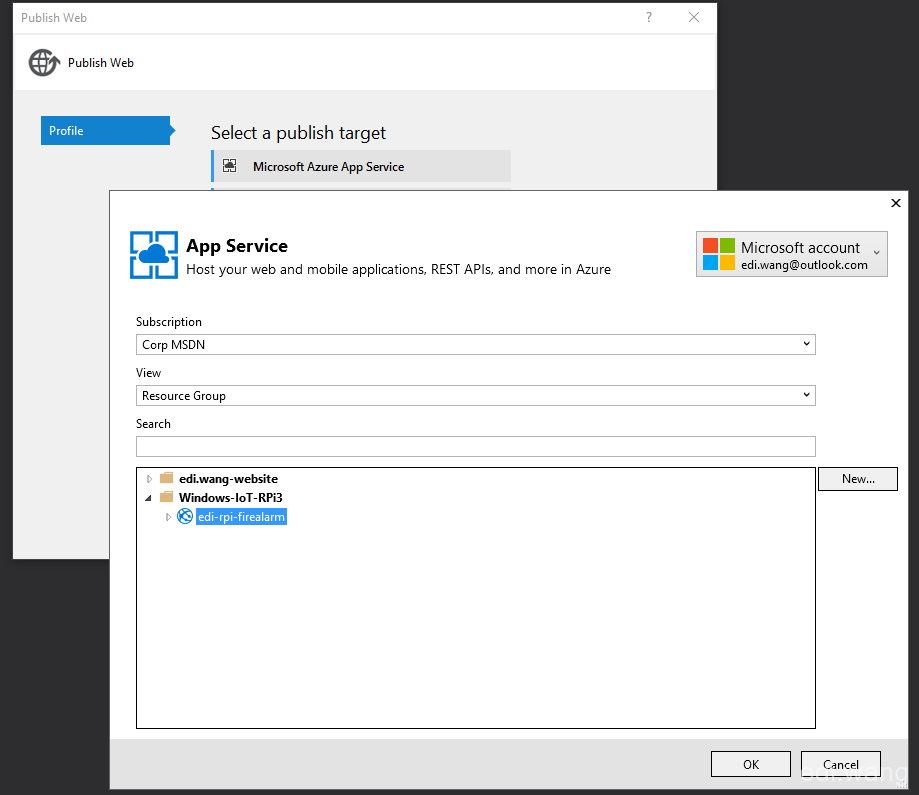
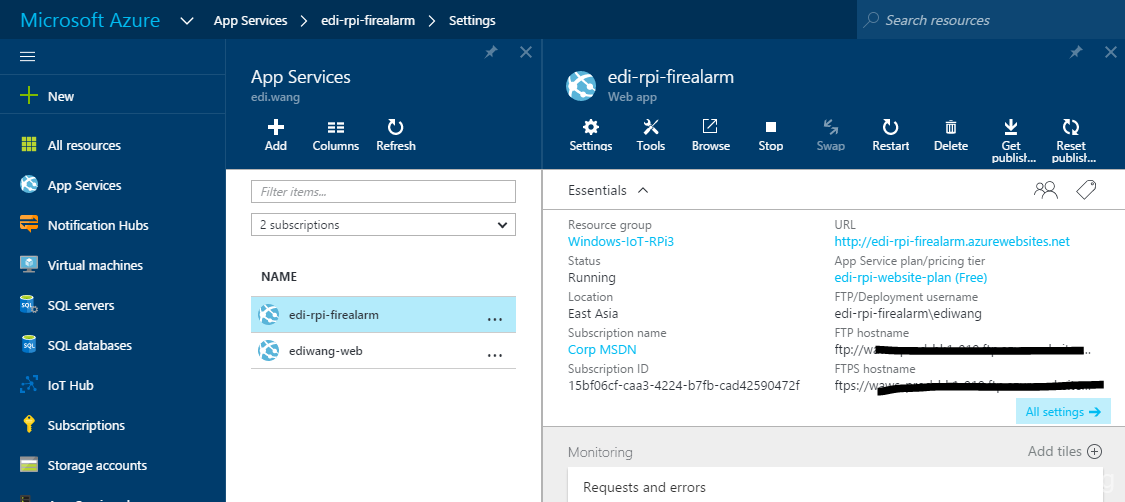
http://edi-rpi-firealarm.azurewebsites.net/FireAlarm/SendAlarm?isFire=true
七、树莓派端IoT应用
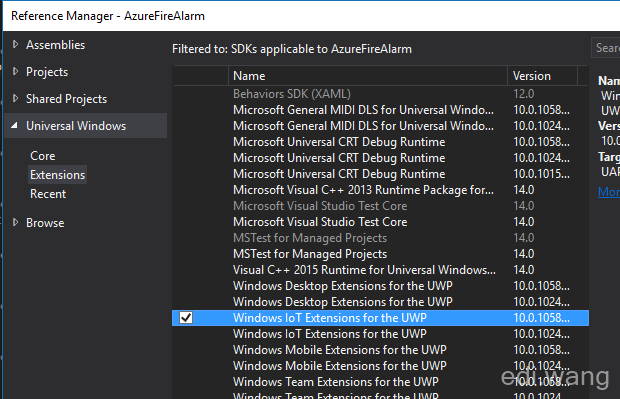
用VS2015新建一个UWP工程,加入 Windows IoT Extensions for the UWP的引用。
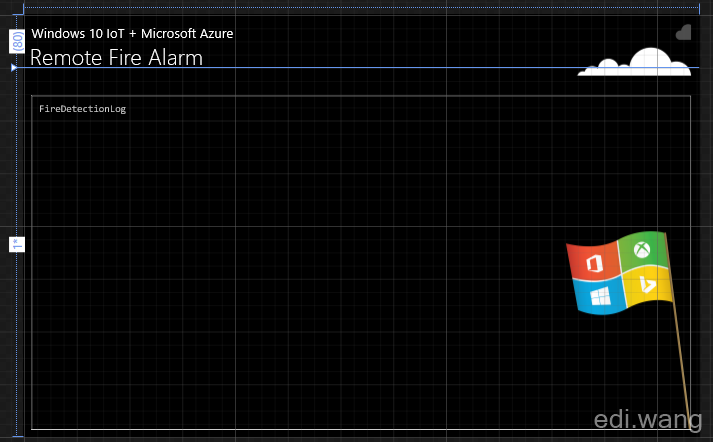
然后画个牛逼的界面(当然对于火警系统来说界面不是必须的):
<Page
    x:Class="AzureFireAlarm.MainPage"
    xmlns="http://schemas.microsoft.com/winfx/2006/xaml/presentation"
    xmlns:x="http://schemas.microsoft.com/winfx/2006/xaml"
    xmlns:local="using:AzureFireAlarm"
    xmlns:d="http://schemas.microsoft.com/expression/blend/2008"
    xmlns:mc="http://schemas.openxmlformats.org/markup-compatibility/2006"
    DataContext="{Binding Source={StaticResource Locator}, Path=Main}"
    mc:Ignorable="d">

    <Grid Background="{ThemeResource ApplicationPageBackgroundThemeBrush}" Padding="12">
        <Grid.RowDefinitions>
            <RowDefinition Height="Auto" />
            <RowDefinition Height="*" />
        </Grid.RowDefinitions>

        <Image Source="Assets/cloud-hero.png" Grid.Row="0" Height="80" HorizontalAlignment="Right" VerticalAlignment="Top" />

        <StackPanel Grid.Row="0">
            <TextBlock Text="Windows 10 IoT + Microsoft Azure" Style="{StaticResource SubtitleTextBlockStyle}" />
            <TextBlock Text="Remote Fire Alarm" Style="{StaticResource SubheaderTextBlockStyle}" />
        </StackPanel>

        <Grid Grid.Row="1" Margin="0,20,0,0">
            <Image Source="Assets/Windows_Insiders_Flaimg-987e154e-85c6-47ba-8402-2045c4642afimg-b3a2ac7b-06c5-4a35-ad69-0a0b5366c7e9.png" HorizontalAlignment="Right" Height="300" VerticalAlignment="Bottom" />

            <Border BorderBrush="#CCC" BorderThickness="1" Margin="0,10,0,0" Padding="10">
                <TextBlock TextWrapping="Wrap" Text="{Binding FireDetectionLog}" Foreground="#CCC" FontFamily="Consolas" />
            </Border>
        </Grid>
    </Grid>
</Page>
主要逻辑在ViewModel里:
定义GPIO控制器和所有要用到的阵脚:
#region GPIO Settings

public GpioController GpioController { get; }

public GpioPin RedLEDPin { get; }

public int RedLEDPinNumber => 5;

public GpioPin GreenLEDPin { get; }

public int GreenLEDPinNumber => 6;

public GpioPin FirePin { get; }

public int FirePinNumber => 19;

#endregion
在树莓派屏幕上显示日志的字段:
#region Display Fields

private string _fireDetectionLog;

public string FireDetectionLog
{
    get { return _fireDetectionLog; }
    set { _fireDetectionLog = value; RaisePropertyChanged(); }
}

#endregion
初始化元件和传感器:
public MainViewModel()
{
    GpioController = GpioController.GetDefault();
    if (null != GpioController)
    {
        // fire light
        RedLEDPin = GpioController.OpenPin(RedLEDPinNumber);
        RedLEDPin?.SetDriveMode(GpioPinDriveMode.Output);
        RedLEDPin?.Write(GpioPinValue.Low);

        // secure light
        GreenLEDPin = GpioController.OpenPin(GreenLEDPinNumber);
        GreenLEDPin?.SetDriveMode(GpioPinDriveMode.Output);
        GreenLEDPin?.Write(GpioPinValue.High);

        // fire detector
        FirePin = GpioController.OpenPin(FirePinNumber);
        if (null != FirePin)
        {
            FirePin.SetDriveMode(GpioPinDriveMode.Input);
            FirePin.ValueChanged += FirePinOnValueChanged;
        }
    }
}
注意,绿色LED一开始就要输出高电平,以点亮,表示安全,没有明火。
火焰传感器事件:一旦遇到低电平,表示有明火,向Azure Website发送火警通知。检测不到火焰则发送安全通知。
private async void FirePinOnValueChanged(GpioPin sender, GpioPinValueChangedEventArgs args)
{
    if (sender.Read() == GpioPinValue.Low)
    {
        await DispatcherHelper.UIDispatcher.RunAsync(CoreDispatcherPriority.Normal, () =>
        {
            FireDetectionLog += "\nFire detected! Sending alarm to Azure.";
        });

        // alarm buzz
        RedLEDPin.Write(GpioPinValue.High);
        GreenLEDPin?.Write(GpioPinValue.Low);
        await SendToastNotificationAsync(true);
    }
    else
    {
        await DispatcherHelper.UIDispatcher.RunAsync(CoreDispatcherPriority.Normal, () =>
        {
            FireDetectionLog += "\nFire is killed! Sending alarm to Azure.";
        });

        // shut down buzz
        RedLEDPin.Write(GpioPinValue.Low);
        GreenLEDPin?.Write(GpioPinValue.High);
        await SendToastNotificationAsync(false);
    }
}
请求Azure Website的方法:
public async Task SendToastNotificationAsync(bool isFire)
{
    using (HttpClient client = new HttpClient())
    {
        string url = "http://edi-rpi-firealarm.azurewebsites.net/FireAlarm/SendAlarm?isFire=" + isFire;
        await client.GetAsync(url);
        Debug.WriteLine("{0} > Sending message: {1}", DateTime.Now, isFire);
    }
}
八、运行效果
有火焰时,红灯亮起,蜂鸣器启动,向Azure发送通知
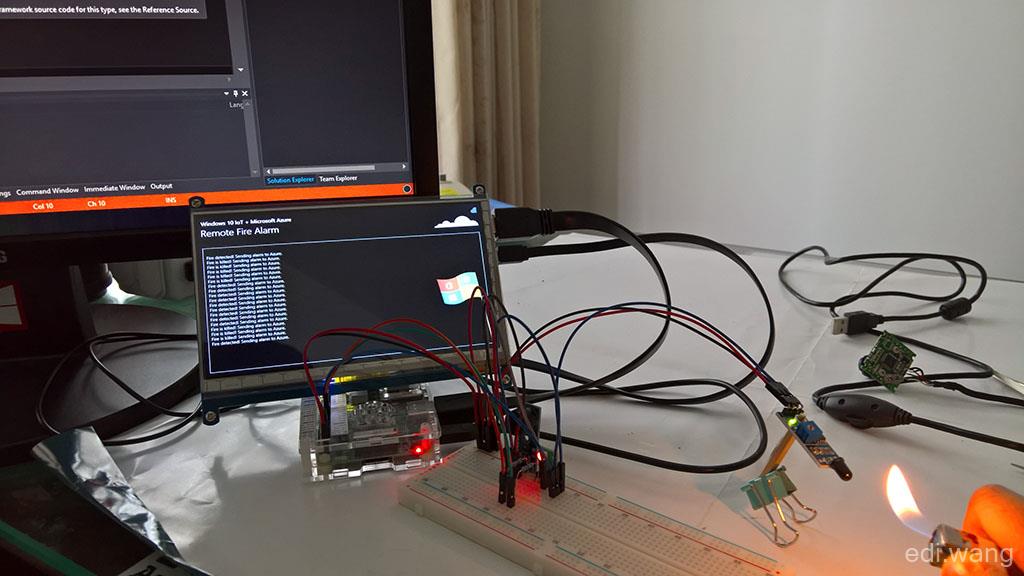
没有火焰时,绿灯亮起,向Azure发送火焰已灭的通知
Windows 10 PC上的通知中心:
Windows 10 手机上的通知中心: