Background
Last week at Microsoft Reactor Shanghai, I addressed a speech "Automating Infrastructure as Code (IaC) Deployment with Azure Bicep". One of the demo was how to use Bicep to deploy a complete Azure web app environment, including an App Service and an Azure SQL Database. I know we didn’t have time to walk through the whole script, so I wanted to break it down here in a blog post.
Let’s walk through this Bicep file together, and see what each part does!
The Bicep File
First, the complete Bicep file is:
@description('Web App Name')
param webAppName string = 'demowebapp${uniqueString(resourceGroup().id)}'

@description('SQL Server administrator username')
param sqlAdminUsername string = 'demoadmin'

@secure()
@description('SQL Server administrator password')
param sqlAdminPassword string

@description('SQL Server Name')
param sqlServerName string = 'sqlserver${uniqueString(resourceGroup().id)}'

@description('SQL Database Name')
param sqlDbName string = 'demodb'

@description('App Service region')
param location string = resourceGroup().location

// Create App Service Plan
resource appServicePlan 'Microsoft.Web/serverfarms@2022-03-01' = {
  name: 'demoplan'
  location: location
  sku: {
    name: 'S1'
    tier: 'Standard'
    capacity: 1
  }
}

// Create Web App
resource webApp 'Microsoft.Web/sites@2022-03-01' = {
  name: webAppName
  location: location
  properties: {
    serverFarmId: appServicePlan.id
    httpsOnly: true
    siteConfig: {
      appSettings: [
        // Connection string to be added later
      ]
    }
  }
}

// Create SQL Server
resource sqlServer 'Microsoft.Sql/servers@2022-02-01-preview' = {
  name: sqlServerName
  location: location
  properties: {
    administratorLogin: sqlAdminUsername
    administratorLoginPassword: sqlAdminPassword
    version: '12.0'
  }
}

// Create SQL Database
resource sqlDb 'Microsoft.Sql/servers/databases@2022-02-01-preview' = {
  parent: sqlServer
  location: location
  name: sqlDbName
  properties: {
    collation: 'SQL_Latin1_General_CP1_CI_AS'
    maxSizeBytes: 2147483648
    sampleName: 'AdventureWorksLT'
  }
  sku: {
    name: 'S0'
    tier: 'Standard'
    capacity: 10
  }
}

// Allow Azure Services to access SQL Server (firewall rule)
resource allowAzureServices 'Microsoft.Sql/servers/firewallRules@2022-02-01-preview' = {
  name: 'AllowAzureServices'
  parent: sqlServer
  properties: {
    startIpAddress: '0.0.0.0'
    endIpAddress: '0.0.0.0'
  }
}

// Build database connection string
var connectionString = 'Server=tcp:${sqlServer.name}.database.windows.net,1433;Initial Catalog=${sqlDb.name};Persist Security Info=False;User ID=${sqlAdminUsername};Password=${sqlAdminPassword};MultipleActiveResultSets=False;Encrypt=True;TrustServerCertificate=False;Connection Timeout=30;'

// Add the connection string to the Web App's application settings
resource webAppConnectionString 'Microsoft.Web/sites/config@2022-03-01' = {
  parent: webApp
  name: 'connectionstrings'
  properties: {
    DefaultConnection: {
      value: connectionString
      type: 'SQLAzure'
    }
  }
}

output webAppUrl string = webApp.properties.defaultHostName
output sqlServerName string = sqlServer.name
output sqlDbName string = sqlDb.name
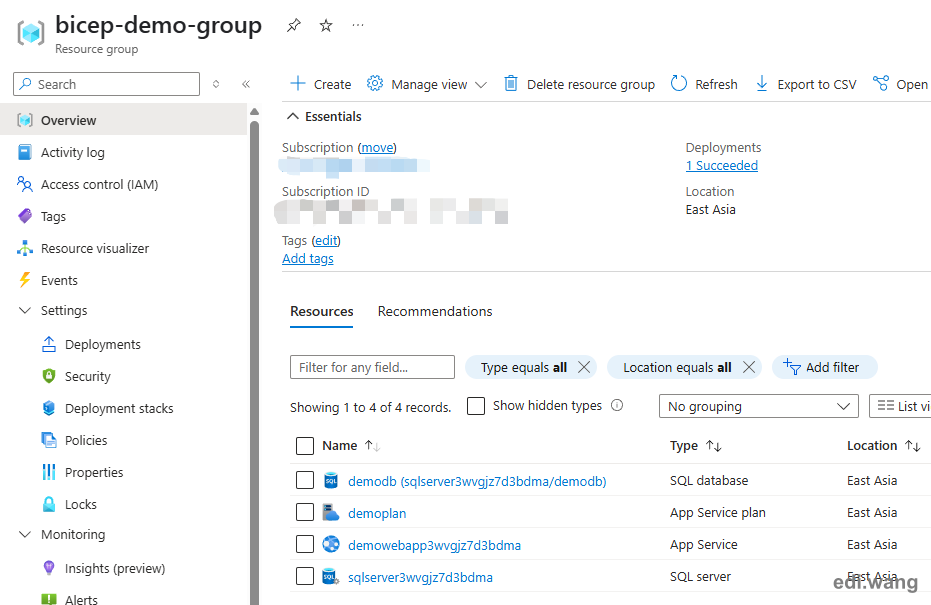
To deploy it, run this command in PowerShell:
az deployment group create --resource-group bicep-demo-group --template-file .\webappsql.bicep --parameters sqlAdminPassword=DemoSQLAdmin123!The result will be:
Step by Step Explanation
Parameters
At the top, we define a few parameters. These are like variables that let you customize your deployment without editing the code every time.
param webAppName string = 'demowebapp${uniqueString(resourceGroup().id)}'
param sqlAdminUsername string = 'demoadmin'
@secure()
param sqlAdminPassword string
param sqlServerName string = 'sqlserver${uniqueString(resourceGroup().id)}'
param sqlDbName string = 'demodb'
param location string = resourceGroup().locationwebAppName: The name of your web app. It default to a unique name so you don’t get name conflicts.
sqlAdminUsername and sqlAdminPassword: The admin login for SQL Server. Note the password is marked as @secure(), so it won’t show up in logs or outputs.
sqlServerName: The name for your SQL Server, also unique.
sqlDbName: The name of your SQL Database.
location: Where all your resources will be (like “westus” or “eastasia”).
App Service Plan
Before you can run a web app, you need an App Service Plan, it's the host of your app. Here, we’re creating a plan called demoplan, using the Standard S1 tier.
resource appServicePlan 'Microsoft.Web/serverfarms@2022-03-01' = {
  name: 'demoplan'
  location: location
  sku: {
    name: 'S1'
    tier: 'Standard'
    capacity: 1
  }
}
Web App
Next, we create the Web App itself, using the plan above. It’s set to use HTTPS only. For now, the app settings are empty, we’ll add the database connection string later.
resource webApp 'Microsoft.Web/sites@2022-03-01' = {
  name: webAppName
  location: location
  properties: {
    serverFarmId: appServicePlan.id
    httpsOnly: true
    siteConfig: {
      appSettings: [
        // Connection string to be added later
      ]
    }
  }
}
SQL Server and SQL Database
Create a SQL Server (not a VM, but a logical server in Azure). You set the admin username and password here.
resource sqlServer 'Microsoft.Sql/servers@2022-02-01-preview' = {
  name: sqlServerName
  location: location
  properties: {
    administratorLogin: sqlAdminUsername
    administratorLoginPassword: sqlAdminPassword
    version: '12.0'
  }
}
Next, create a SQL Database inside the server. It uses the AdventureWorksLT sample data (so you get some tables and data to play with right away). The database is set to the Standard S0 tier.
resource sqlDb 'Microsoft.Sql/servers/databases@2022-02-01-preview' = {
  parent: sqlServer
  location: location
  name: sqlDbName
  properties: {
    collation: 'SQL_Latin1_General_CP1_CI_AS'
    maxSizeBytes: 2147483648
    sampleName: 'AdventureWorksLT'
  }
  sku: {
    name: 'S0'
    tier: 'Standard'
    capacity: 10
  }
}
Now, we need to let Azure services access the database, in this case, we are letting the App Service instance access our database.
resource allowAzureServices 'Microsoft.Sql/servers/firewallRules@2022-02-01-preview' = {
  name: 'AllowAzureServices'
  parent: sqlServer
  properties: {
    startIpAddress: '0.0.0.0'
    endIpAddress: '0.0.0.0'
  }
}
Connection String
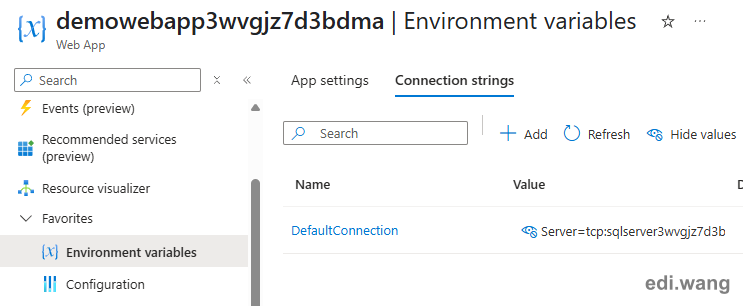
First, we build the connection string. For demo purpose, I hard code database.windows.net, please use environment() function in real world apps. Then, we set the connection string into the web app’s settings with name DefaultConnection.
// Build database connection string
var connectionString = 'Server=tcp:${sqlServer.name}.database.windows.net,1433;Initial Catalog=${sqlDb.name};Persist Security Info=False;User ID=${sqlAdminUsername};Password=${sqlAdminPassword};MultipleActiveResultSets=False;Encrypt=True;TrustServerCertificate=False;Connection Timeout=30;'

// Add the connection string to the Web App's application settings
resource webAppConnectionString 'Microsoft.Web/sites/config@2022-03-01' = {
  parent: webApp
  name: 'connectionstrings'
  properties: {
    DefaultConnection: {
      value: connectionString
      type: 'SQLAzure'
    }
  }
}
Outputs
After deployment, you’ll get the URL for your web app, plus the names of your SQL Server and Database.
output webAppUrl string = webApp.properties.defaultHostName
output sqlServerName string = sqlServer.name
output sqlDbName string = sqlDb.name
Wrapping Up
So, in a nutshell, this Bicep file lets you deploy a ready-to-go Web App and SQL database in Azure, all connected and secured, with just a single deployment.
Comments