
3 years ago, I wrote a blog post "Azure Remote Controlled Light with Windows 10 IoT Core", which is an experiment to sending a signal from your home and it will travel around the world then come back to your home to turn on an LED light on your Raspberry Pi. 3 years later, Windows 10 IoT Core and UWP seem not living so well. Microsoft doesn't have a new build of Windows 10 to support the latest Raspberry Pi 4 currently. I have a Pi 4, so I have no choice but to use .NET Core on Linux. Microsoft and the community are rapidly developing the .NET IoT libraries here, so it's very easy to move my old project from UWP to .NET Core 3.0 on Linux.
Before we begin, please check out "Setup .NET Core 3.0 Runtime and SDK on Raspberry Pi 4" if you haven't installed .NET Core on your Raspberry Pi.
Overview
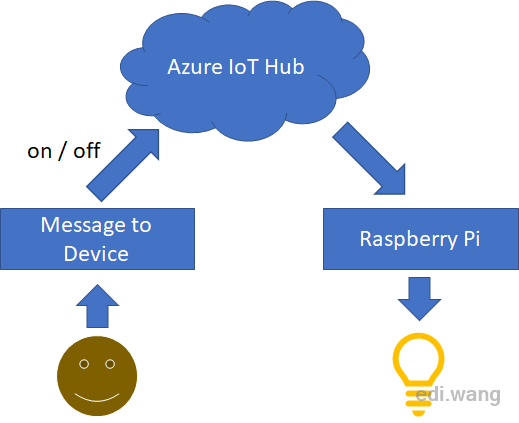
We are going to send messages from our computer to Azure IoT Hub, and Raspberry Pi will listen to the message and turn on/off the LED.
Create Azure IoT Hub
Refer to Azure document to create an IoT Hub. Copy your connection string, it looks like this:
HostName=<Your Hub Name>.azure-devices.net;SharedAccessKeyName=iothubowner;SharedAccessKey=<Your Key>Download and install Azure Device Explorer from https://aka.ms/aziotdevexp
Copy your IoT Hub connection string and paste it into the main tab. Then hit the "Update" button.

Then go to the "Management" tab, click "Create", enter your device name for your Raspberry Pi and select "Auto Generate Keys"
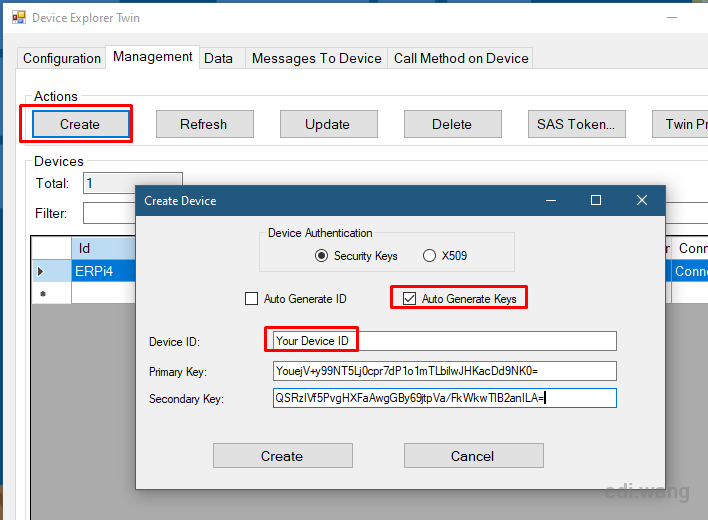
After the registration, you would see the result listed in the grid view.
Physical Connection on the Pi
Connect an LED to your Raspberry Pi with:
- Long led to GPIO 17
- Short leg to GROUND
Create AzureLightControl Project
Create a new .NET Core 3.0 Console project. Add Microsoft.Azure.Devices.Client and System.Device.Gpio NuGet packages. Microsoft.Azure.Devices.Client talks to Azure IoT Hub, while System.Device.Gpio controls the GPIO for switching the LED. The project file looks like this:
<Project Sdk="Microsoft.NET.Sdk">

  <PropertyGroup>
    <OutputType>Exe</OutputType>
    <TargetFramework>netcoreapp3.0</TargetFramework>
  </PropertyGroup>

  <ItemGroup>
    <PackageReference Include="Microsoft.Azure.Devices.Client" Version="1.21.1" />
    <PackageReference Include="System.Device.Gpio" Version="1.0.0" />
  </ItemGroup>

</Project>
Replace Program.cs with the following content. Replace the const string content with your own value from Azure.
using System;
using System.Device.Gpio;
using System.Text;
using System.Threading;
using System.Threading.Tasks;
using Microsoft.Azure.Devices.Client;
using Microsoft.Azure.Devices.Client.Exceptions;

namespace AzureLightControl
{
    class Program
    {
        private const string IotHubUri = "<Your Hub Name>.azure-devices.net";
        private const string DeviceKey = "<Your Key>";
        private const string DeviceId = "<Your Device ID>";
        private const int Pin = 17;

        private static CancellationToken _ct;

        static async Task Main(string[] args)
        {
            Console.WriteLine("------------------------------");
            Console.WriteLine(" Azure IoT Hub Light Control");
            Console.WriteLine("------------------------------");

            var cts = new CancellationTokenSource();
            _ct = cts.Token;

            Console.CancelKeyPress += (sender, eventArgs) =>
            {
                Console.WriteLine($"{DateTime.Now} > Cancelling...");
                cts.Cancel();

                eventArgs.Cancel = true;
            };

            try
            {
                var t = Task.Run(Run, cts.Token);
                await t;
            }
            catch (IotHubCommunicationException)
            {
                Console.WriteLine($"{DateTime.Now} > Operation has been canceled.");
            }
            catch (OperationCanceledException)
            {
                Console.WriteLine($"{DateTime.Now} > Operation has been canceled.");
            }
            finally
            {
                cts.Dispose();
            }

            Console.ReadKey();
        }

        private static async Task Run()
        {
            using var deviceClient = DeviceClient.Create(IotHubUri, new DeviceAuthenticationWithRegistrySymmetricKey(DeviceId, DeviceKey));
            using var controller = new GpioController();
            controller.OpenPin(Pin, PinMode.Output);

            Console.WriteLine($"{DateTime.Now} > Connected to the best cloud on the planet.");
            Console.WriteLine($"Azure IoT Hub: {IotHubUri}");
            Console.WriteLine($"Device ID: {DeviceId}");

            Console.WriteLine($"{DateTime.Now} > GPIO pin enabled for use: {Pin}");

            while (!_ct.IsCancellationRequested)
            {
                Console.WriteLine($"{DateTime.Now} > Waiting new message from Azure...");
                var receivedMessage = await deviceClient.ReceiveAsync(_ct);
                if (receivedMessage == null) continue;

                var msg = Encoding.ASCII.GetString(receivedMessage.GetBytes());
                Console.WriteLine($"{DateTime.Now} > Received message: {msg}");

                switch (msg)
                {
                    case "on":
                        Console.WriteLine($"{DateTime.Now} > Turn on the light.");
                        controller.Write(Pin, PinValue.High);
                        break;
                    case "off":
                        Console.WriteLine($"{DateTime.Now} > Turn off the light.");
                        controller.Write(Pin, PinValue.Low);
                        break;
                    default:
                        Console.WriteLine($"Unknown command: {msg}");
                        break;
                }

                await deviceClient.CompleteAsync(receivedMessage, _ct);
            }
        }
    }
}
In this example, deviceClient.ReceiveAsync() method will listen for any new message from Azure IoT Hub. Process it, and then call CompleteAsync() to tell Azure a message has been processed, so it won't be processed again if the device reconnects to Azure.
Processing the message is very straight forward, read the message as string content, if it says "on", write a GPIO HIGH to pin 17, this can light up the LED. If the message content is "off", write a GPIO LOW to pin 17 to turn off the LED. The GPIO operation for controlling an LED is PinMode.Output, if you work with sensors, it is usually PinMode.Input.
Deploy and Run
Copy the source code or publish it to Raspberry Pi.
On your Raspberry Pi: Use dotnet CLI to run this project. (If you don't know how, please refer to "Setup .NET Core 3.0 Runtime and SDK on Raspberry Pi 4")
On your PC: Send message content "on" or "off" to your Raspberry Pi in Device Explorer.

You have the magic to control a light over the internet now:

Anduin
要是树莓派只能在企业内网里部署(无法访问Internet),这么玩会不会炸呢?
绿荫
博客更新的是真速度。